Permissions define the access to items and functions inside Experlogix Documents. Permissions dictate user actions, such as who can create, view, modify, or delete content, while ensuring that only authorized users have the necessary access to perform these actions.
In this document, we’ll explore the structure of the permissions system, including how permissions are applied at various levels—organization, project, and individual item—and how these permissions can be inherited or explicitly set. Additionally, you’ll learn about different permission states, such as Allow, Deny, and Not Set, and their impact on user access.
This guide also provides step-by-step instructions for managing permissions at the item level and removing or adjusting permissions as needed. By the end of this guide, you will manage permissions effectively, ensuring both security and flexibility across your content and projects.
Key Terms in Experlogix Documents
|
Key Terms |
Description |
|---|---|
|
User |
A user in the system. |
|
Group |
A collection of users. |
|
Item |
An item in Experlogix Documents is any object you can create, modify, view, delete, and authorize. These items can be Data Sets or files or folders in Content Manager or a template in Templates. |
Permissions System
The Permissions system controls access to specific actions across different areas of Experlogix Documents. It simplifies the assignment of permissions by organizing users into groups, each with a defined set of permissions. These permissions determine users’ available actions, such as creating, modifying, viewing, deleting, sharing, and authorizing items.
Group-Based Permissions
-
Users must be organized into groups when they are invited to the organization or a project, with each group assigned a set of permissions. See Group Types for more information.
-
These permissions can either Allow, Deny, or Not Set (implicitly Deny) access to functionalities or actions.
-
Users become group members once invited, and these members automatically inherit the permissions assigned to their group.
Permission Levels
The Permissions System enables the management of access across different levels within Experlogix Documents. Permissions are defined for various levels within Experlogix Documents, ensuring that users have appropriate access based on their group and the level at which they are operating. The levels include:
|
Permission Level Name |
Description |
|---|---|
|
Organization Level |
Manages permissions within an organization. |
|
Project Level |
Manages permissions within a project. |
Group Types
Groups are a collection of users with a set of permissions assigned to them. Groups are classified into system groups, which are native to Experlogix Documents, and custom groups that you create within your project.
-
System Groups: When an organization or project is created, Experlogix automatically generates a set of default system groups, each assigned default permissions. These groups are integral to the system and cannot be removed.
Use Case
Jamie Patel is a Organization Administrators, and she needs to be able to allow her product divisions to assign users to additional groups based on their responsibilities. In this case, Jamie could do the following:
-
Users who need to manage groups and settings within an organization would be assigned as an Organization administrator by adding them as members in the Organization administrators system group.
-
Users who need to only work with content would be assigned as Content Contributors inside the Project Settings by adding them as members in the Content Contributors system group at the Project level.
-
Custom Groups: Users can create custom groups within a project to manage permissions for specific actions both within the project and for individual items. This ensures tailored access control by allowing specific permissions that are not provided by the default system groups.
Use Case
Mia Hernandez, a Project Owner, customizes permissions for specific custom groups based on project requirements. She needs to ensure that Quality Assurance Reviewers have access to all the information they need without having to request additional permissions and without the risk of accidentally altering or deleting any information.
-
Mia creates a group with view and edit permissions, ensuring that Quality Assurance reviewers can access all necessary content and data without deleting them. This approach maintains the integrity of the review process.
-
She invites these external users to the project and assigns them to the Quality Assurance Reviewers group during the invitation process.
For more details, refer to Groups.
Understanding Permission Levels and Groups in Experlogix Documents
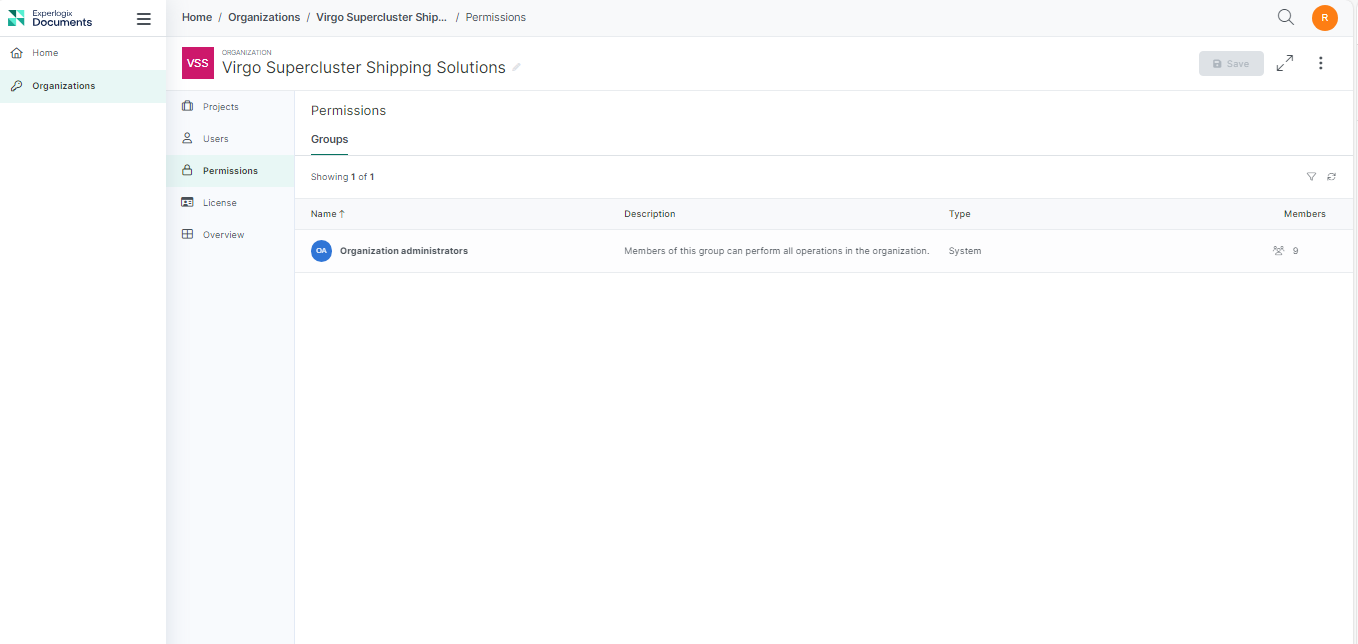
In Experlogix Documents, permissions levels include organization and project, each with specific system groups that have distinct access controls and actions. See Permission Settings for an Organization and Permission Settings for a Project for details about the system groups available at each level and the permissions granted to them.
Permission Settings for an Organization
|
Group Name |
Description |
|---|---|
|
Organization administrators |
Members of this group can perform all operations at the organization level. |
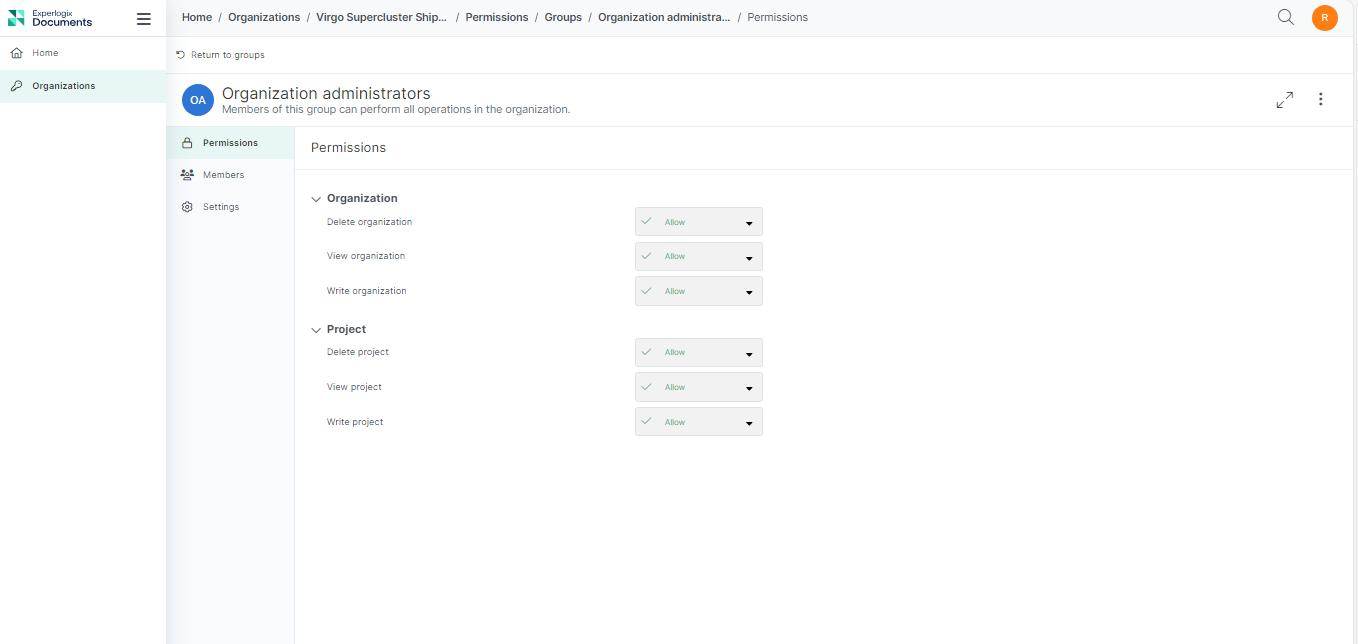
Here are the default permissions set for an Organization level system group:
Permission Settings for a Project
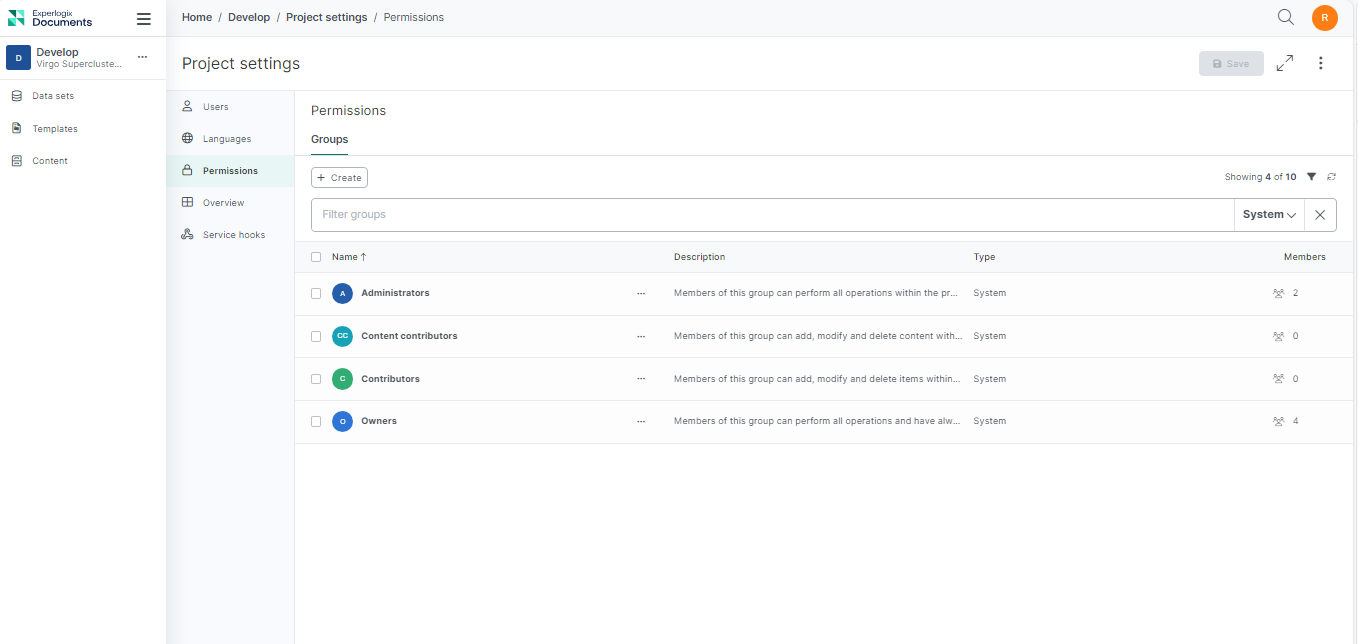
Managing access to project-wide settings and functionalities is essential for ensuring the security and efficiency of your operations. Here's a detailed overview of the various system groups available at the project level in Experlogix Documents.
|
Group Name |
Description |
|---|---|
|
Owners |
Members of this group can perform all operations and always have access to all objects within the project. |
|
Administrators |
Members of this group can perform all operations within the project. |
|
Contributors |
Members of this group can add, modify, and delete items within the project. |
|
Content Contributors |
Members of this group can add, modify, and delete content within the project. |
Here are the default permissions set for a project level system group.
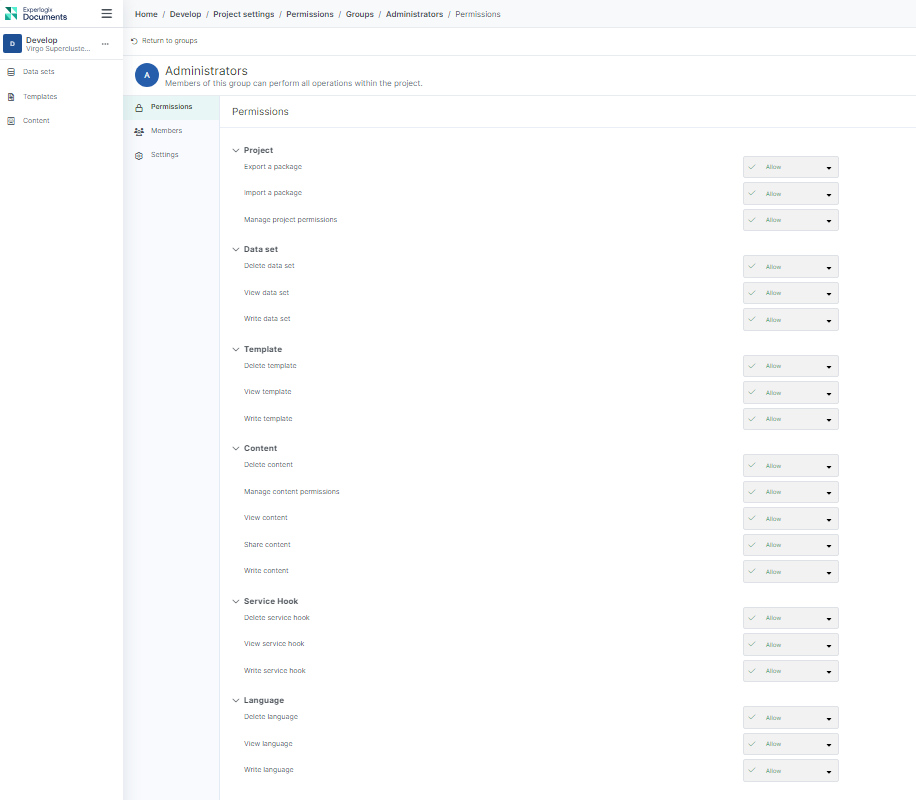
Permission States
Permission states define the level of access and control users of a group have over specific actions within a system. These states determine whether users can perform certain actions or are restricted from doing so.
The Group Has Permission:
|
Permission State Name |
Description |
|---|---|
|
Allow |
This grants group members the ability to perform specific actions. This permission is not inherited from a parent item. |
|
Allow (Inherited) |
This grants group members the ability to perform specific actions. This permission is inherited from a parent item. |
The Group Does Not Have Permission:
|
Permission State Name |
Description |
|---|---|
|
Deny |
This restricts group members from performing specific actions. This permission is not inherited from a parent item. |
|
Deny (Inherited) |
This restricts group members from performing specific actions. This permission is inherited from a parent item. |
|
Not Set |
This implicitly denies users the ability to perform tasks that require that permission. This is effectively a Deny permission but has not been explicitly set. The system defaults to this setting for all actions. |
Permission Inheritance
Permission inheritance ensures that control access assigned at a parent level (such as a folder or project-level settings) is automatically applied to its child elements (like subfolders or data sets inside the project level). This ensures that new entities created within a parent inherit the same access permissions, streamlining user access management and maintaining consistent security policies across related items like projects, templates, and content manager folders. This section explains how permission inheritance works and how it impacts user access in Experlogix Documents.
When a user is part of a group, they automatically receive the permissions assigned to that group. This simplifies the management of permissions, as changes made to the group’s permissions are propagated to all its members.
Any permissions configured at a parent level (e.g., a project or folder) are passed down to all child items. However, these inherited permissions can be specifically modified or overridden at the child level if needed, allowing for flexible access control. For more details, see Explicit Permissions.
Managing Inherited Permissions
New entities inherit permissions from their parent entity. If you want a child entity to have different permissions, you can explicitly set them at the child level, overriding the inherited ones.
Deny Takes Precedence
-
If a user has an Allow permission directly or through group membership but also has a Deny permission through another group for the same action, the Deny permission takes precedence.
-
If a permission state is denied at the parent level for an action, explicitly setting it to allow for a child entity will not override the denial. The permission will remain denied at both the parent and child levels.
Not Set Does Not Take Precedence
If the permission is set to Not Set at the parent level, the child entity inherits this state, which effectively means neither the parent nor the child has the permission, as Not Set is treated as an implicit Deny. However, if you explicitly set the permission to Allow at the child level, this Allow state will override the Not Set state. As a result, the child entity will have permission, even though the parent does not.
Moving or Copying an Item
When you move or copy an item (Content Manager file) to a new location, it inherits the permissions of the new parent item. You can override inherited permissions by setting explicit permissions at the item level in the new location.
Project Owners always have access to all items, regardless of explicit or inherited permissions. Setting Deny for them is ineffective.
Use Case: Permission Inheritance in Experlogix Documents
Maya Ali is the Project Owner and supervisor for Interstellar Operations at Virgo Supercluster Shipping Solutions LLC. She manages the project and needs to set up permissions for the Documentation Editors group to ensure they can manage documentation effectively while maintaining security. By configuring permissions at the project level, they will apply to all folders and files within the Content Manager.
-
Setting Permissions at the Project Level
Maya navigates to the project settings and creates the Documentation Editors custom group. She assigns the necessary permissions to it. For instance, she sets permissions to Allow for actions like View Content, Write Content, and Share Content and Deny for actions like Delete.
-
Outcome
The permissions set at the project level are automatically inherited by the Content Manager. This means that all folders and files within the Content Manager will have the same permissions as those set at the project level. This inheritance ensures that any new folders or files created within the Content Manager will also inherit these permissions, maintaining consistent access control. This ensures that the Documentation Editors can access all files or folders within the Content Manager without additional configuration. It also means they cannot delete content, even if they belong to other permission groups (system or custom) where they have Allow for deletion.
Explicit Permissions
Explicit permissions are directly granted permissions to a specific item, such as a folder. A privileged user sets these permissions, which are specific to that item , without impacting any other items. This allows you to define a granular set of permissions for that specific item, rather than inheriting them from a parent object, giving precise control over who can access and modify the item.
Managing Inheritance with Explicit Permissions
Explicit permissions allow for granular control over access to specific items. When explicit permissions are set, they override inherited permissions. This means that even if a parent item has certain permissions, the explicit permissions set on a child item will take precedence, except for the Deny permission, which always takes priority and cannot be overridden by explicit permissions.
Explicit State vs Effective State
Users set the explicit state for an item, choosing from Not Set, Allow, or Deny. The Experlogix Documents permissions system then calculates the effective state when evaluating permissions. The effective state is what ultimately determines access of an action for a particular item, taking into account both inherited and explicit permissions.
|
When the inherited state is |
If the explicit state is set to |
The effective state for the item will be |
|---|---|---|
|
Not Set |
Not Set |
Not Set |
|
Not Set |
Allow |
Allow |
|
Not Set |
Deny |
Deny |
|
Allow (inherited) |
Not Set |
Allow (inherited) |
|
Allow (inherited) |
Allow |
Allow |
|
Allow (inherited) |
Deny |
Deny |
|
Deny (inherited) |
Not Set |
Deny (inherited) |
|
Deny (inherited) |
Allow |
This combination is invalid because Deny always takes precedence over Allow. If an inherited permission denies access, explicitly allowing it will not override the inherited denial. The system will flag this as a warning and maintain the Deny (inherited) state. |
|
Deny (inherited) |
Deny |
Deny |
Use Case: Granting Access to External Users
In collaborative projects, sharing specific resources with external users is often necessary while maintaining the confidentiality of other project components.
Maya Ali is the Project Owner and supervisor for Interstellar Operations at Virgo Supercluster Shipping Solutions LLC. Maya needs to grant access to a single folder to an external user without exposing other sensitive information within the project. She manages this by setting up permissions for the Documentation Reviewers custom group to ensure they can manage documentation review effectively for this specific folder while maintaining security.
Creating a Custom Group
She creates a custom group named Document Reviewers specifically for the new external users in the Project settings.
Inviting the External User
Maya invites external users to the project by adding their E-mail or user ID and assigning them to the Document Reviewers custom group.
When a custom group is created, the permissions default to Not Set. This means no specific access rights or restrictions are assigned to the user, adding an extra layer of security. As a result, the external user cannot view any content at this stage.
Assigning Explicit Permissions
Maya navigates to the folder’s permissions and selects the option to manage permissions. She adds the custom group created and can then assign the needed explicit permissions to the Document Reviewers group for the specific folder, ensuring that the group has the appropriate permission level (e.g., view, edit) based on the collaborator’s role.
Outcome
The external user will only see the folder for which explicit permissions have been granted. By following these steps, Maya ensures enhanced security by restricting access to only the necessary folder. This allows the external user to focus on the specific task or information without distractions from unrelated project components. This approach simplifies management by reducing the risk of accidental data exposure and underscores the importance of precise access control in collaborative environments.
Setting explicit permissions
This section guides you through setting explicit permissions for a custom group on a specific item in your Content Manager, such as a file or folder.
-
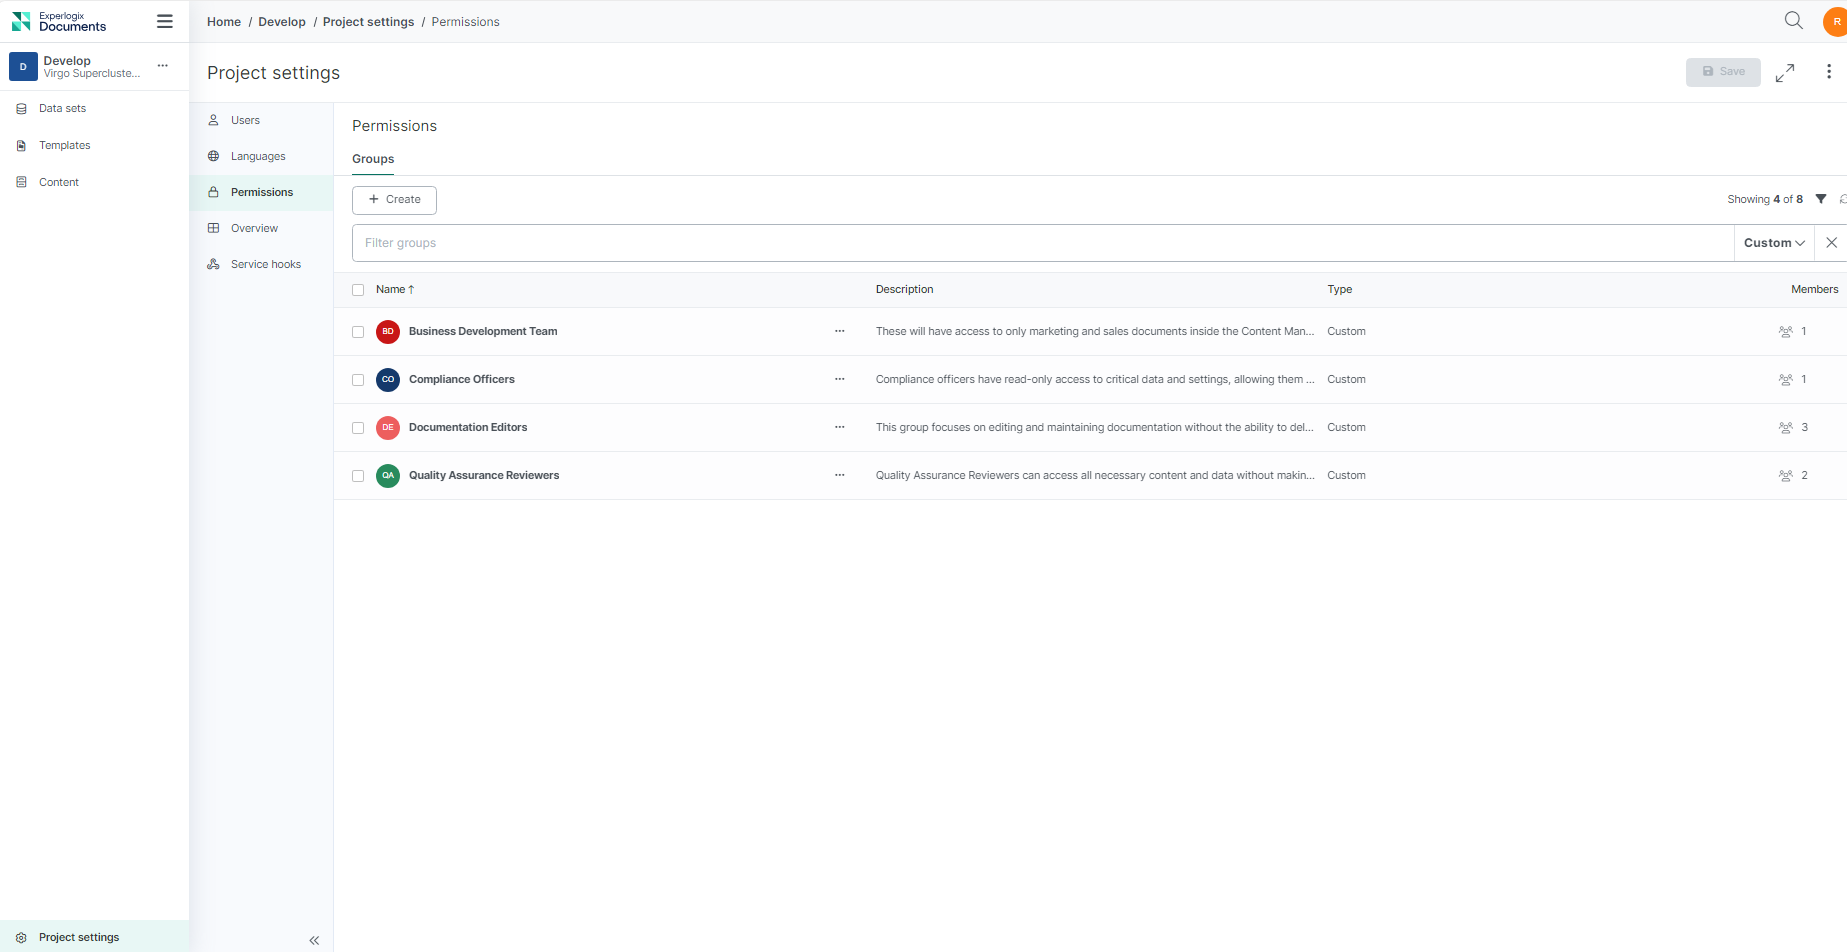
Create a Custom Group inside Project Settings. For more information, see Groups.
-
Add members to your Custom Group. For more information, see Groups.
-
(Optional) For users who do not exist in Experlogix Documents, you can invite them into a custom group from the Project Settings Users Tab.
-
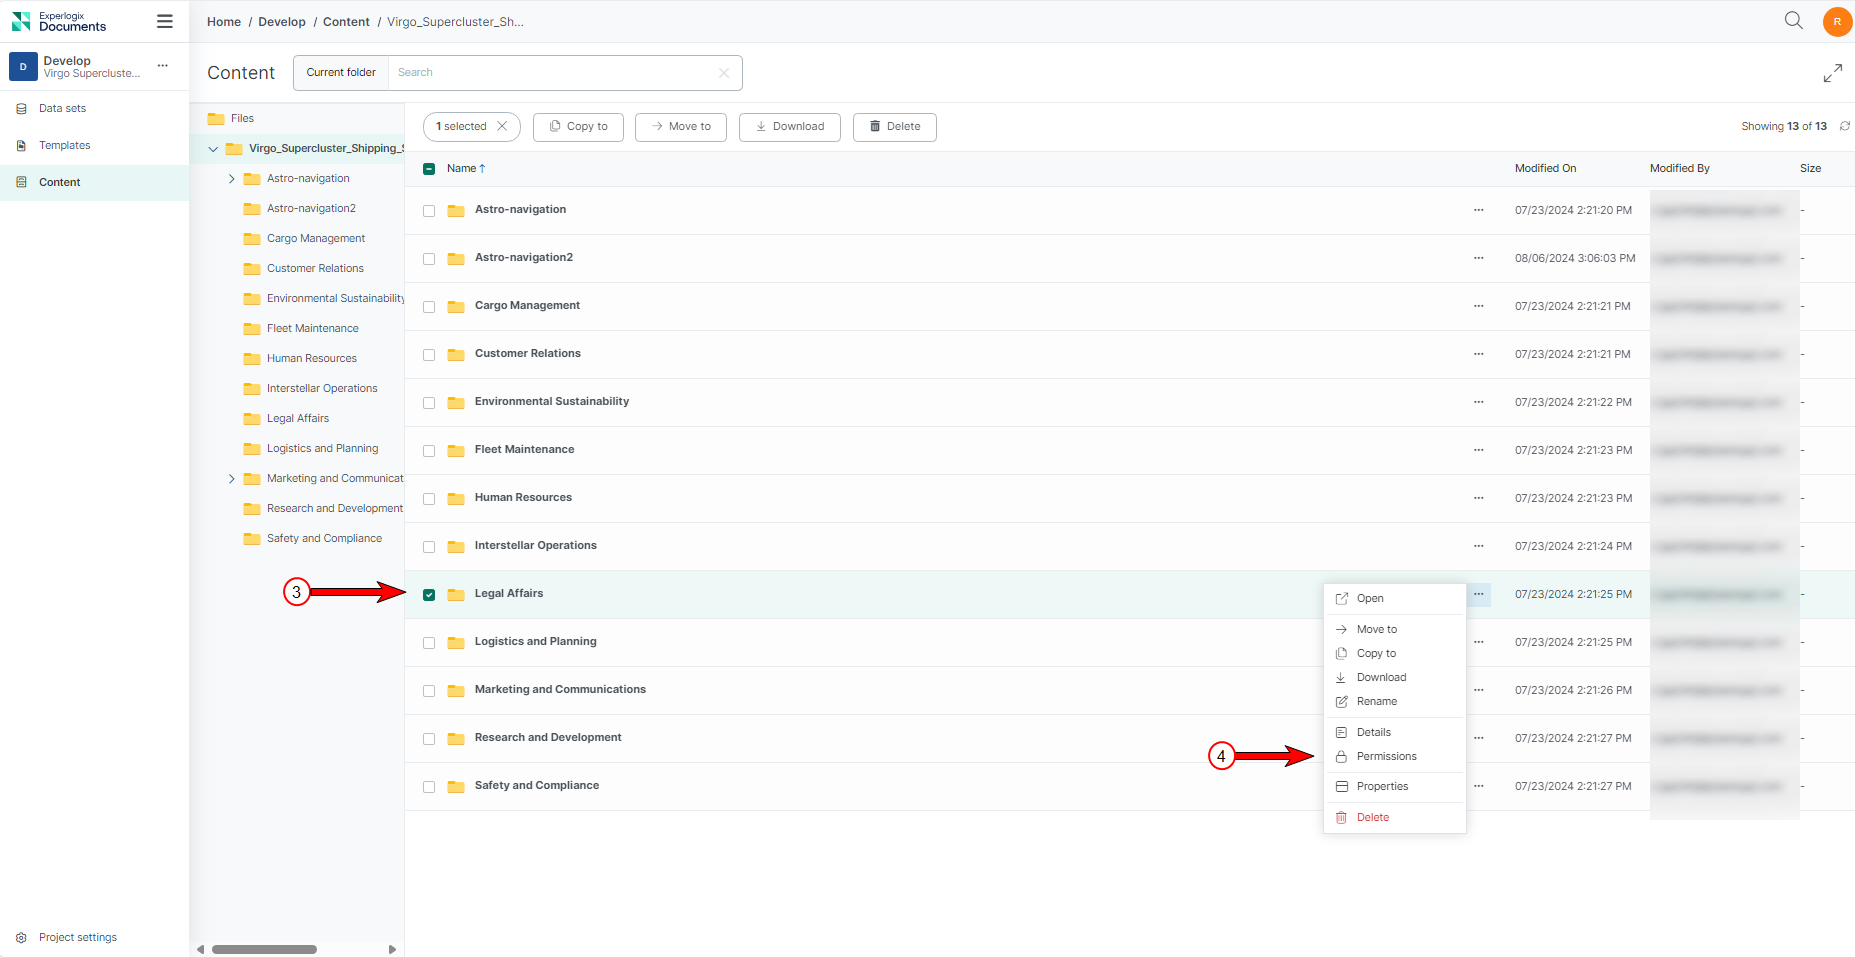
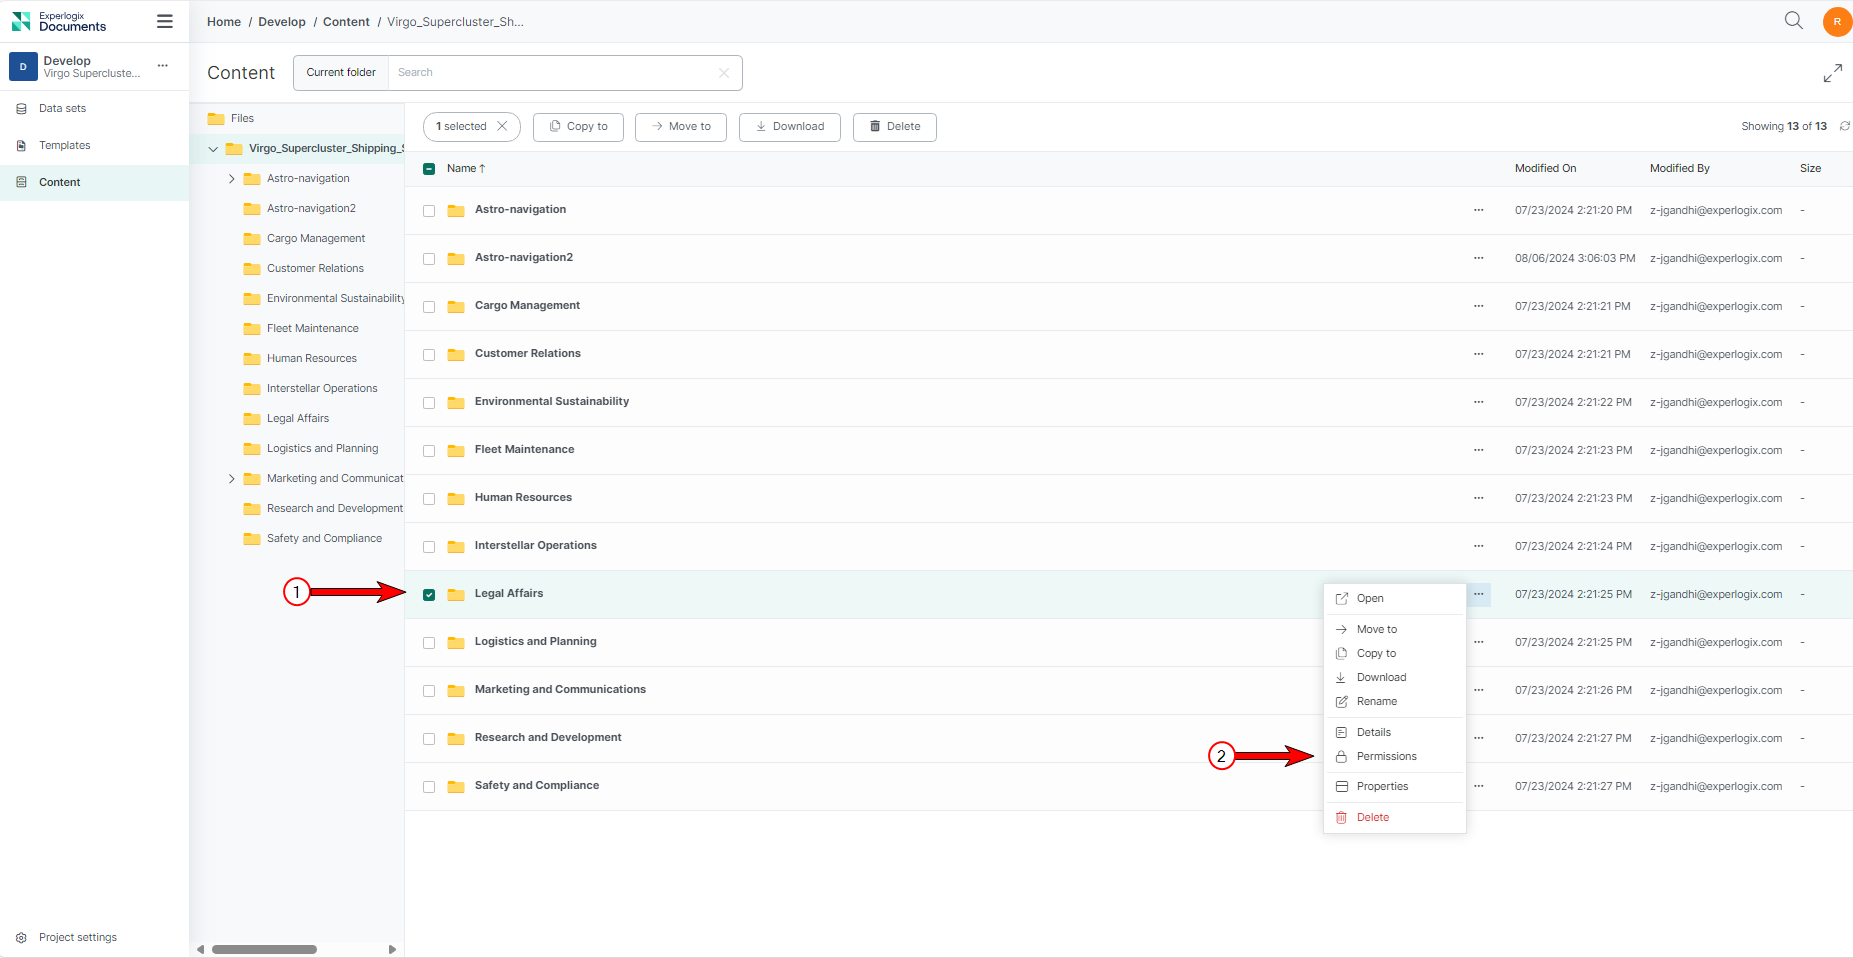
Navigate to the Content Manager and select the specific file or folder for which you want to set explicit permissions.
-
From the ellipsis menu, select the Permissions button.
-
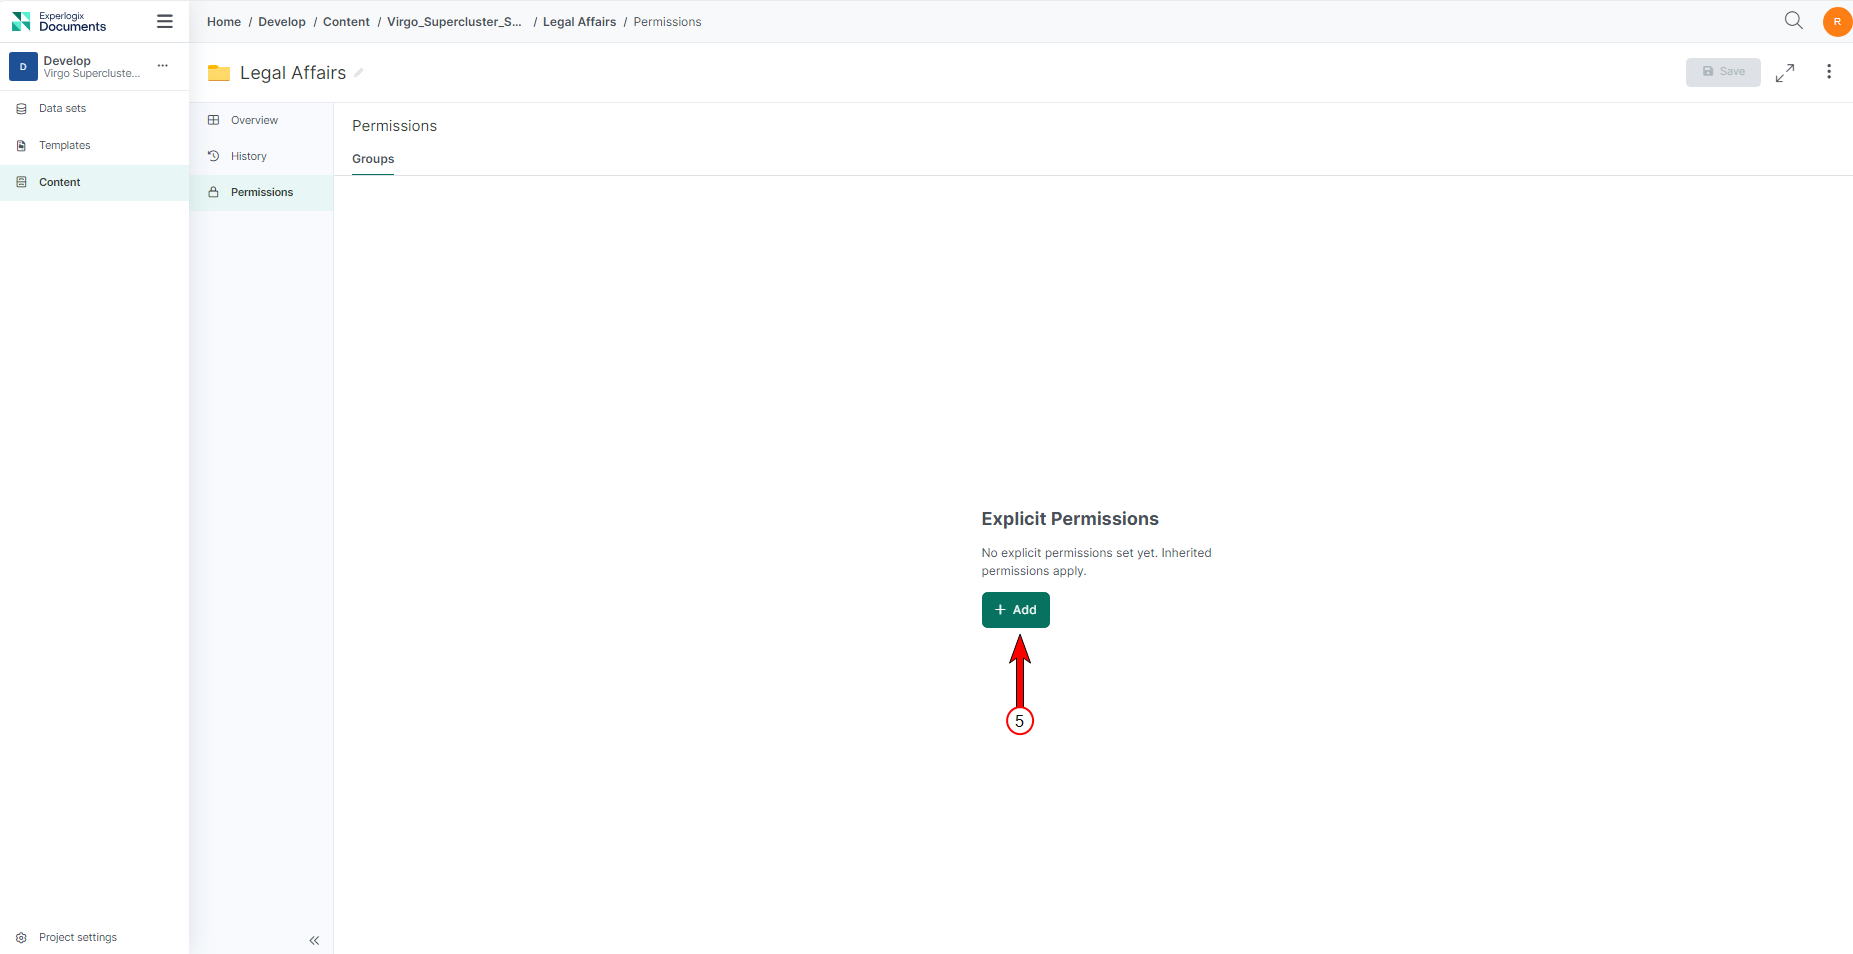
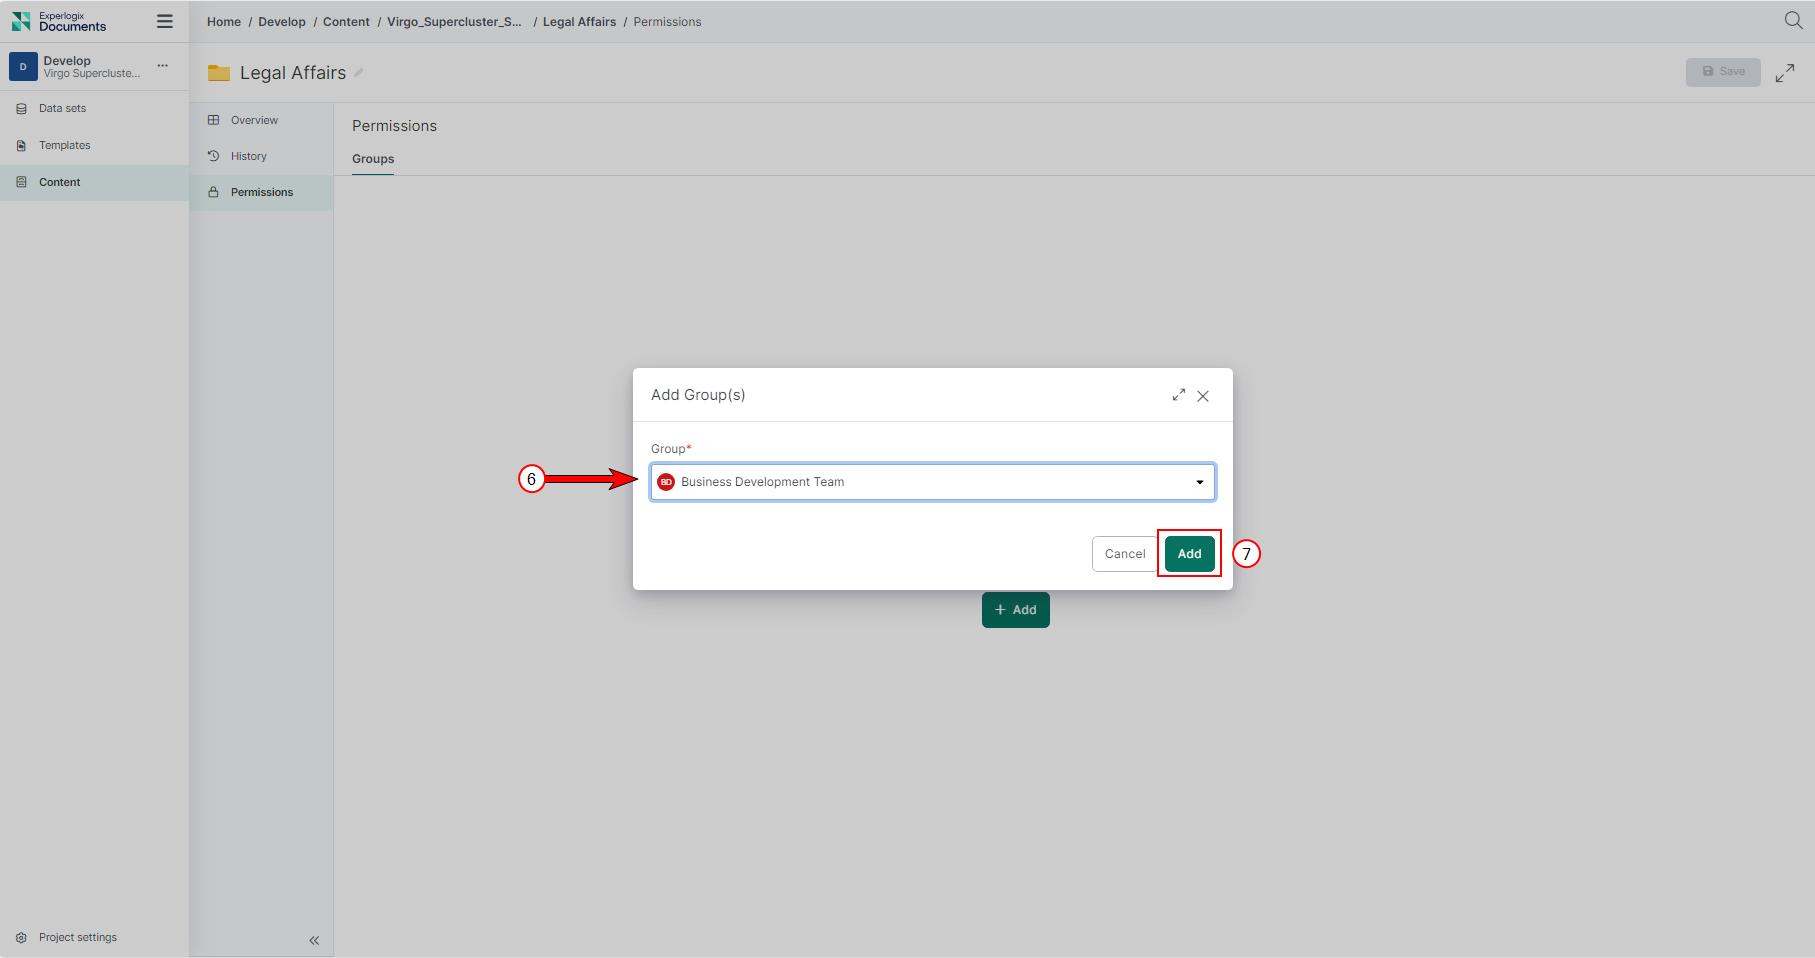
Select Add.
-
From the list of groups dropdown, select the custom group you want.
-
Select Add.
-
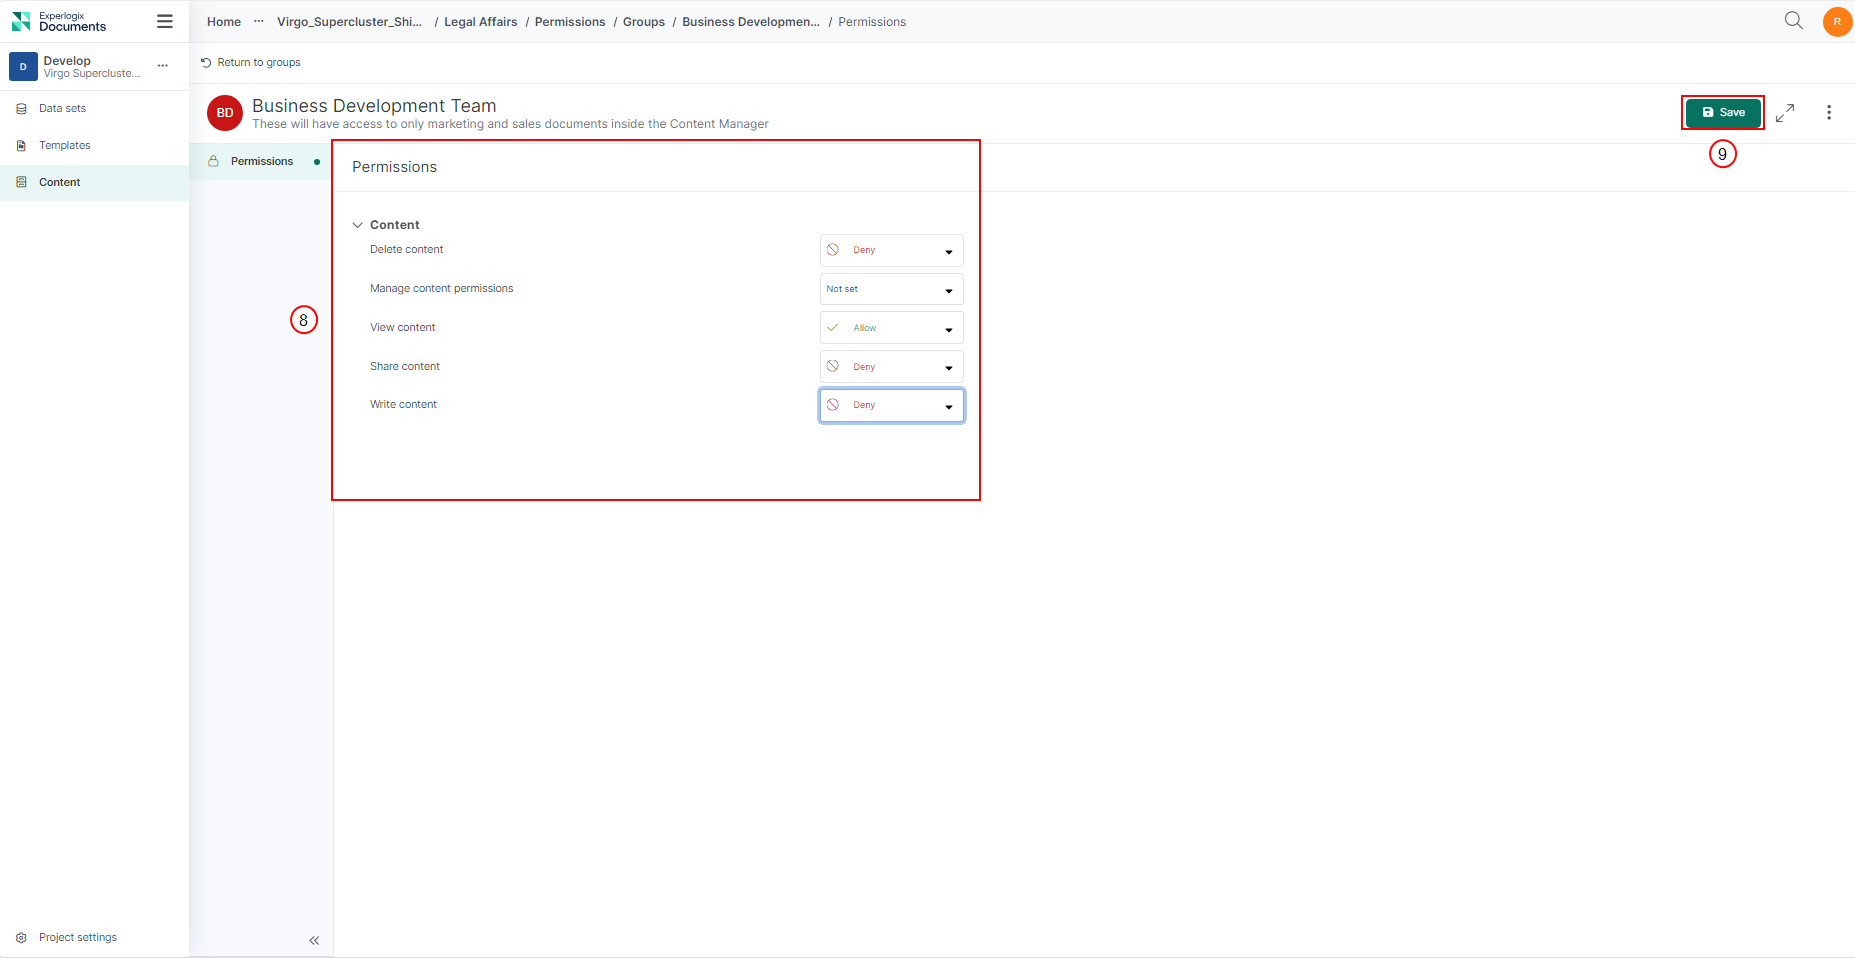
On the Item Level Permissions tab, set the permissions for each action within different actions for users of this custom group. The default permission for all actions is the state set at the project setting level when the custom group was created. You can set the permission to Deny, Not set, or Allow from the dropdown.
-
Select Save.
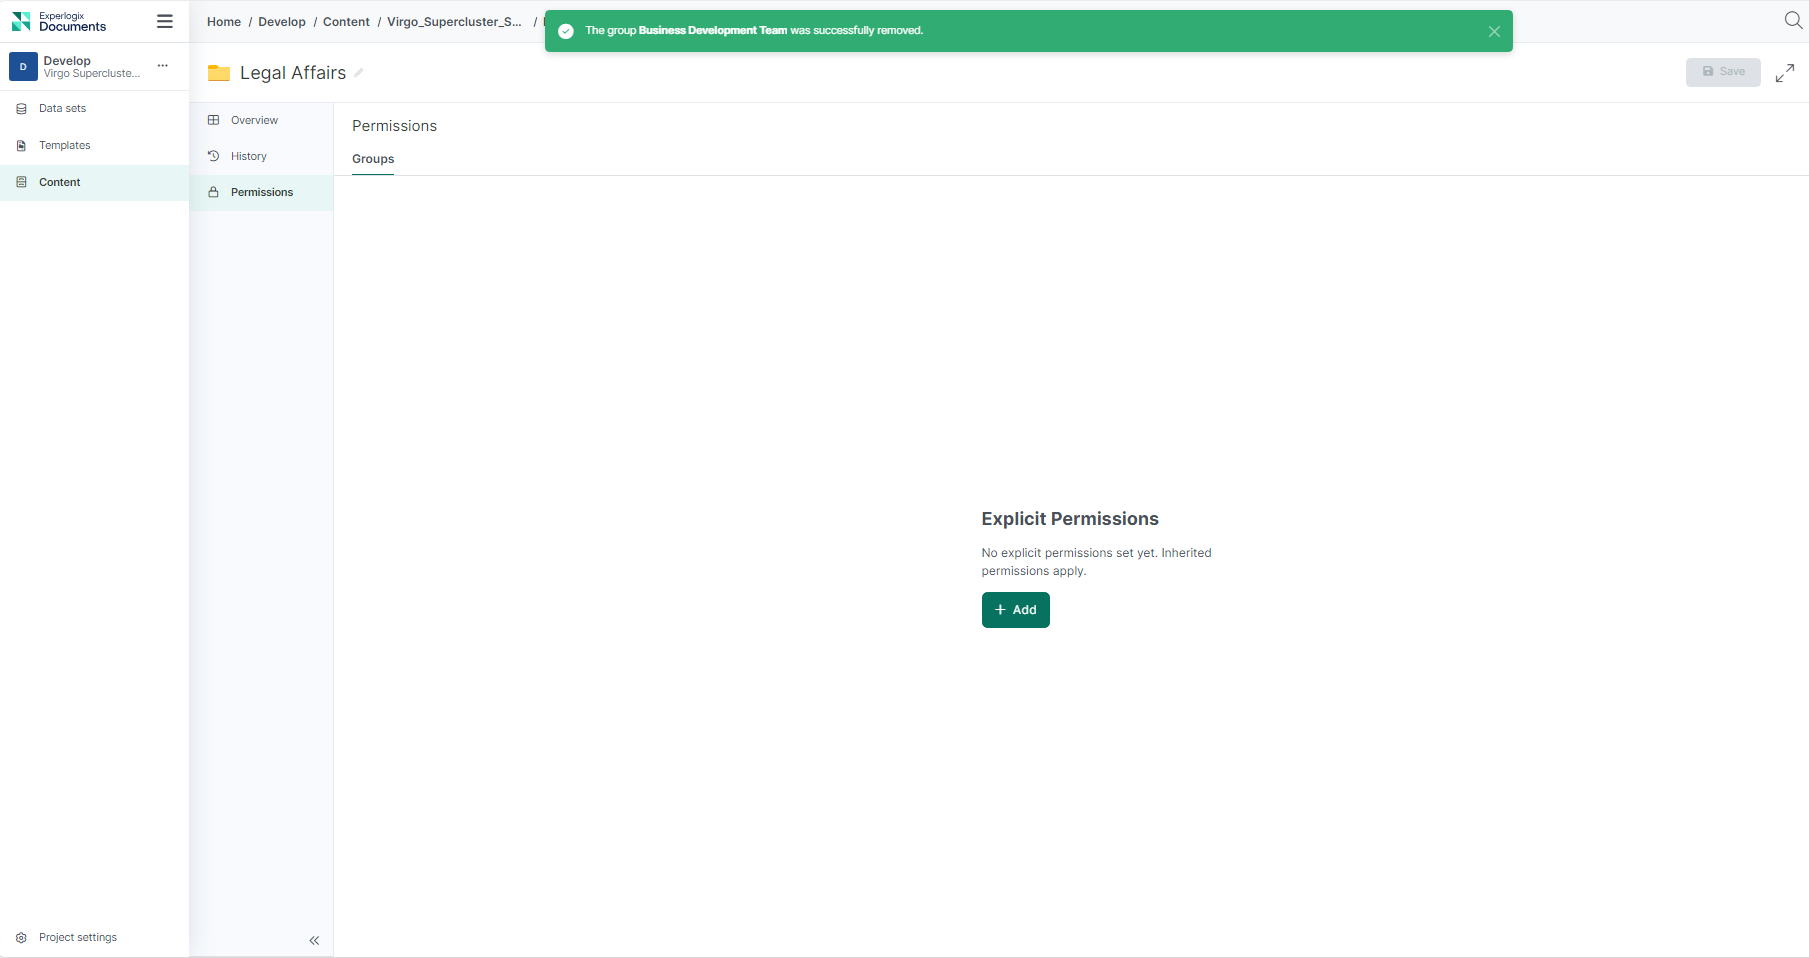
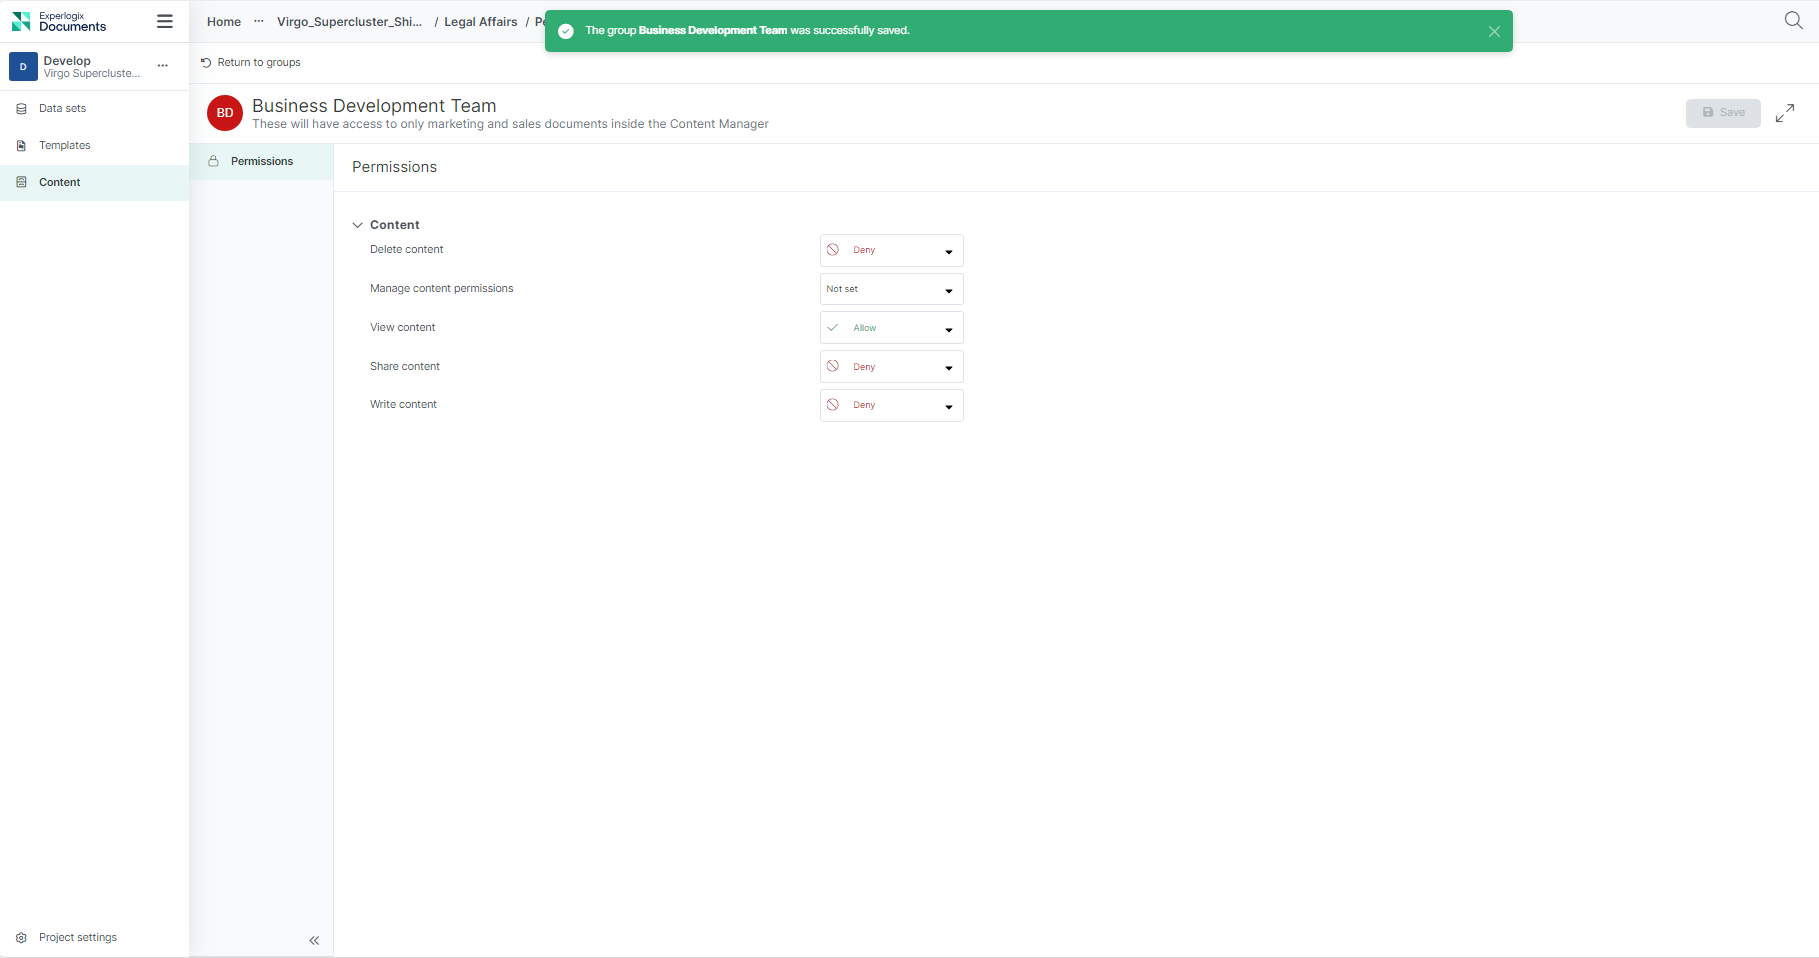
The success message displays.
Removing an Explicit Permission
Managing permissions effectively includes removing explicit permissions when they are no longer needed. Here’s how a privileged user can remove one or more groups from the list of groups with permissions for a specific item in the Content Manager.
-
Navigate to the Content Manager and select the specific file or folder for which you want to remove explicit permissions.
-
From the ellipsis menu, select the Permissions button.
-
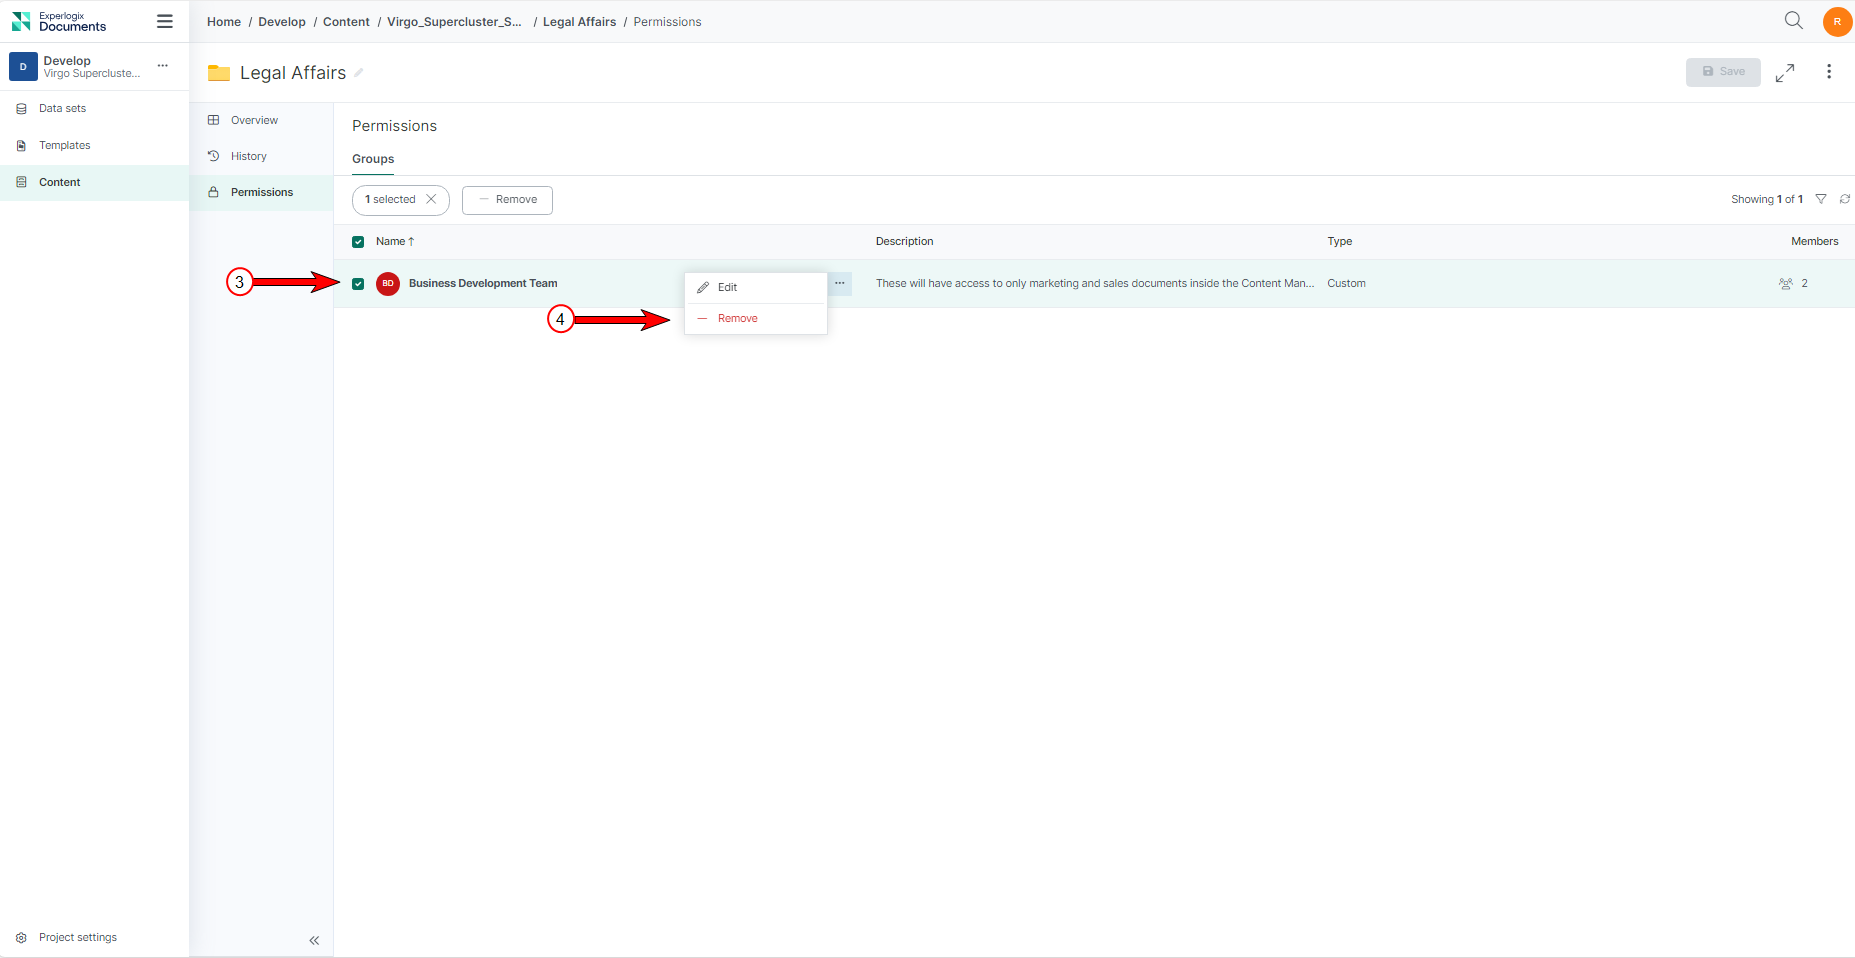
From the list of groups, select the group(s) you want to remove.
-
From the ellipsis menu, select the Remove button.
-
On the confirmation dialog, select Remove
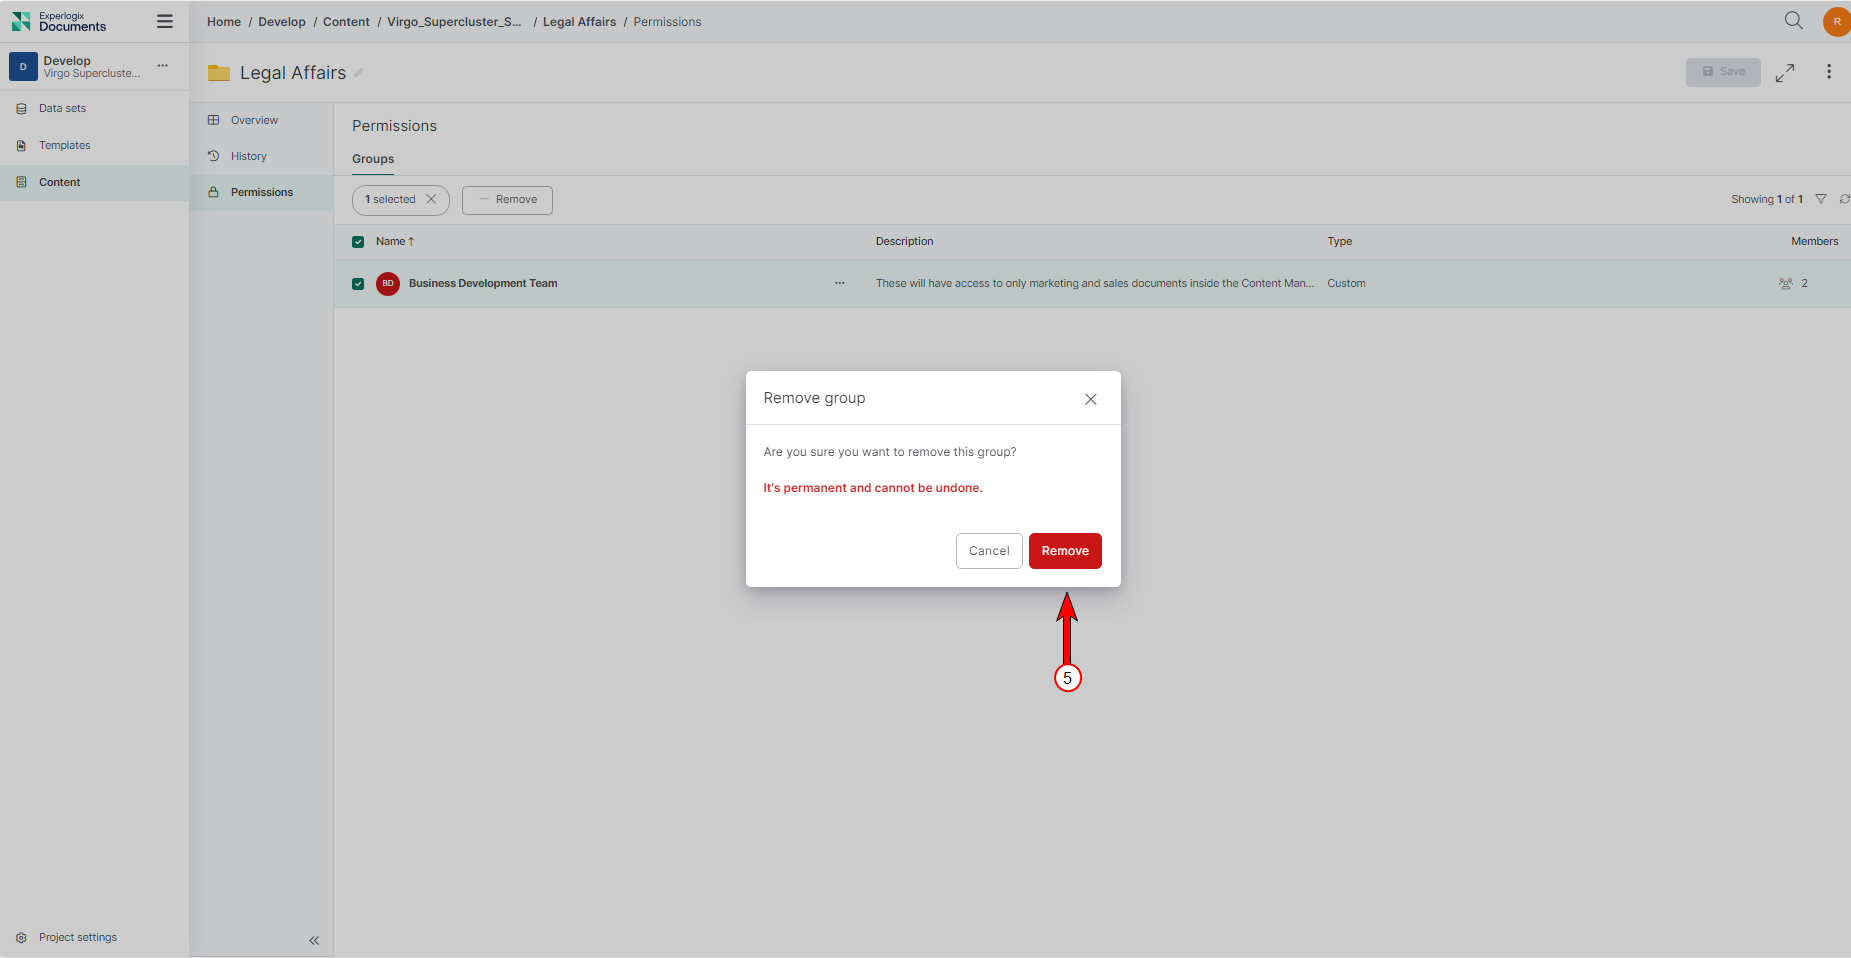
The success message displays.