
Groups are a collection of users with a set of permissions assigned to them. Users with the appropriate permissions can leverage Groups to assign checks and balances on what actions users can take within their organization or project. Groups are classified into system groups, which are native to Experlogix Documents, and custom groups that you create within your project.
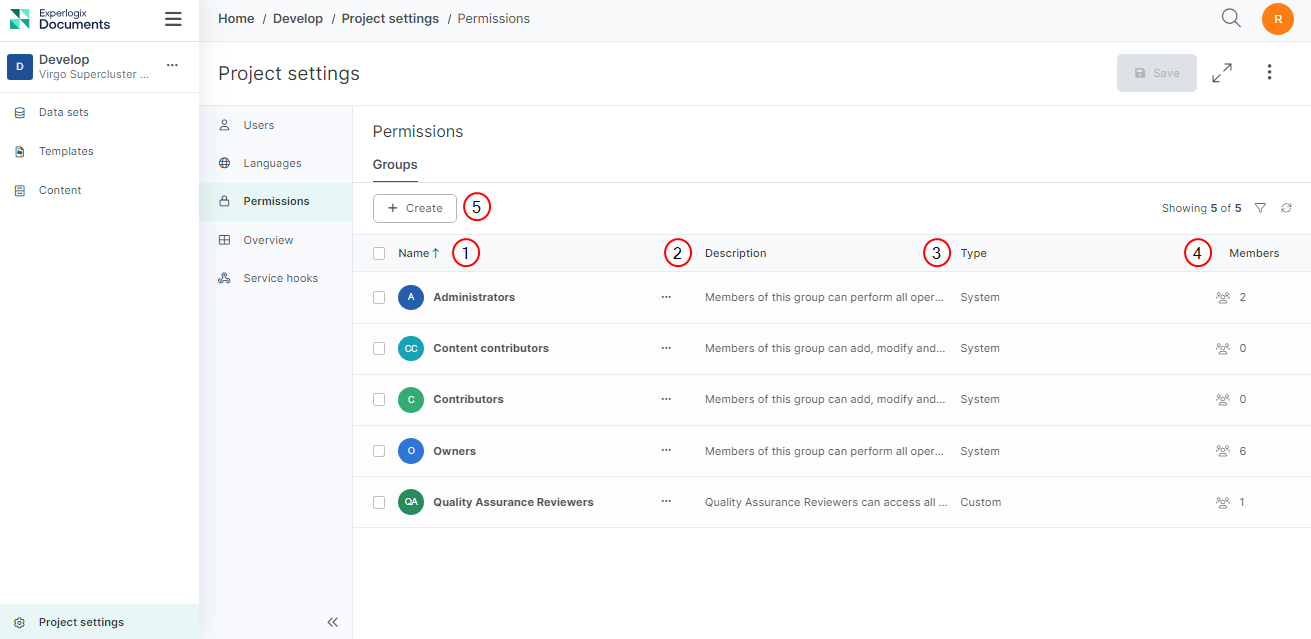
Groups List View
The groups list view inside the permissions tab displays all groups and related metadata fields in the project.
|
Index No. |
Field Name |
Purpose |
|---|---|---|
|
1 |
Name |
Displays the name of the group. |
|
2 |
Description |
A summary or explanation of the group. |
|
3 |
Type |
The type of group, it is either system or custom. |
|
4 |
Members |
The total number of members in a group. |
|
5 |
+ Create |
Opens the Create custom group dialog to allow users to create custom groups. |
System Groups
System groups are native to Experlogix Documents and cannot be removed.
Use Case
Elena Rodriguez a Project Administrator and she needs to be able to allow her divisions to assign users to additional groups based on their responsibilities. In this case Mia could do the following:
-
Users who need to only work with content would be assigned as Content Contributors
-
Users who need to work with data sets, content and more would be assigned as Contributors
System Groups and Permissions:
|
Permission Level |
Group Name |
Description |
|---|---|---|
|
Organization level group |
Organization administrators |
Members of this group can perform all operations at the organization level. |
|
Project level groups |
Owners |
Members of this group can perform all operations and have always access to all objects within the project. |
|
Project level groups |
Administrators |
Members of this group can perform all operations within the project. |
|
Project level groups |
Contributors |
Members of this group can add, modify and delete items within the project. |
|
Project level groups |
Content Contributors |
Members of this group can add, modify and delete content within the project. |
See Permissions to understand different operations you can perform based on your group.
Custom Groups
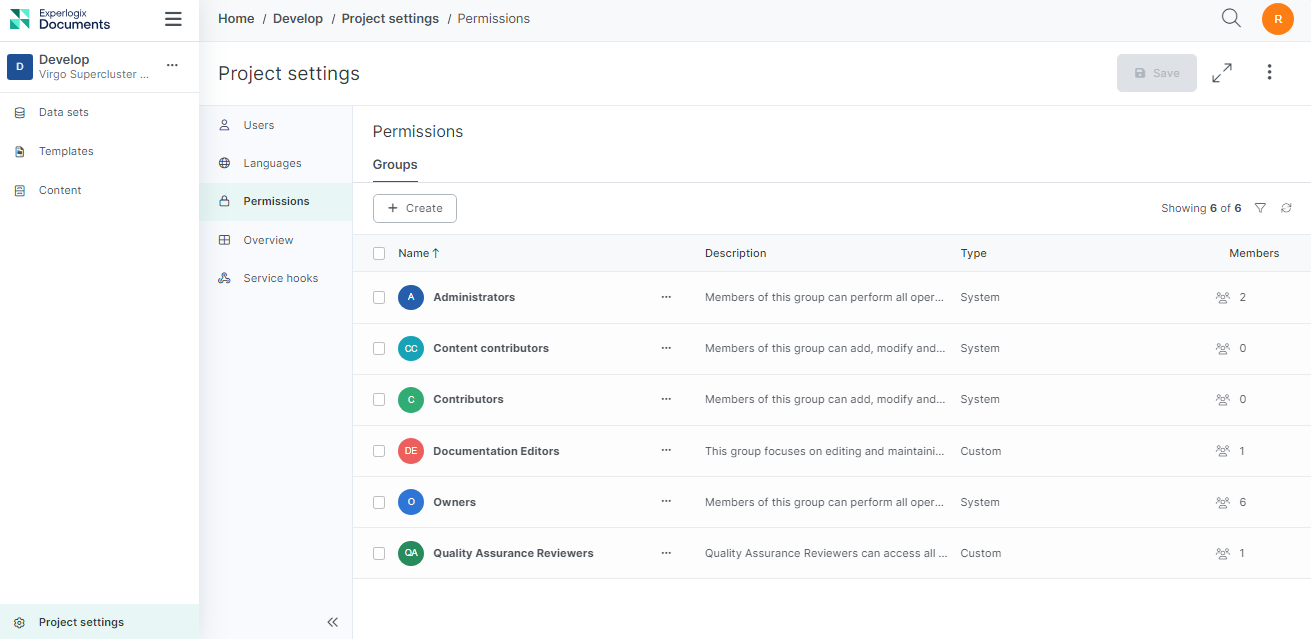
Custom groups are collections you create within a project to control user permissions more precisely. Users with the Manage groups permission, Owners and Administrators, can set up these groups. You can customize them with unique names, descriptions, and member lists to fit your project’s needs.
Use Case
Chloe White, a Project Administrator, customizes permissions for specific custom groups based on project requirements. This strategy helps manage responsibilities, maintain project integrity, and enhance security and compliance. Here’s how Chloe sets up these groups:
-
Quality Assurance Reviewers: Chloe creates a group with all view permissions, ensuring Quality Assurance reviewers can access all necessary content and data without making changes. This means they are denied write and delete permissions, thus maintaining the integrity of the review process.
-
Documentation Editors: Chloe creates a group with view permissions for data sets and templates, and write permissions for content. This setup allows them to edit and maintain documentation without the ability to delete content, reducing the risk of accidental data loss.
Procedures
Administrators and owners can use custom groups to tailor user permissions to specific needs, ensuring users have the correct access for their roles. This document explains how to create custom groups and manage these custom groups in your project.
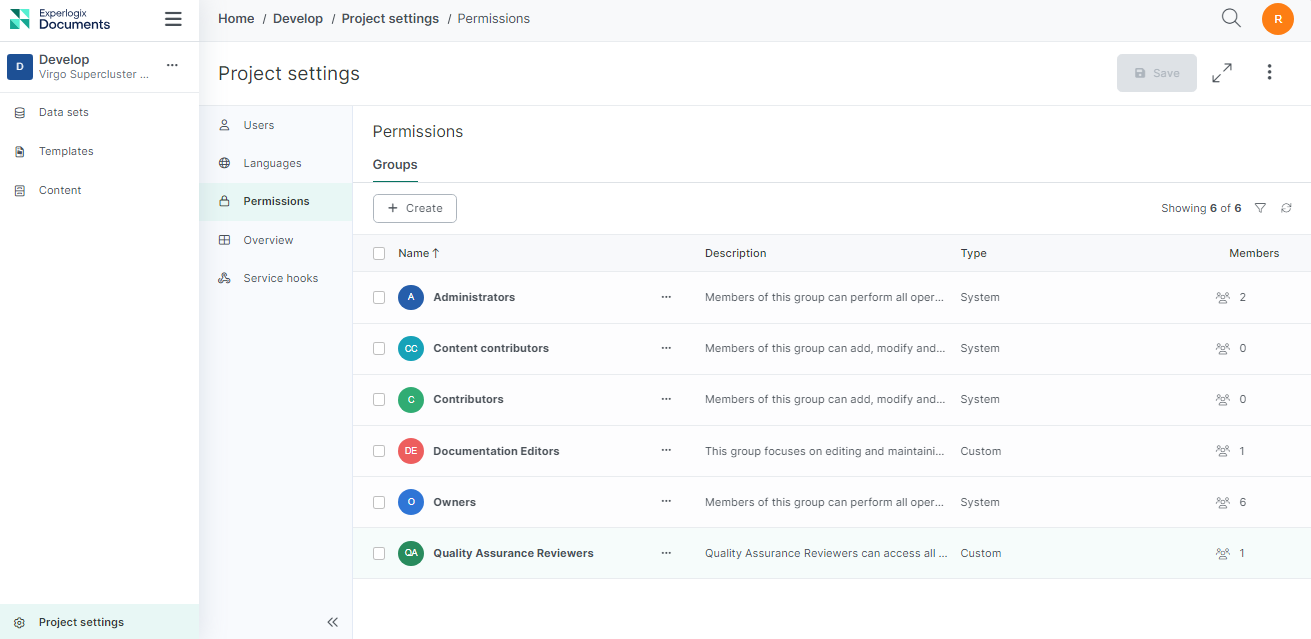
Creating a Custom Group
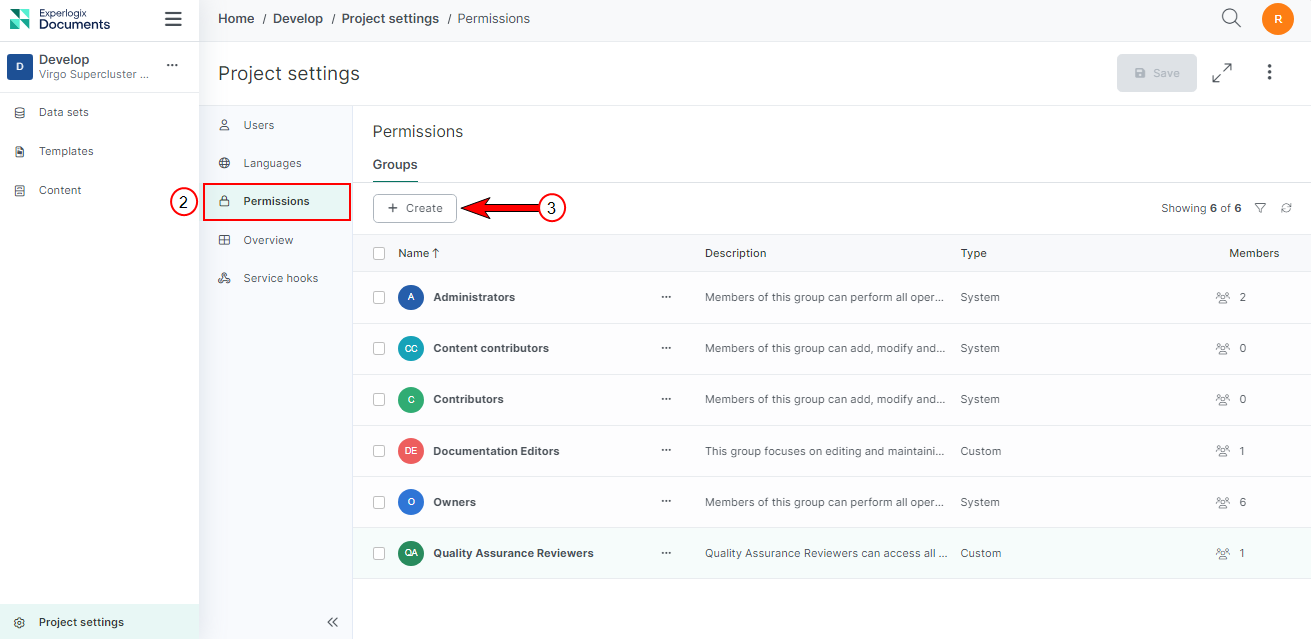
Follow these steps to create custom groups within the project settings page.
-
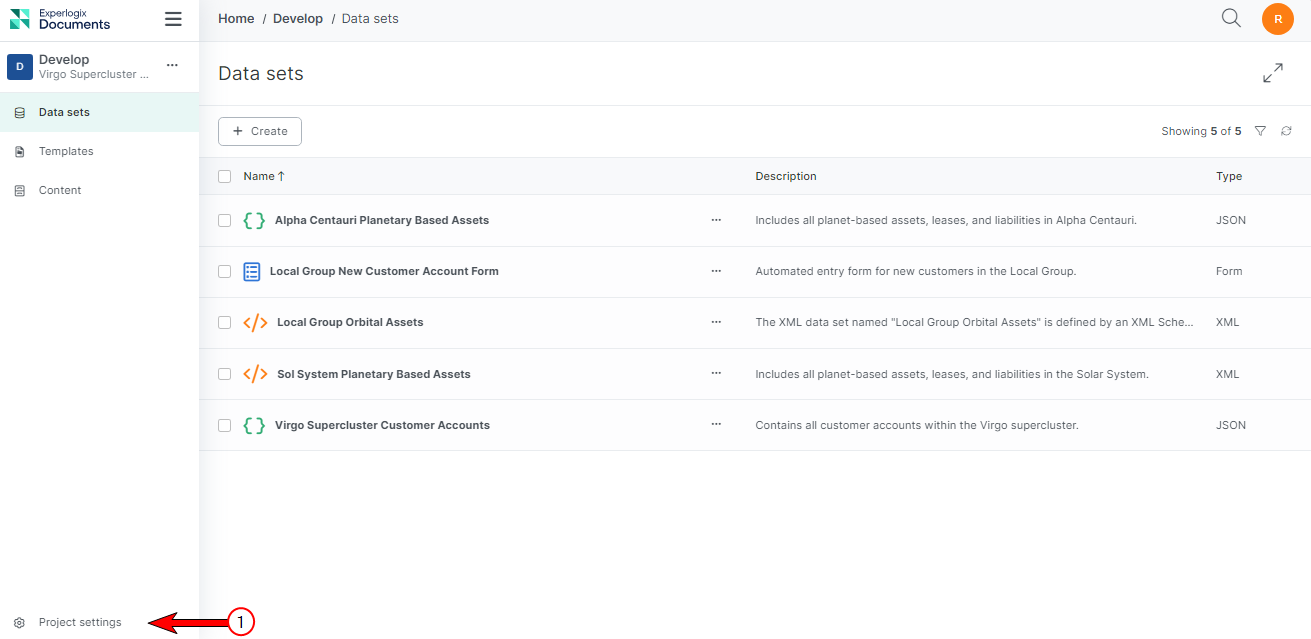
Inside your project, select Project settings.
-
Select the Permissions tab.
-
Select the Create button.
-
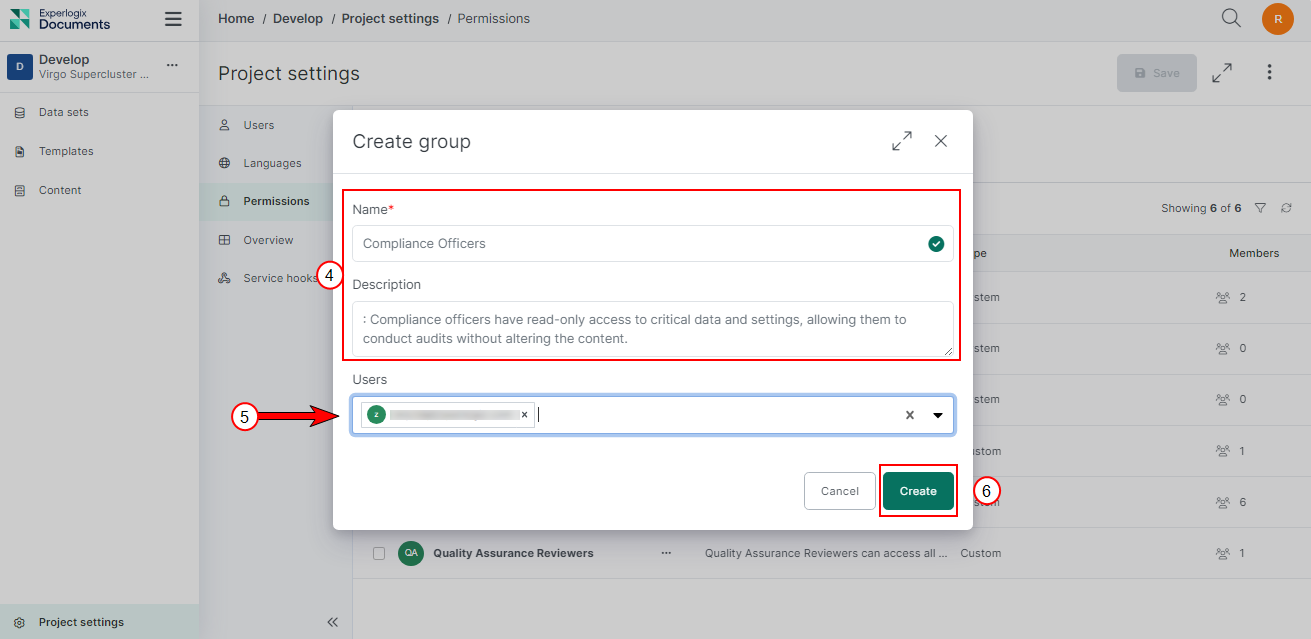
Give a proper name and description to your custom group.
-
From the dropdown menu, select the users to add them to this custom group.
-
Select the Create button.
Permissions tab of the newly created custom group displays.
Setting Permissions for a Custom Group
Follow these steps to customize permissions for a specific custom group.
-
Select a custom group.
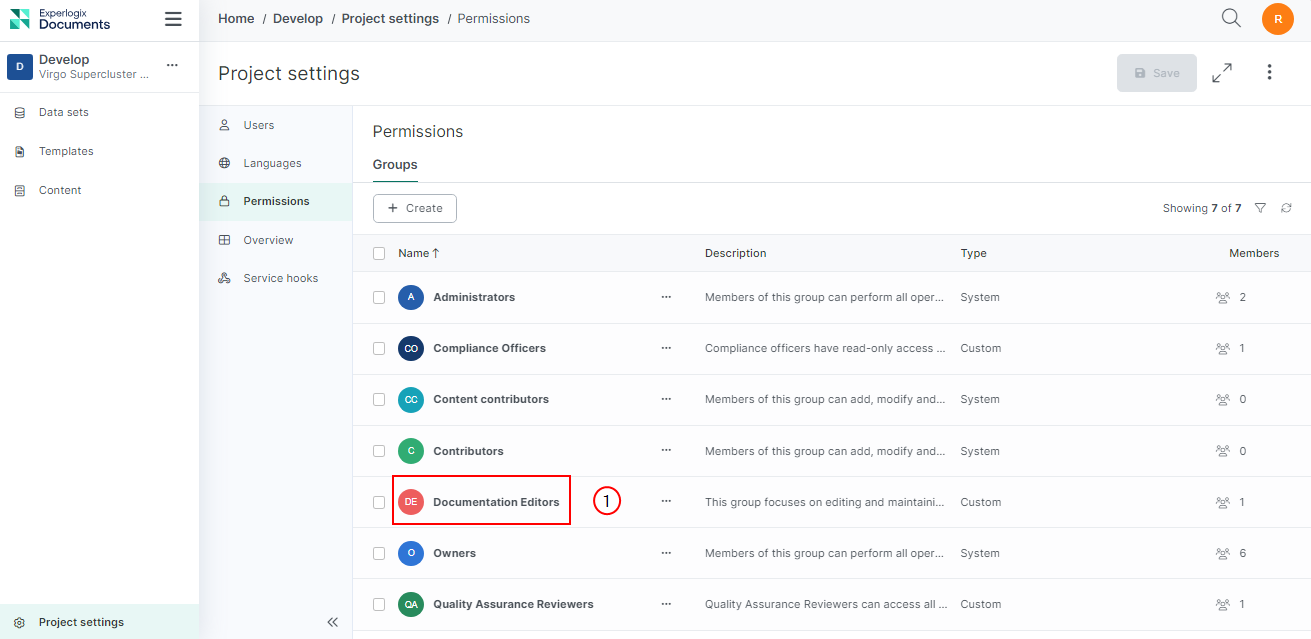
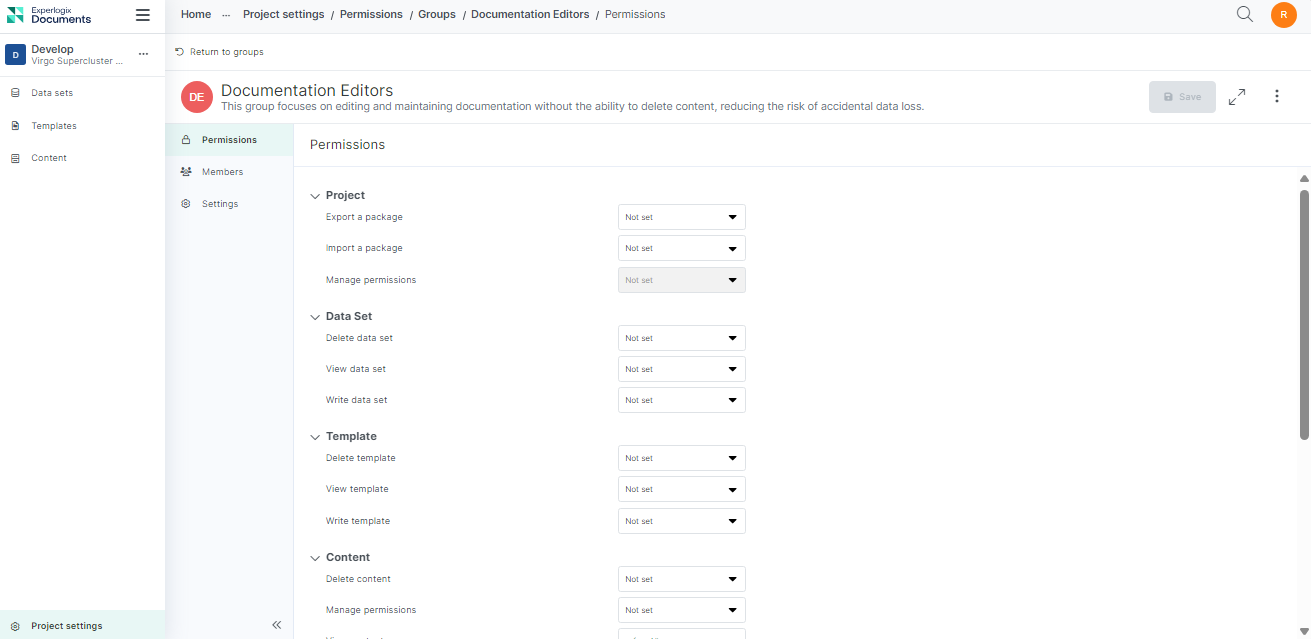
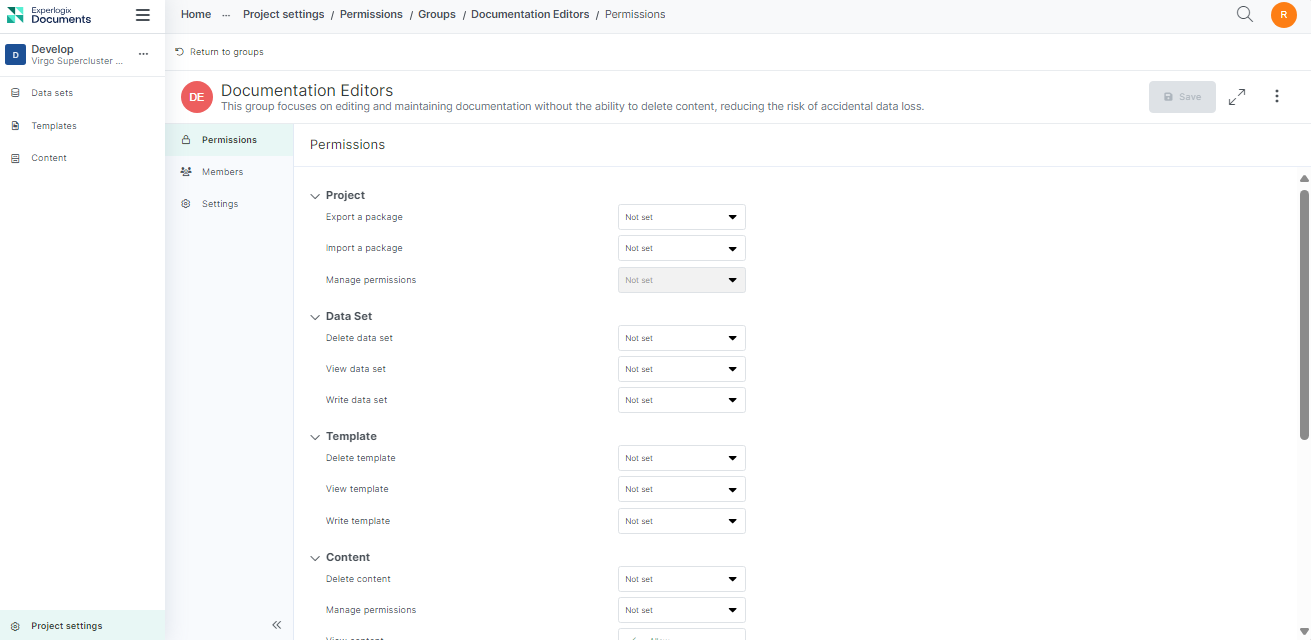
Permissions tab of the custom group displays.
-
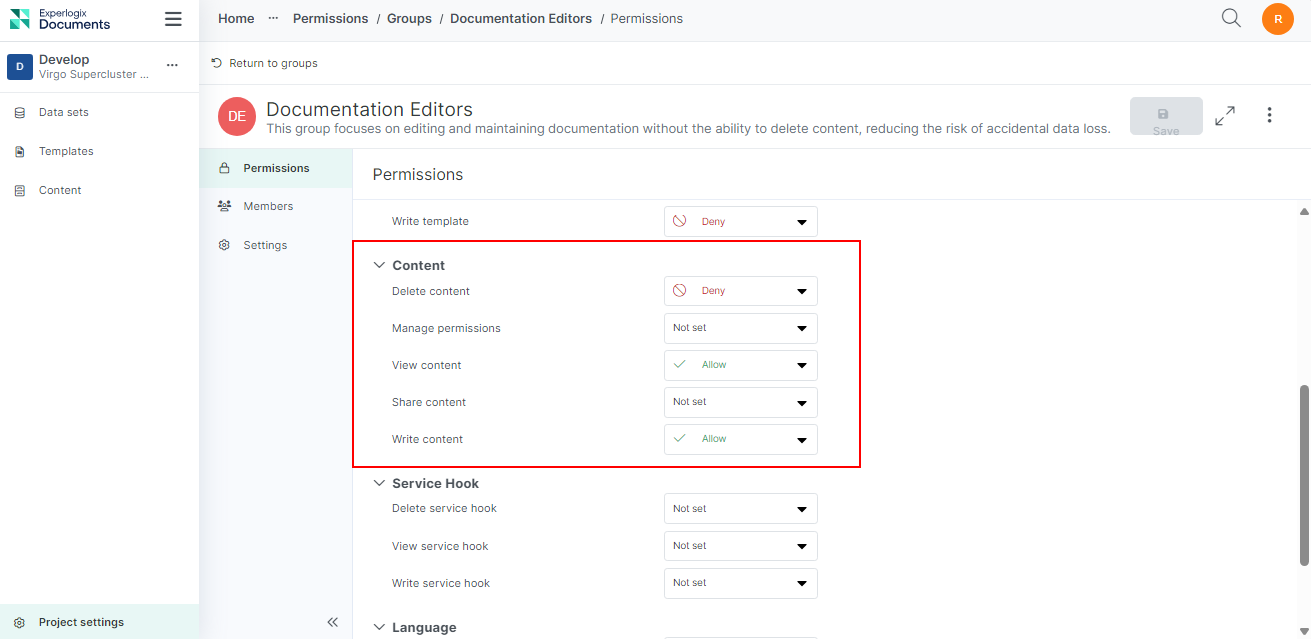
On this tab, set the permissions for each action within different scopes for users of this custom group. The default permission for all actions is set to Not set. You can set the permission to Deny or Allow from the dropdown. See the Scope and Actions table for an overview on each setting.
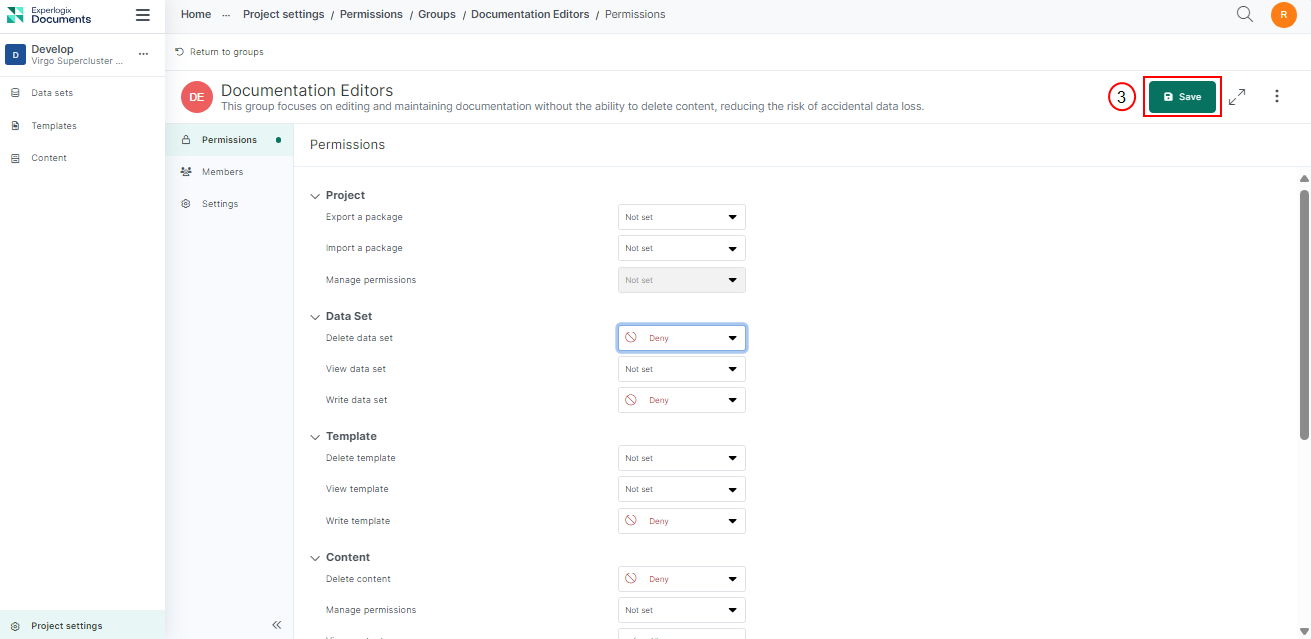
For example, allow the Documentation Editors group to write and view content by setting the write and view content actions to Allow within the content scope. Deny the delete action within the same scope, as this group doesn’t require deletion capabilities. The permission system defaults to Deny, so Not set is treated as denied unless overridden by another group’s permissions. Explicitly setting Deny ensures that even if another group allows it, the deny will take precedence.
-
Select Save.
The success message displays.
Scope and Actions table
|
Scope |
Action |
|---|---|
|
Project |
Export a package |
|
Project |
Import a package |
|
Project |
Manage project permissions |
|
Data set |
Delete data set |
|
Data set |
View data set |
|
Data set |
Manage data set permissions |
|
Data set |
Write data set |
|
Template |
Delete template |
|
Template |
View template |
|
Template |
Write template |
|
Content |
Delete content |
|
Content |
Manage content permissions |
|
Content |
View content |
|
Content |
Share content |
|
Content |
Write content |
|
Service Hook |
Delete service hook |
|
Service Hook |
View service hook |
|
Service Hook |
Write service hook |
|
Language |
Delete language |
|
Language |
View language |
|
Language |
Write language |
Managing Custom Groups
Managing custom groups within a project is crucial for maintaining an organized and secure workflow. This section provides comprehensive guidance on managing, modifying group details, updating member lists, and effectively deleting custom groups.
Modifying Group Details
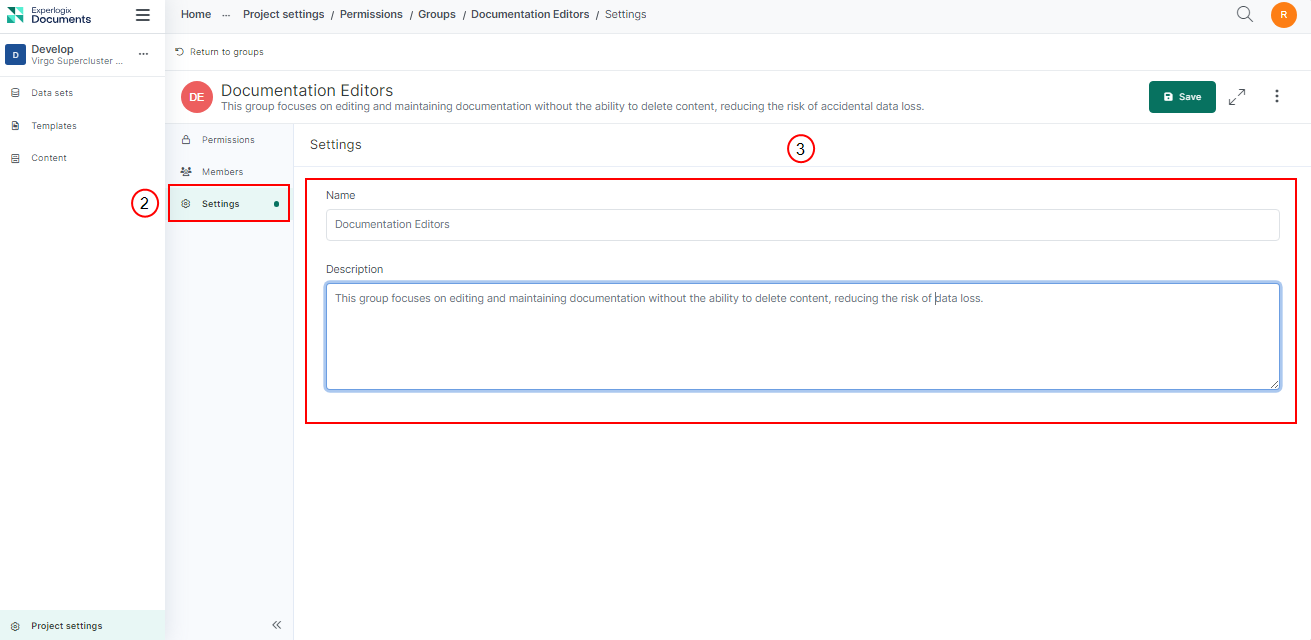
Once a custom group is created, you may need to update its details. Here’s how to modify a group's name and description:
-
Navigate to the group you want to edit.
-
Select the Settings tab.
-
Select Save after making the necessary changes.
The success message displays.
Updating Members List
This document outlines the procedures for adding and removing members from a custom group. By regularly updating the member lists, project administrators can ensure that team members always have the appropriate level of access.
Adding Members to a Custom Group
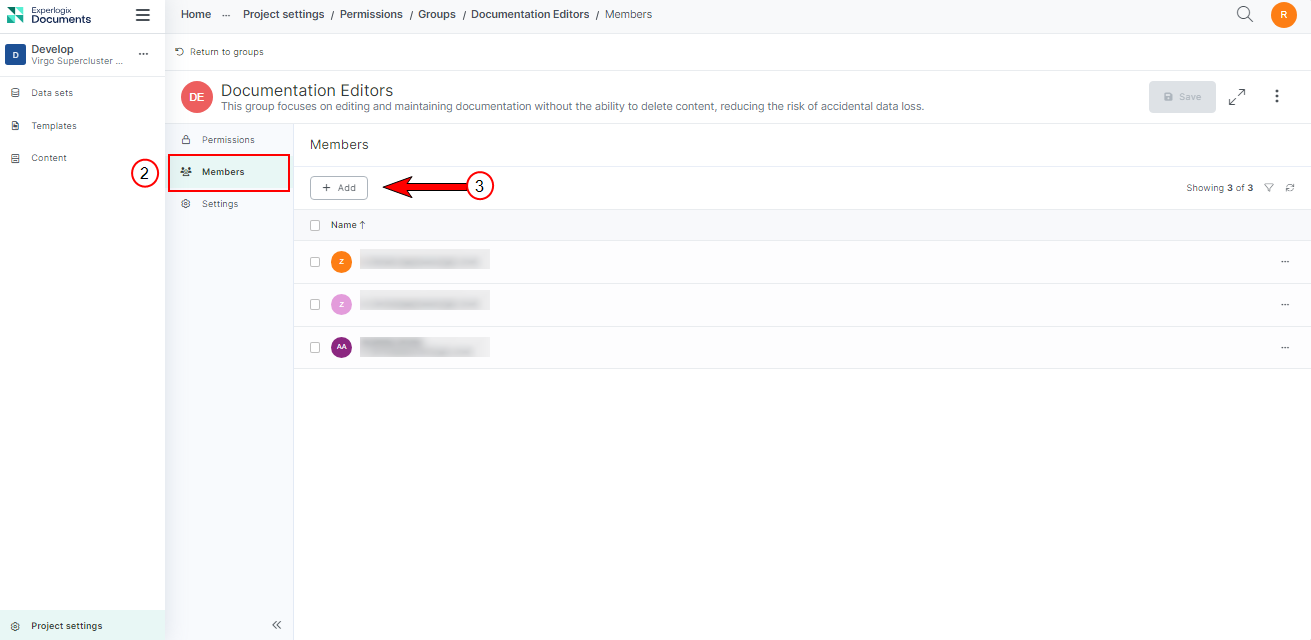
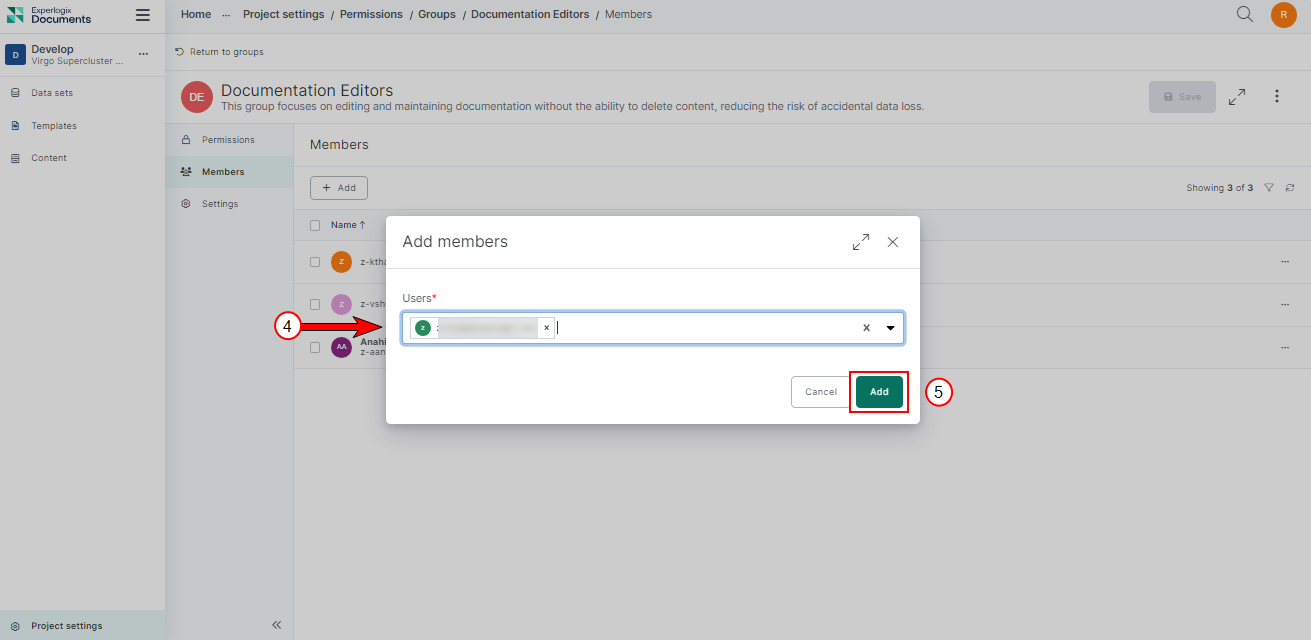
Follow the steps below to add members to a custom group via the Members tab.
-
Navigate to the group to which you want to add users.
-
Select the Members tab.
-
Select Add.
-
Select users from the dropdown.
-
Select Add.
The success message displays.
Removing Members from the Custom Groups
-
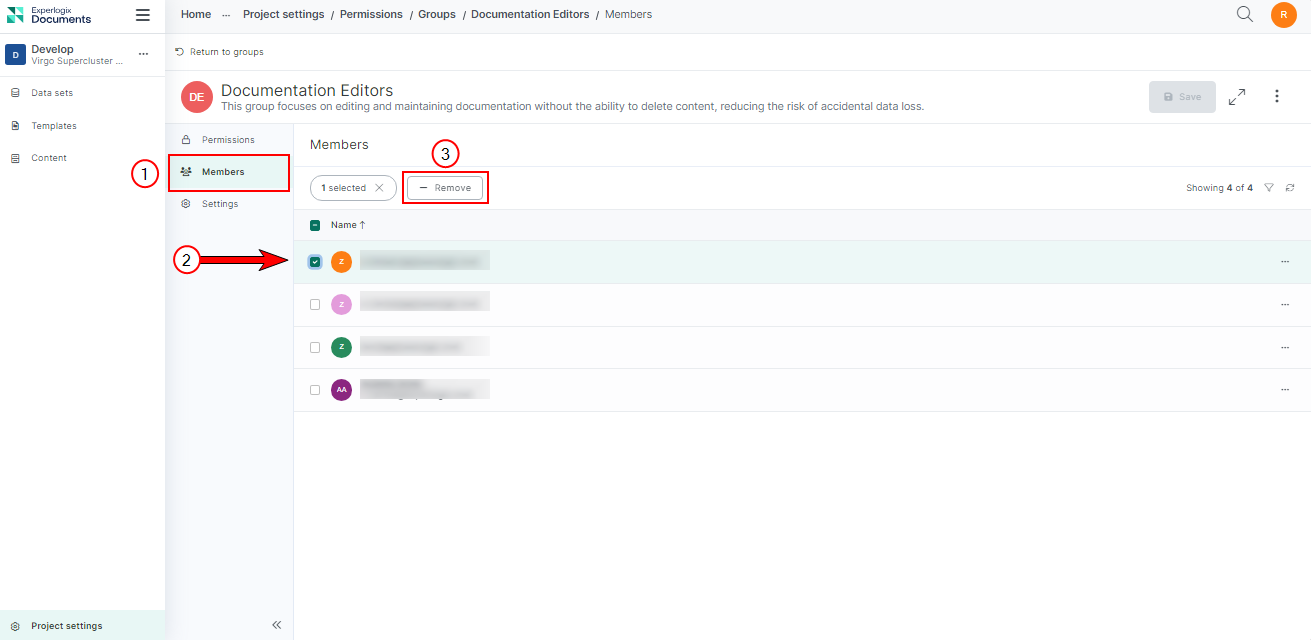
Navigate to the Members tab.
-
On the Members list view, select the member you want to remove.
-
Select Remove.
-
On the confirmation modal, select Remove
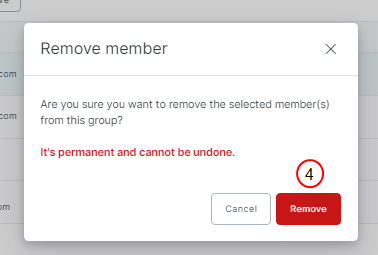
The success message displays.
Deleting Custom Groups
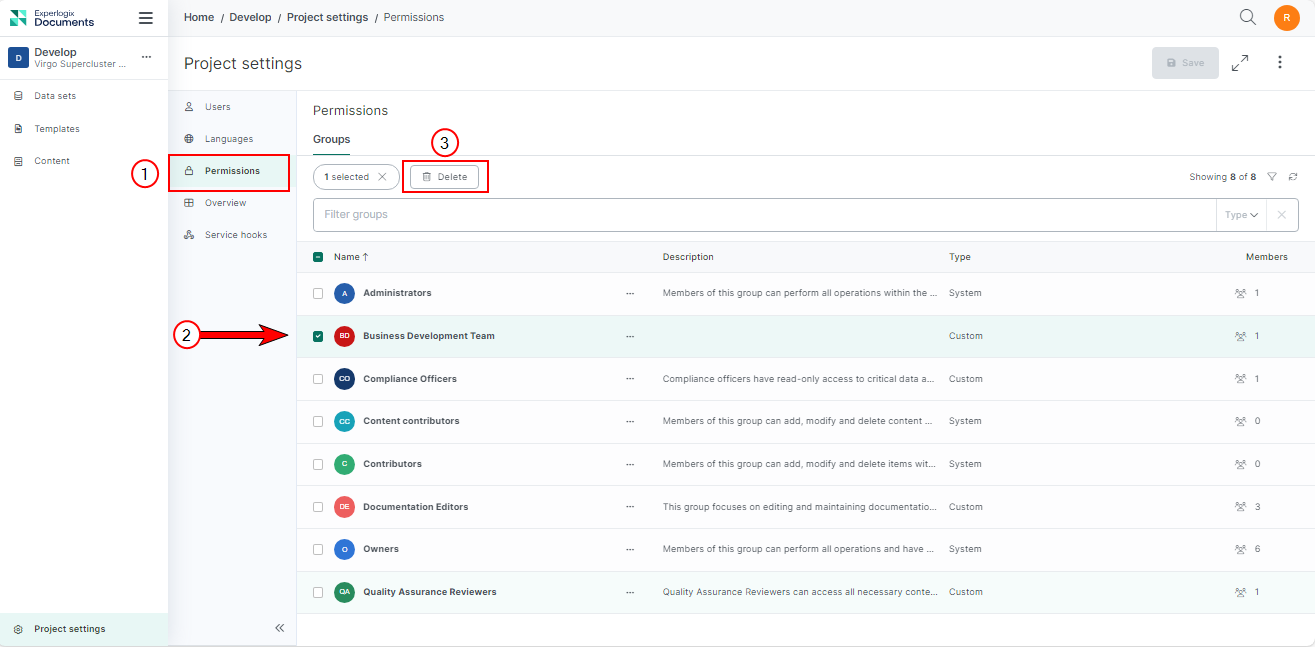
Deleting custom groups within a project is a critical task. Over time, as project requirements change, some custom groups may become obsolete or redundant. Deleting these groups helps keep the project settings clean and relevant.
-
Inside your Project Settings, select the Permissions tab.
-
On the Groups list view, select the group you want to delete.
-
Select Delete.
-
On the confirmation modal, select Delete.
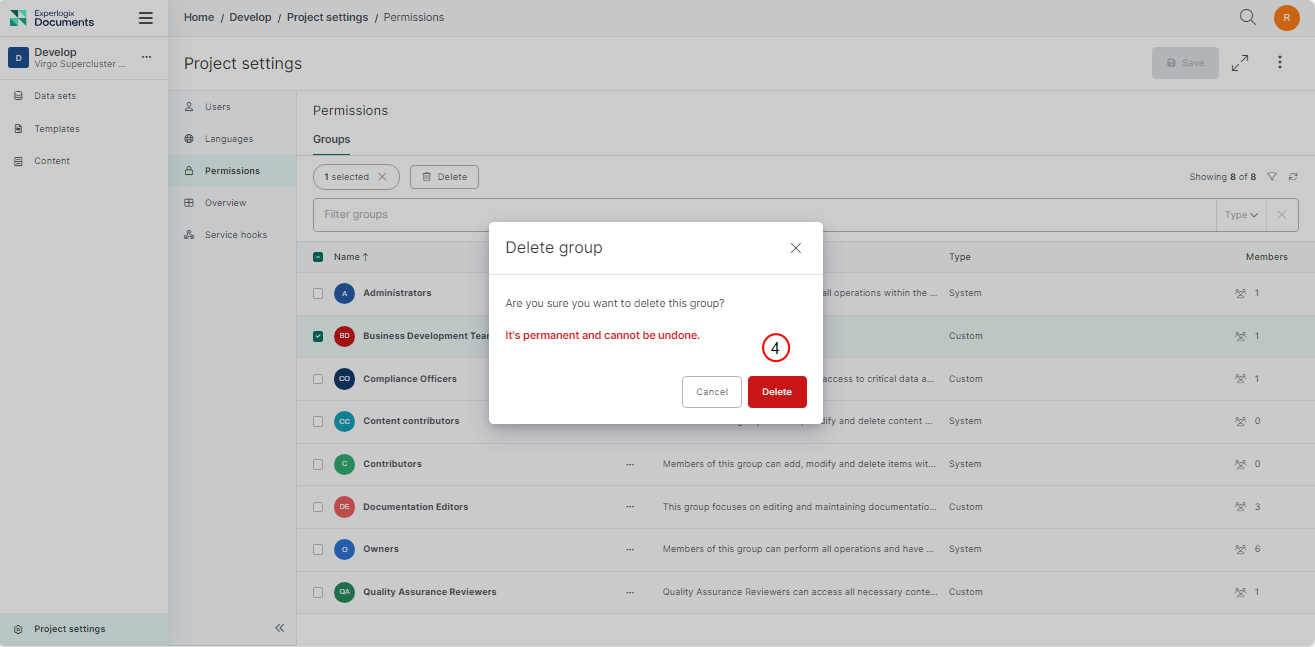
The success message displays.