
The list view is the main working area of Content Manager. It displays the folders and files in the selected folder and lets you open, create, upload, copy, move, download, and delete items, as well as access sharing, translation, and item details.
For an overview of Content Manager and the permissions required for each action, see Content Manager.
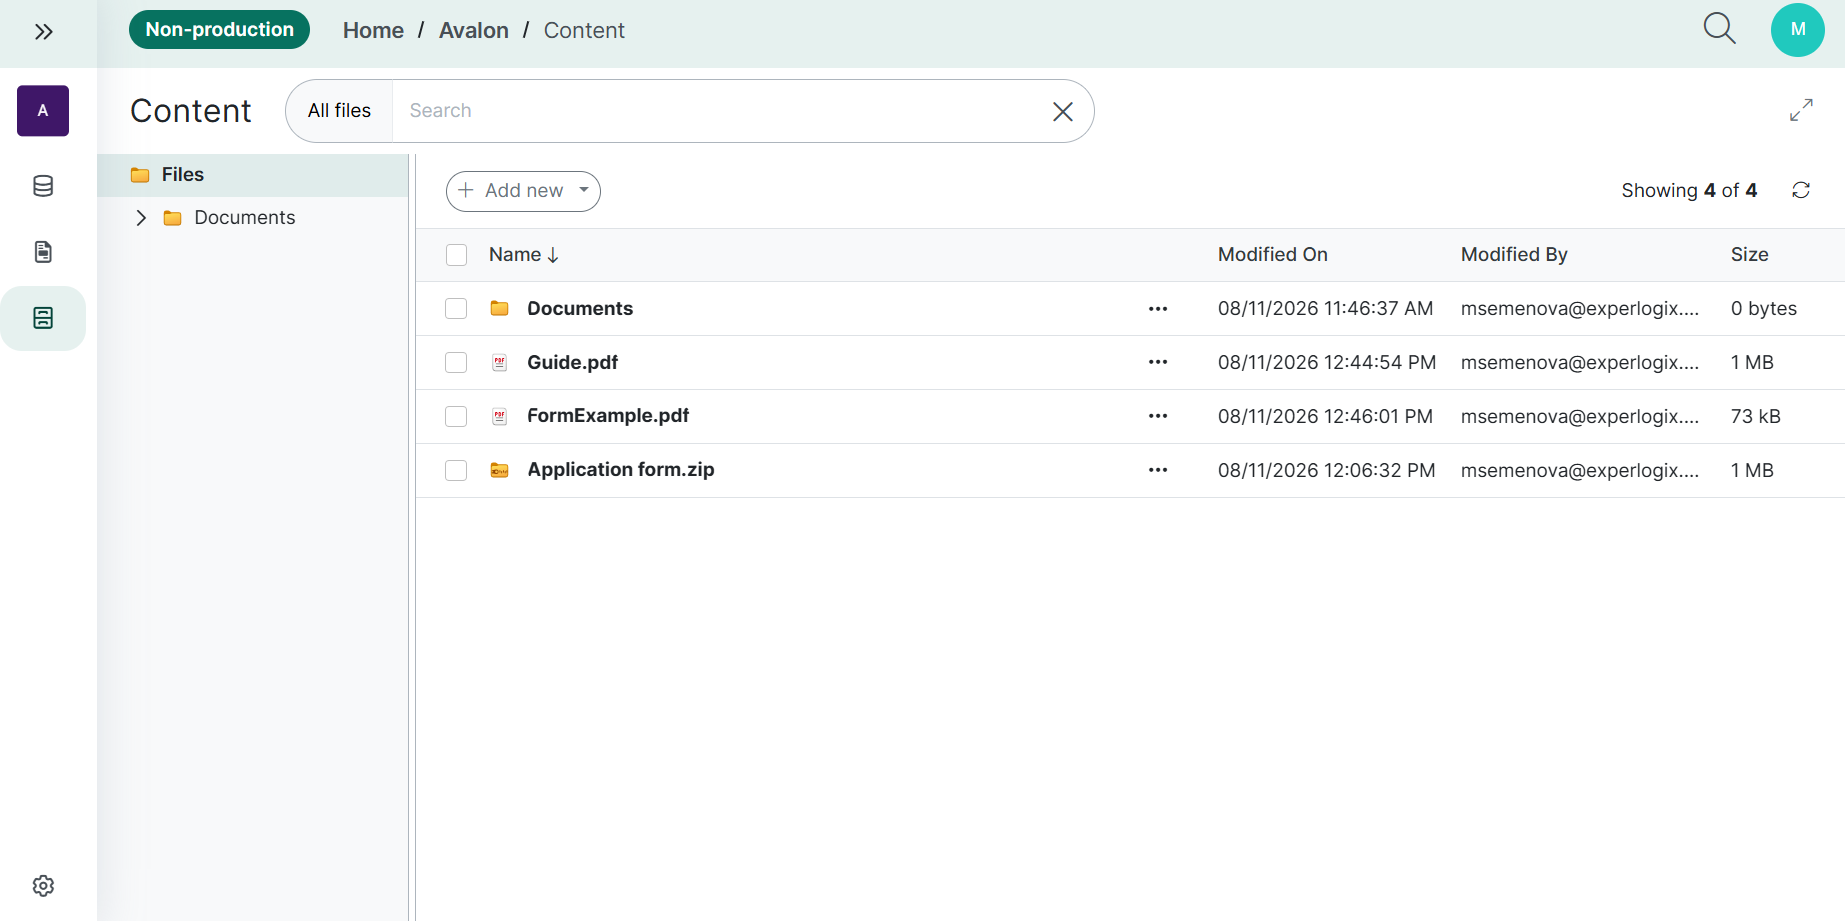
List View
The List View displays items in the active folder with the following columns. Select the column header (Name, Modified On, or Size) to toggle between ascending and descending order.
|
Column |
Description |
|---|---|
|
Name |
Displays the folder or file name with its corresponding icon. Selecting an item: Select the checkbox next to a file or folder to display the toolbar actions, such as Download, Copy, Move, and Delete. Opening an item: Click a folder name to open it and view its contents, or click a file name to open the file and view its details. |
|
Modified On |
Displays the date and time when the item was created, uploaded, or last modified. |
|
Modified By |
Displays the name of the user who performed the last modification. |
|
Size |
Displays the file size. For folders, this displays |
|
Ellipsis (...) |
Opens the action menu for managing the individual file or folder. |
Create a Folder
-
Inside Content Manager, select the Add new button to create or upload a new folder.
-
From the Add new dropdown menu, select Folder to create a new folder
-
Enter a name and select Create.
The new folder is added to the Content Manager list view.
Upload a File or Folder
-
Inside Content Manager, select the Add new button and choose to Upload File(s) or Upload Folder.
-
In the File Explorer, choose the item you want to upload from your device and select Add (for files) or Upload (for folders) to start the upload.
The uploaded item is added to the Content Manager list view.
-
Content Manager preserves the folder structure of uploaded directories.
-
Empty folders cannot be uploaded.
-
Uploading a file with the same name automatically overwrites the existing file and creates a new version in its history.
-
Uploading a folder with an existing name merges its contents into that folder.
Content Manager supports files uploads up to 10 GB.
Uploading or Moving Items via Drag & Drop
In addition to using the Add new upload button, you can upload and move files and folders using drag & drop:
-
Upload to the Current Folder: Drag files or folders from your computer and drop them anywhere onto the main list view area to upload them into your currently active folder.
-
Upload Directly into a Subfolder: Drag items from your computer and drop them onto a specific folder row in the table to upload directly into that subfolder without opening it first.
-
Move to a Subfolder: Drag a file or folder and drop it onto a target folder row in the table.
-
Bulk Move: When multiple items are selected using checkboxes, dragging any selected item moves the entire batch into the target folder row.
Open a file
Inside Content Manager, select the filename of the file you want to open. The file displays in a new tab or gets downloaded.
To open the file, you can also use the Open button located in the ellipse menu, which is available in both the Content Manager List view and the item's detail view.
How files open depends on the file type, user permissions, and organization licensing:
-
Office for the Web (Microsoft 365): If your organization has the Office for the Web integration enabled, supported files (such as
.docx,.xlsx, or.pptx) open directly in the online Microsoft viewer/editor in a new browser tab. -
Native Browser Display: File formats natively supported by your browser (such as PDF documents, standard images, and text files) open directly in a new tab.
-
Automatic Download: Files in formats not supported for browser preview download directly to your computer.
Performing Actions in the List View
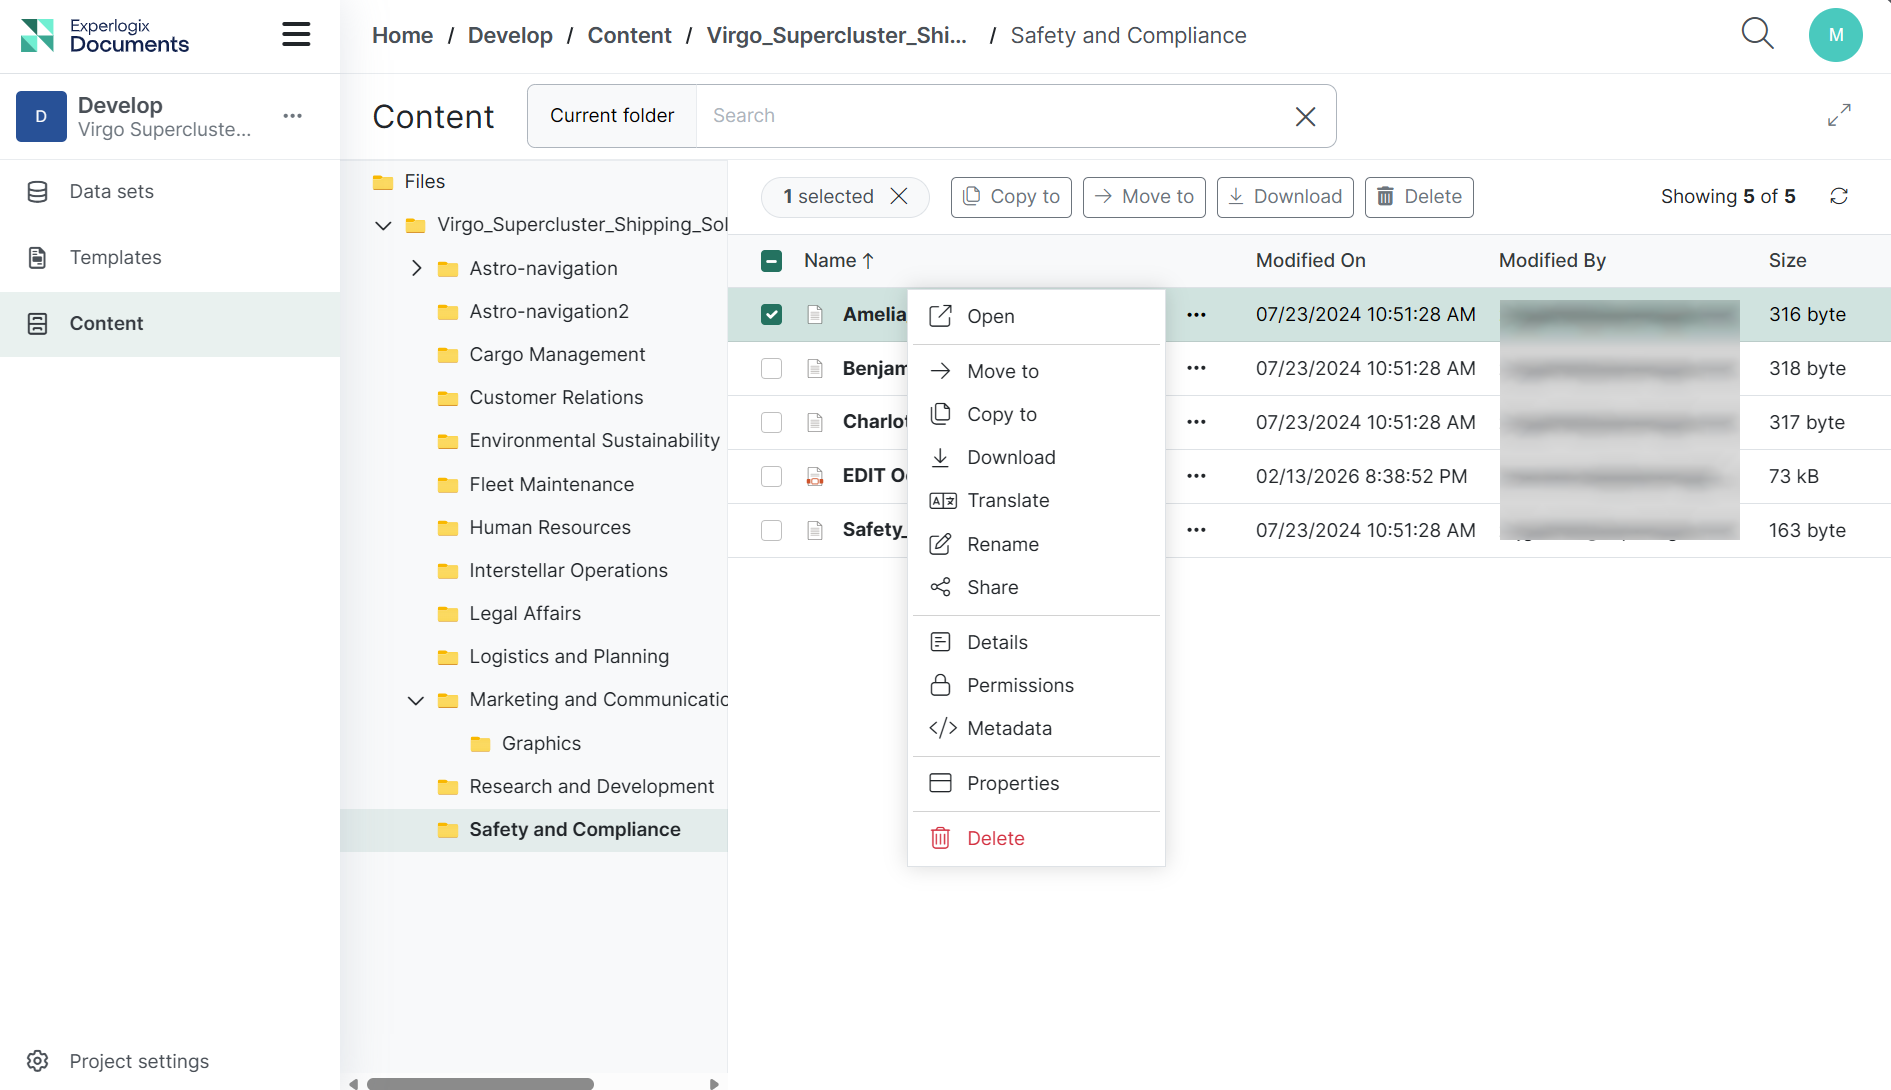
You can manage files and folders in Content Manager either individually or in bulk. Available actions can be triggered from the action toolbar above the table when one or more items are selected, or directly from the row ellipsis menu (...) next to each item.
-
Inside Content Manager, select a file/folder.
-
Select the Download/Copy/Move or Delete button above the list of items.
All these actions can also be performed using the ellipsis menu next to files or folders. This menu provides additional options such as renaming, translating, and sharing files or folders when applicable.
Available actions:
|
Action/Toolbar Button |
Description & Behavior |
Confirmation / Result |
|---|---|---|
|
Move to |
Moves the selected items to a target folder chosen from the folder tree modal, or to a new folder (Create new folder). Name Conflict Handling: If an item with the identical name already exists in the destination folder, the operation fails with a duplicate name error. |
A notification confirms that the items were moved. |
|
Copy to |
Copies the selected items to a target folder chosen from the folder tree modal, or to a new folder (Create new folder) Name Conflict Handling:
|
A notification confirms that the items were copied. |
|
Download |
Downloads selected files or folders. Single files download directly. Multiple files or folders are automatically packaged into a ZIP archive named |
Download starts immediately without an extra confirmation prompt. |
|
Delete |
Permanently deletes the selected items after confirmation. |
A modal dialog prompts for confirmation before items are deleted. |
Bulk Actions in Content Manager
Within Content Manager, you can select single or multiple files and folders to perform bulk operations efficiently. When one or more items are selected, the action toolbar above the list view dynamically displays the available actions.
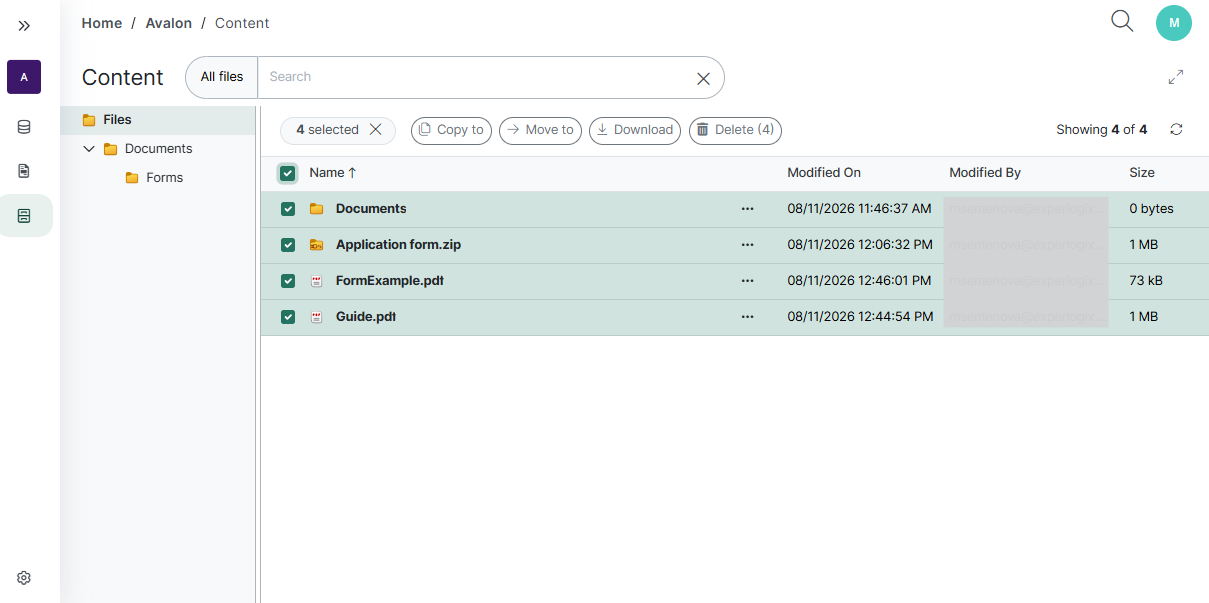
To perform bulk actions:
-
In the Content Manager list view, select the checkboxes next to the files or folders you want to manage (or select the checkbox in the table header to select all visible items).
-
Select the required action button in the bulk management toolbar.
Download Files and Folders
You can download files and folders directly to your local device from the list view action toolbar or the row ellipsis menu (...):
-
In the list view, select one or more items you want to download.
-
Select Download button above the list.
-
Single File: Downloads directly in its native file format.
-
Single Folder: Downloads as a compressed ZIP archive named
<FolderName>.zip, preserving the folder structure. -
Multiple Files/Folders (Bulk Download): When multiple items are selected via checkboxes, they are packaged into a single ZIP archive named
Content_<Timestamp>.zip.
Deleting Files and Folders
You can delete a single file or folder, or delete multiple files and folders at once. Deleting a folder also removes all of its subfolders and files.
Deleted files and folders cannot be restored. This action cannot be undone.
Deleting a Single File or Folder
-
In the List View, select the ellipsis button (...) on the file or folder row.
-
Select Delete.
-
In the confirmation dialog ("Are you sure you want to delete this item?"), select Delete to confirm, or Cancel to cancel.
A notification confirms: "Item deleted."
Deleting Multiple Files and Folders (Bulk Deletion)
-
In the List View, select the checkboxes next to the files and folders you want to delete.
-
In the bulk action toolbar above the table, select Delete.
-
In the confirmation dialog ("Are you sure you want to delete these items?"), select Delete to confirm.
-
Deleting requires Delete permission on the selected items. If you lack this permission for some of them, a warning lists those items. If you lack it for all of them, the Delete button is unavailable.
Properties Panel
The Properties side panel allows you to quickly preview metadata, edit descriptions, and track recent activity without navigating away from the list view. Selecting different files or folders in the table dynamically updates the side panel.
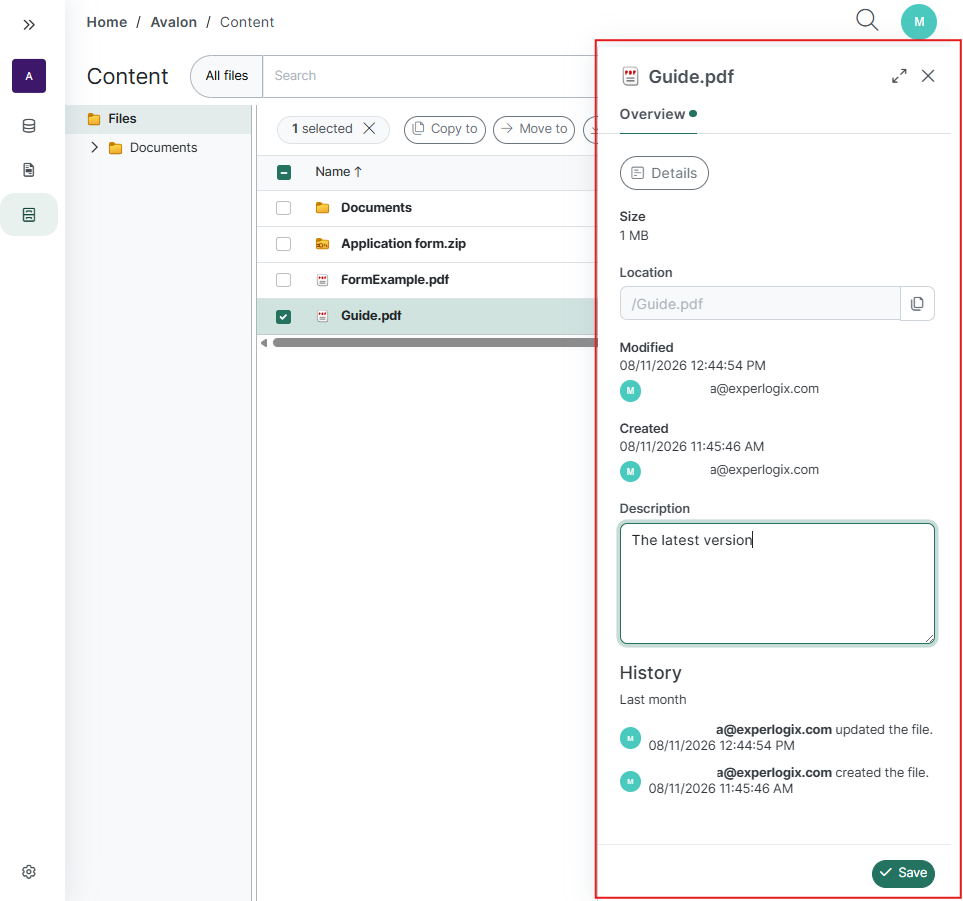
Accessing the Properties Panel
-
In the Content Manager list view, select the ellipsis button (...) next to a file or folder.
-
Select Properties.
What You Can Do in the Properties Panel
-
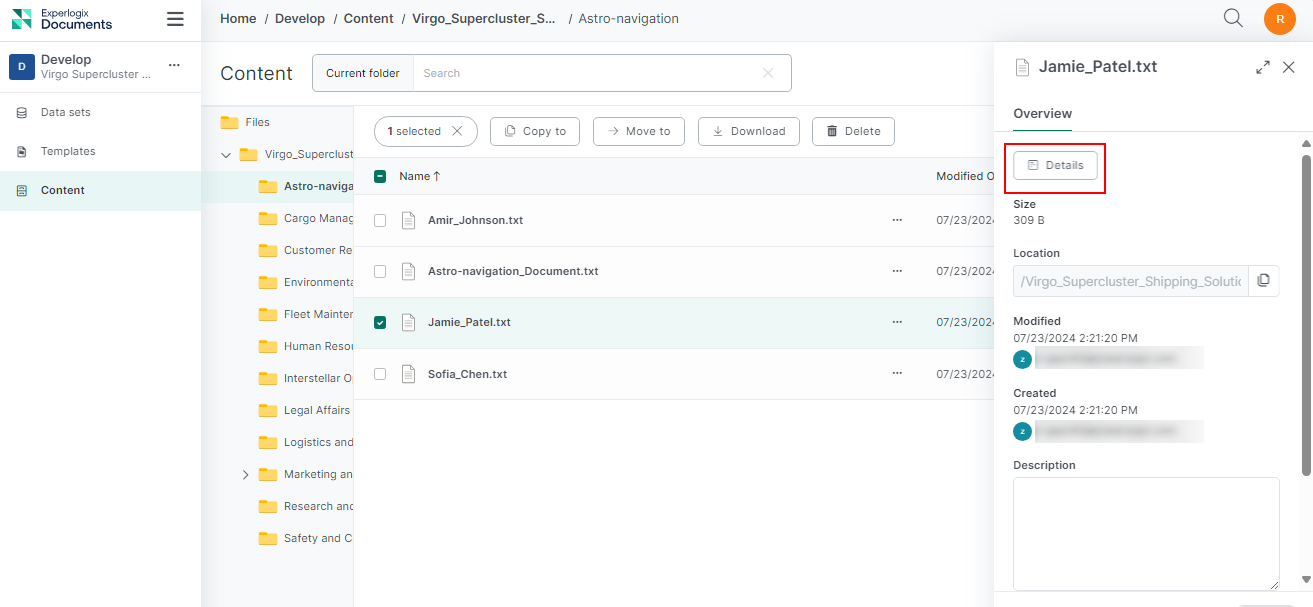
Overview: View the file or folder name, size (displays "0 B" if empty), storage location path, creation date, and last modified date. Users with write permissions can edit the Description field directly and select Save.
-
Activity: View a chronological summary log of recent actions (creation, modifications, copies, and moves).
-
Navigate to Full Details: Select Details in the panel to open the dedicated full-screen Details page for in-depth management.
Note: Viewing properties and activity requires Read permission. Modifying the description requires Write permission.
AI-Powered Content Translation
Translations enable users to translate files stored in the Content Manager using AI. Users can obtain a translated version of a file and view it either by downloading or viewing it in the browser. This enhances usability by providing seamless translation capabilities for organizations working with documents in multiple languages. Experlogix Documents AI Assistant handles these translations.
Experlogix uses AI to translate, so mistakes are possible. Always review the translated file before using it.
Translation is available for files in supported document formats. The Translate option appears only for files in a supported format.
To translate a file:
-
Select a file in the Content Manager List view.
-
Select the ellipsis button.
-
Select Translate.
-
From the Language dropdown menu, select the desired language for translation.
Note: Make sure your browser allows pop-ups for Experlogix Documents. Otherwise, the translated file cannot be opened or downloaded.
-
Select Translate & open to view the translated file in the browser, or select the arrow next to it and choose Translate & download to download it for offline access. Depending on your selection, the translated file will open in a new browser tab or be downloaded offline.
Each translation consumes Document Processing Units (DPUs). For details, see Organization License.
Whether the translated file opens in the browser depends on the file type and your browser capabilities. If the browser cannot open the file, it will be downloaded instead.
Search Functionality
The Content Manager provides a search box to find files and folders.
By default, the search covers All files. Users can narrow the search to a specific folder by navigating to that folder before searching. The active search scope remains visible during the search.
Search matches file and folder names and descriptions, supports partial matches, and is not case-sensitive, providing a user-friendly experience. The search result is displayed in a List view, showcasing a different set of details, including:
-
Name
-
Location
-
Modified by
-
Modified on
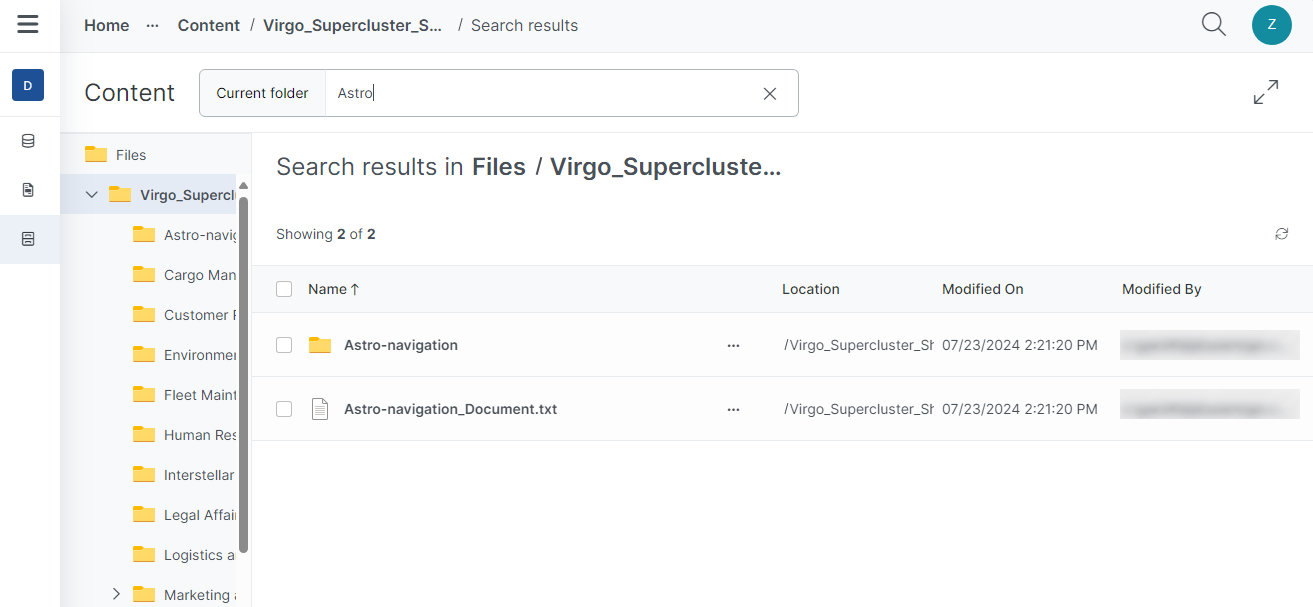
To clear the search and return to the Content Manager, remove the text from the search box or select X. You can also navigate to a folder using the tree view in the left pane.
To rerun your search, select the refresh icon at the top-right corner of the search result List view.
Accessing the Details View inside the Content Manager
-
Inside Content Manager, navigate to the folder that contains the file you want to view details for.
-
On the file/folder for which you want to view details, select the ellipsis button.
You can also navigate to the Content Manager Details Page from the Properties Pane.
Next Steps
To learn how to manage the properties, metadata, shares, history, and permissions of individual files and folders, see Content Manager Details Page