
The PDF Template Designer streamlines document automation by allowing users to upload and reuse existing PDF documents to create templates, significantly reducing the time and effort needed to build documents from scratch.
-
Create a PDF Template: Upload a PDF document and open it as a template within the PDF designer interface.
-
Design a PDF Template: Map PDF fields to corresponding data set fields, and add logic to your PDF template.
Create PDF Templates
In Experlogix Documents, PDF templates are created from AcroForms or static XFA PDF files uploaded into the system.
Field Mapping Compatibility
Supported field types:
-
Check boxes
-
Combo boxes
-
Dates
-
List boxes
-
Numbers
-
Radio buttons
-
Rich texts
-
Texts
The following field types are not yet supported for mapping:
-
Bar codes
-
Buttons
-
Untyped fields
-
Files
-
Passwords
-
Signatures
-
Images
Create a PDF Template
Use the following steps to create your PDF template:
-
In the Templates section, select Add New, then Fillable PDF Template from the dropdown menu.
-
Upload a PDF document.
The uploaded file must meet the following requirements:
-
PDF AcroForm or static XFA format
-
Maximum file size: 200 MB
-
Not password-protected
-
Select Template Language (for more information, see Template Languages). If only one language is available, the system will not prompt the user to select a language.
-
Choose one or more Data Sets
-
Add a Description.
-
Select Create.
-
At the Create PDF Template step, only the Template Name is mandatory; the PDF document, data set(s), and language(s) can be added later.
-
When you click Create, if a PDF document has been uploaded, you'll be directed to the Design screen; otherwise, the Template Edit view will open.
Design PDF Templates
You can map fields and add logic to your PDF template in the Design screen. Mapping is the process of binding individual fields in a PDF template to specific data fields in a data source, such as a Form field or an XML node. This allows the generated document to be dynamically populated with data-driven values.
Mapping is the process of binding individual fields in a PDF template to specific data fields in a data source, such as a Form field or an XML node.
This allows the generated document to be dynamically populated with data-driven values.
Users can access the Design screen in two ways:
For a new template:
Upload your PDF document in the Templates view and get directed to the Design screen.
For an existing template:
-
In the Templates View, select the template you want to design.
-
Select the Actions menu (⋯) on the right and select Design from the dropdown.
-
Choose the Template language (for more information, see Template Languages).
-
Select Design.
or
Access the Design screen within the Template Edit view by selecting the Design button.
Design Screen
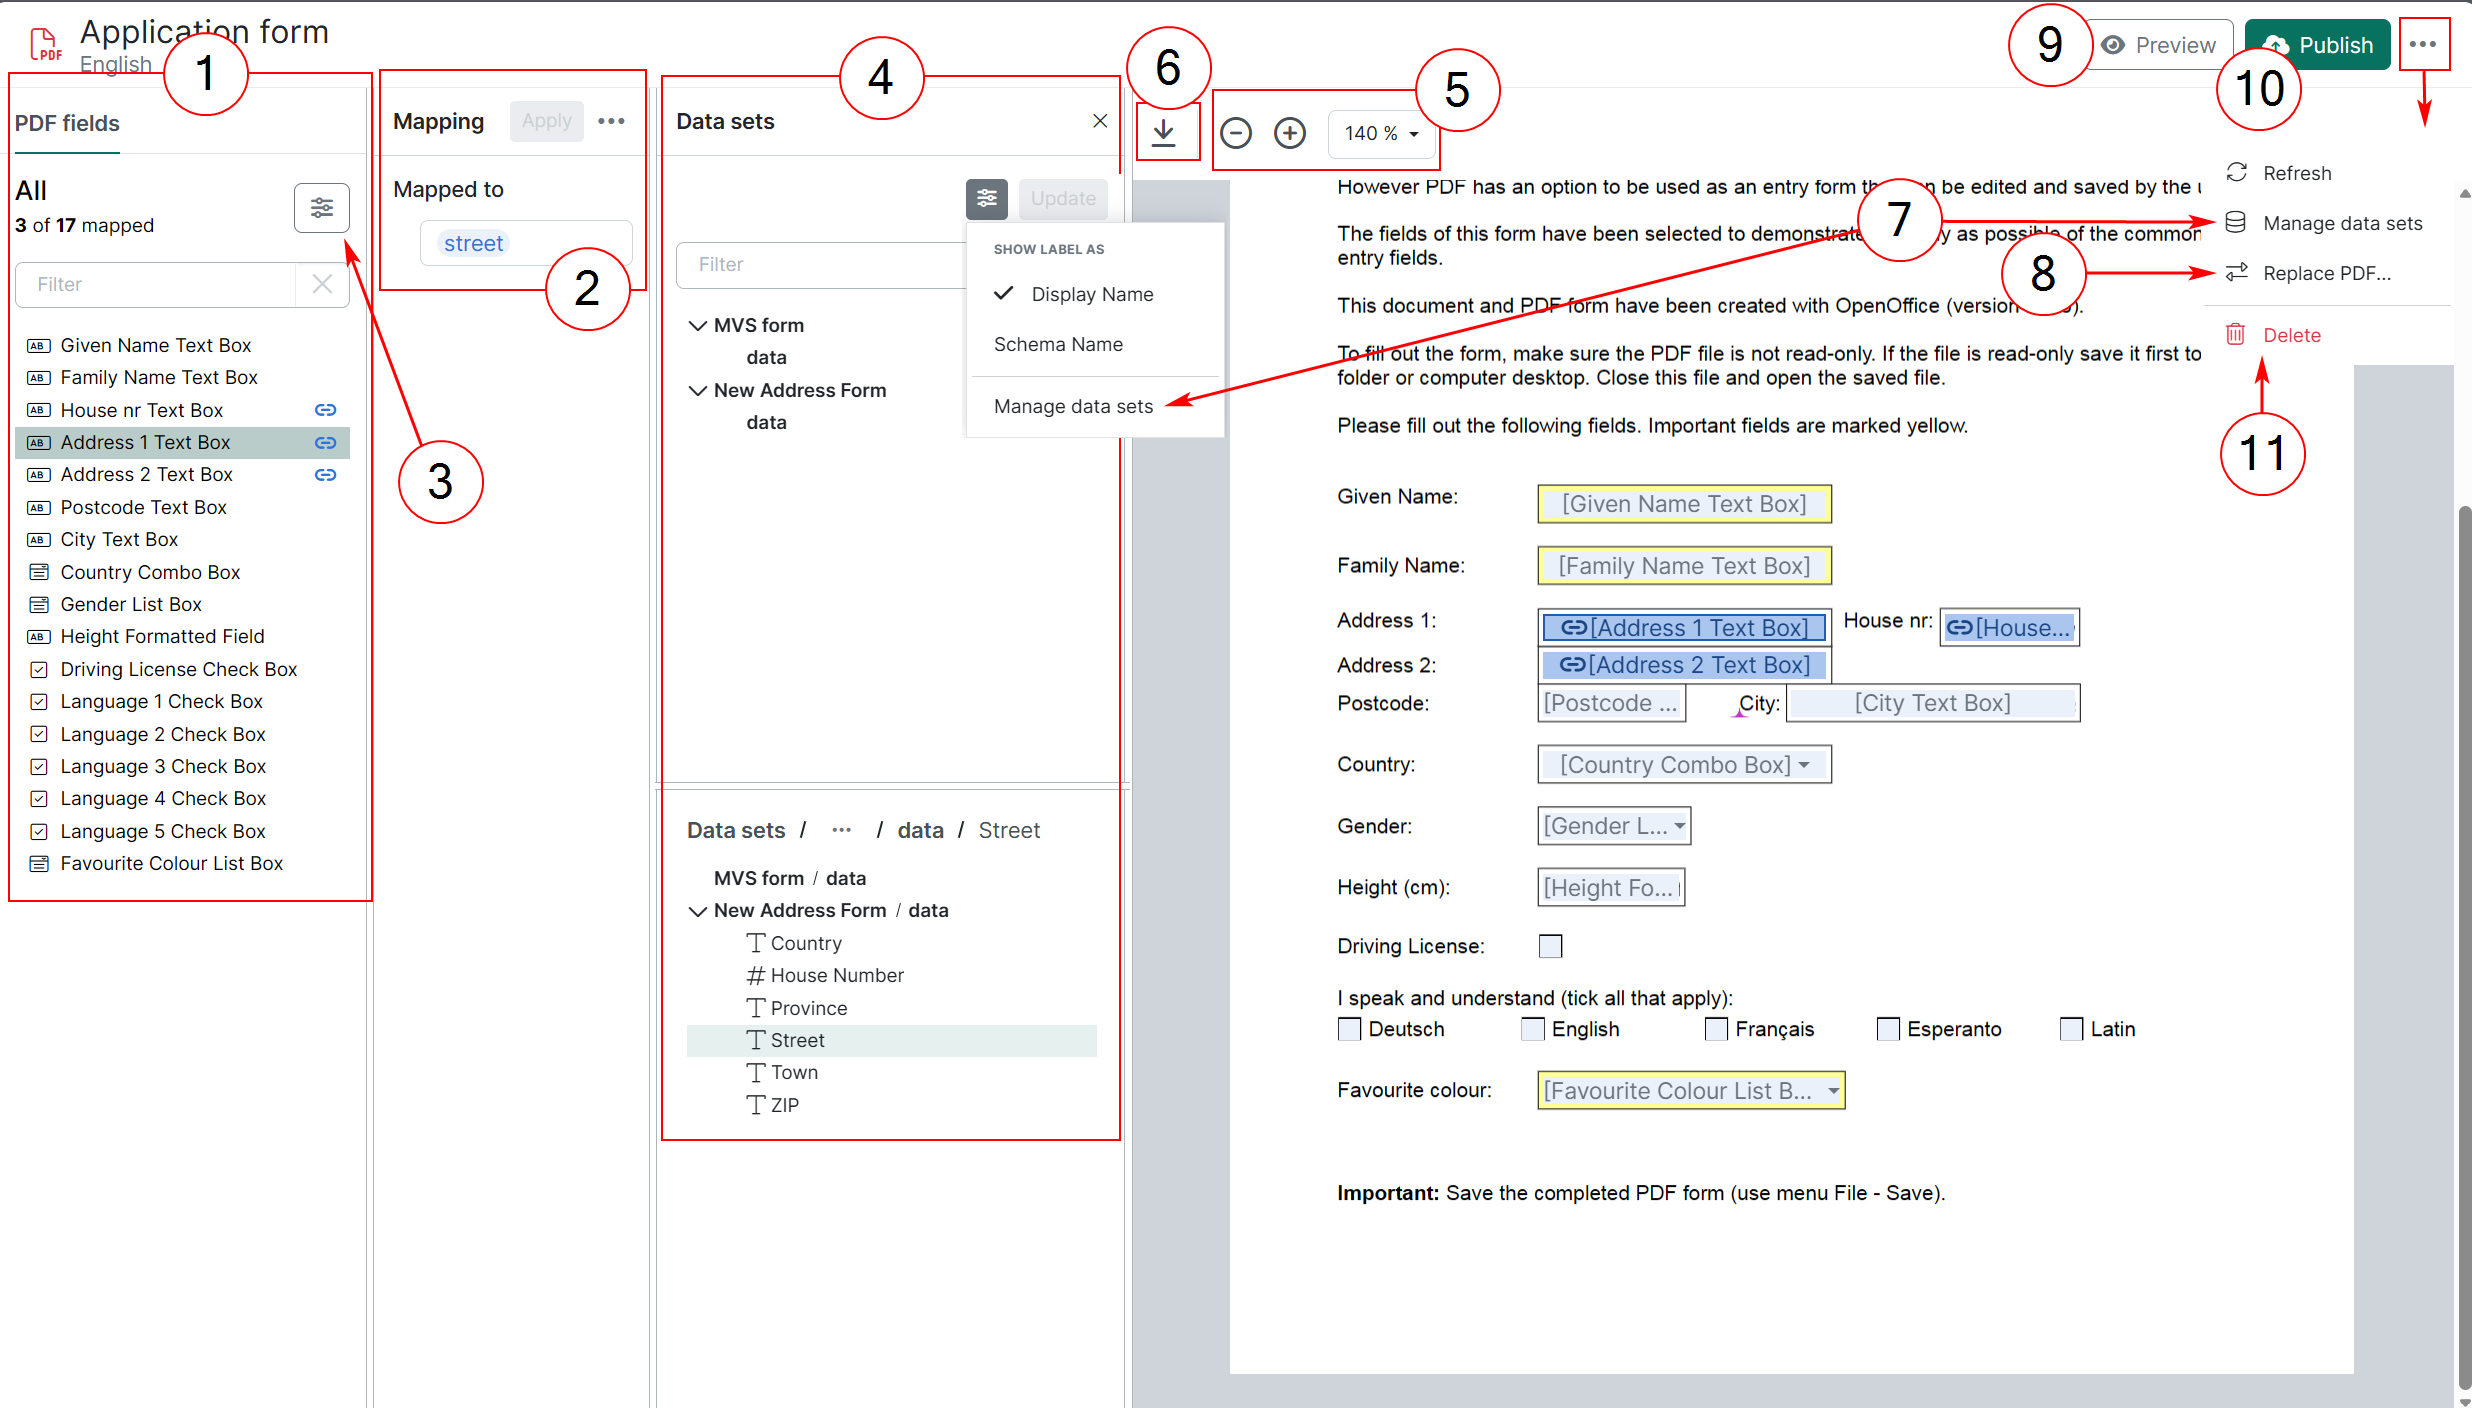
The Design screen allows you to:
-
Map your data into template fields: Link fields from your data set(s) to the relevant template fields.
-
Edit or format mappings: Update PDF fields mappings by linking them to different data set fields. Change mapping’s format.
-
View template fields: Use the filter to display all fields (default), mapped fields, or unmapped fields, and choose whether to sort the PDF fields alphabetically or by their document order. Refer to Field Mapping Compatibility for supported and unsupported field types.
-
View data sets: Filter data set fields by names, and choose to show either display or schema names.
-
Zoom In or Out: Use the zoom controls in the toolbar at the top of the PDF viewer (–, +, or percentage dropdown) to adjust the template scale.
-
Download template: Access the PDF document offline.
-
Manage data sets: Add, or remove data sets used in your template.
-
Replace PDF document: Replace the current document in the Design screen by selecting Replace PDF from the ellipsis menu and uploading a new PDF document.
-
Preview template: Preview Mapping calculates mappings and displays the final output using sample data.
-
Publish template: Publish the changes made to your template.
-
Delete: This action will delete the PDF template language variant. Select the ellipsis menu (⋯) in the top right corner, and select Delete language variant from the list.
Deleting a language variant removes only the template for that variant, not the language itself.
Removing a template language variant is permanent and cannot be undone.
Mappings
Users map PDF fields to corresponding data set fields, enabling the template to retrieve the necessary data during document generation.
Create Mappings
Open your PDF template in the Design Screen.
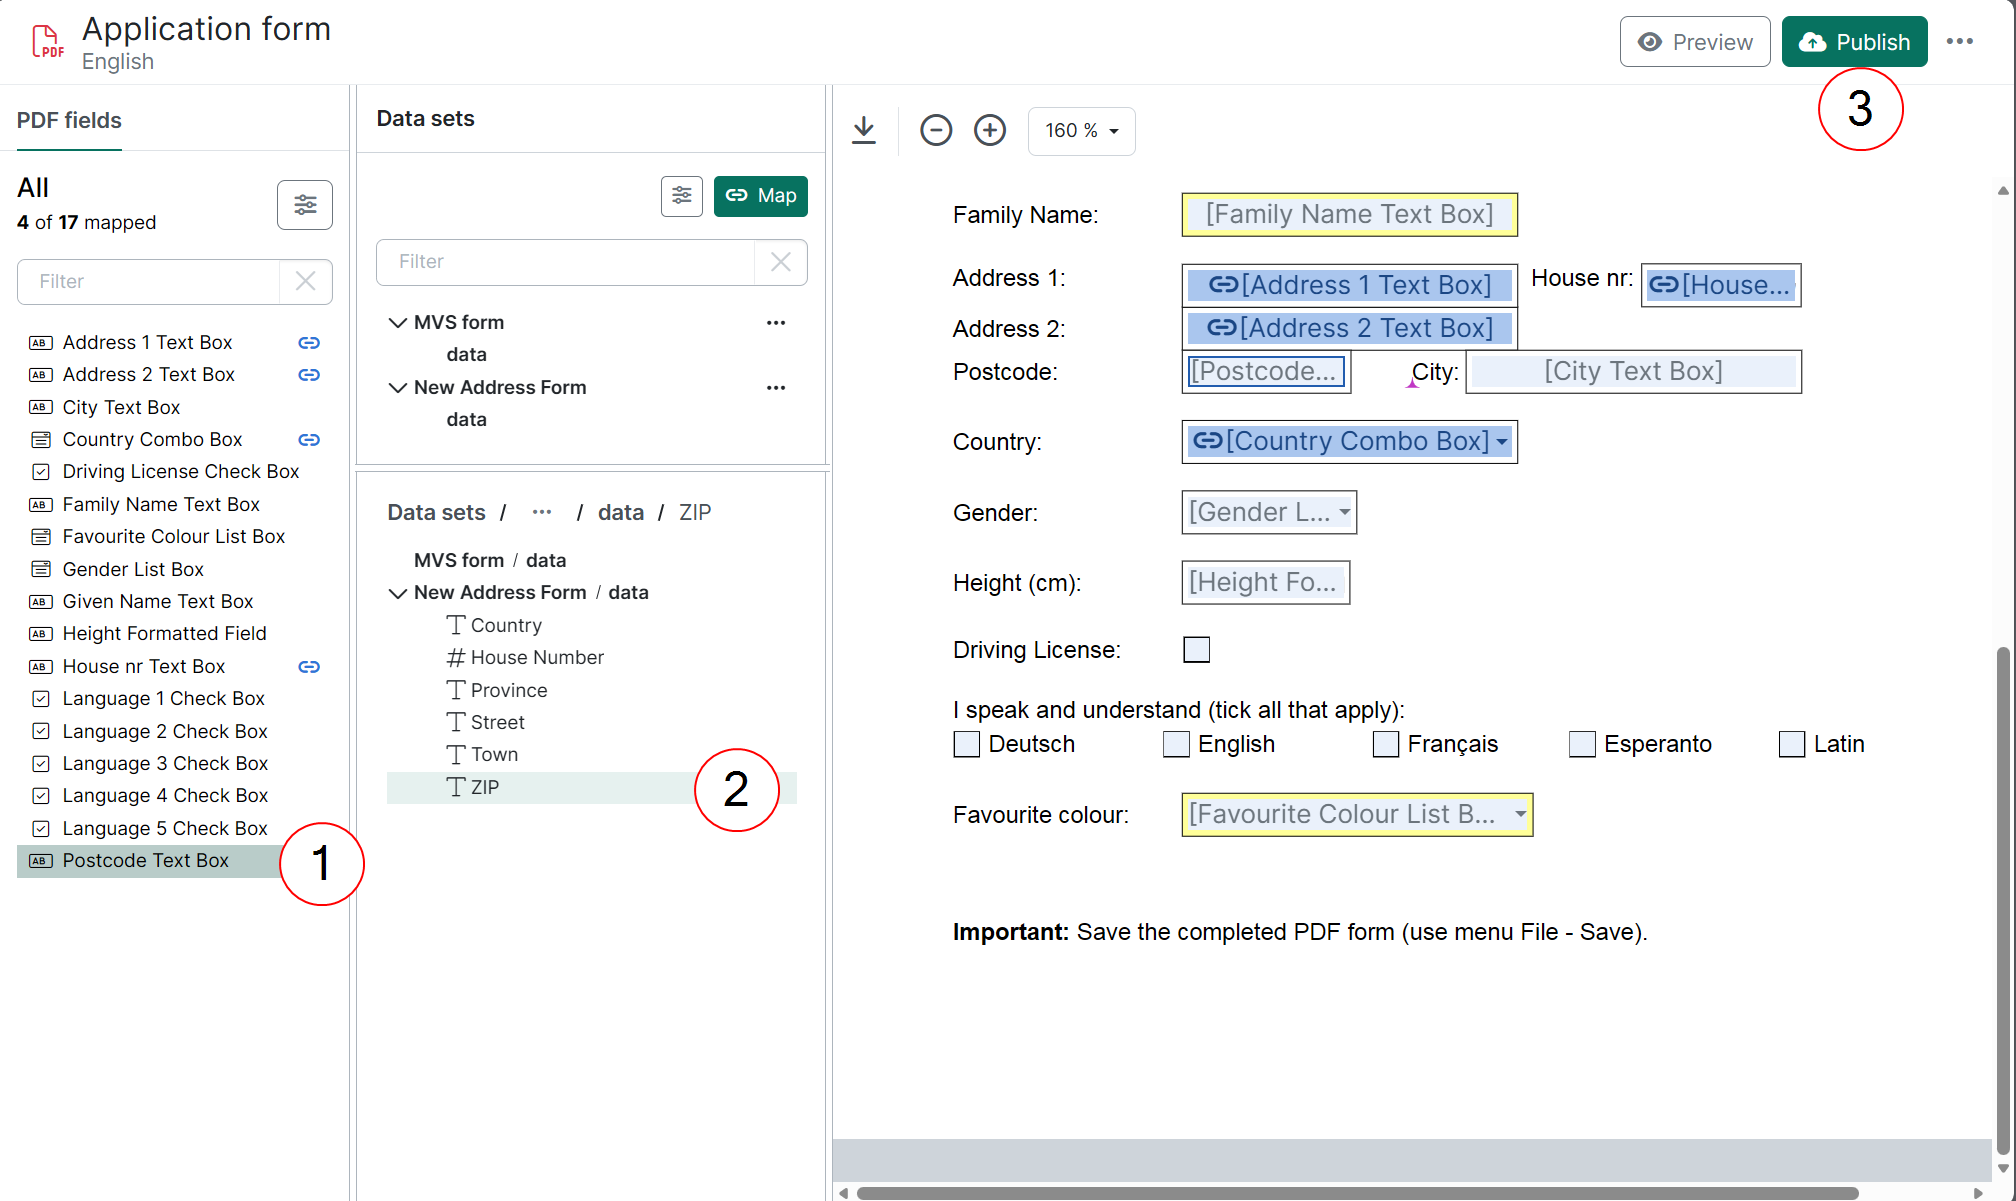
If one or more data sets are associated with the template, the data sets view opens automatically when the user selects a PDF field.
-
Select the target PDF field for data mapping — either from the list of available PDF fields or directly within the PDF document.
-
Select a data set field from the available data set(s): browse or filter the data set(s) to find the desired field.
-
Create the mapping by double-clicking the data set field or by using the Map button.
If a PDF field appears multiple times in the document, the same mapping is automatically applied to all of its occurrences.
Read-only fields cannot be mapped.
Expression Mappings
An expression is a combination of functions, fields, operators, and values used to calculate and produce a result. By supporting Power Fx alongside standard field-to-field mapping, Experlogix Documents empowers you to create more dynamic and customized data outputs. For instance, you can seamlessly concatenate text fields like merging a first and last name, apply conditional logic to display dynamic order statuses, or perform real-time mathematical calculations directly within your data fields.
Expressions are essential for scenarios that require more than just data transfer:
-
Calculated Values: Define values that aren't present in your data set.
-
Data Manipulation: Transform existing values, such as changing text formatting or performing calculations..
-
Complex Logic: Create advanced conditions that go beyond standard mapping capabilities.
Experlogix documents uses the standard Power Fx expression engine. For a complete list of supported functions and syntax examples, you can refer to the official Microsoft Power Fx formula reference.
Use Case: Merging Fields
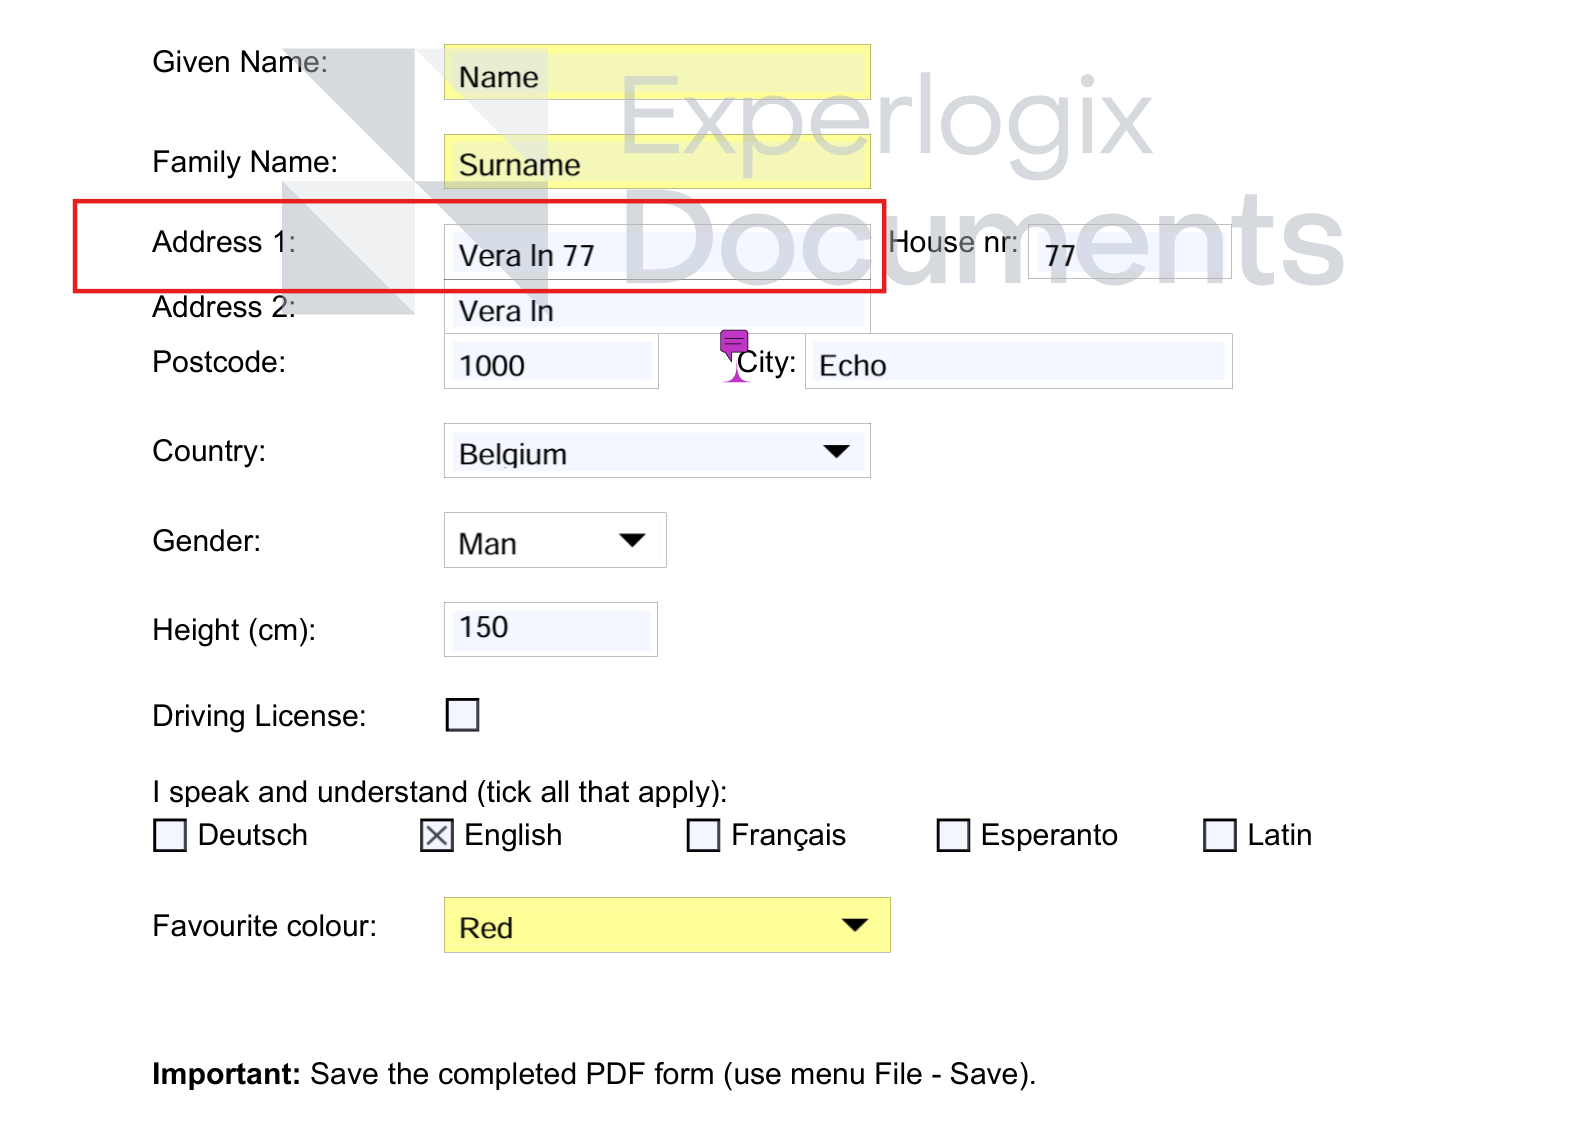
A user needs to combine the Street and House Number field values into a single Address 1 field. To do this, they create an expression mapping and use the following concatenation formula:
Concatenate(New_Contact_Form.street, " ", New_Contact_Form.houseNumber)
The result: The PDF automatically merges both values into one seamless line, ensuring the address is formatted perfectly without any manual data changes.
Create a New Expression Mapping
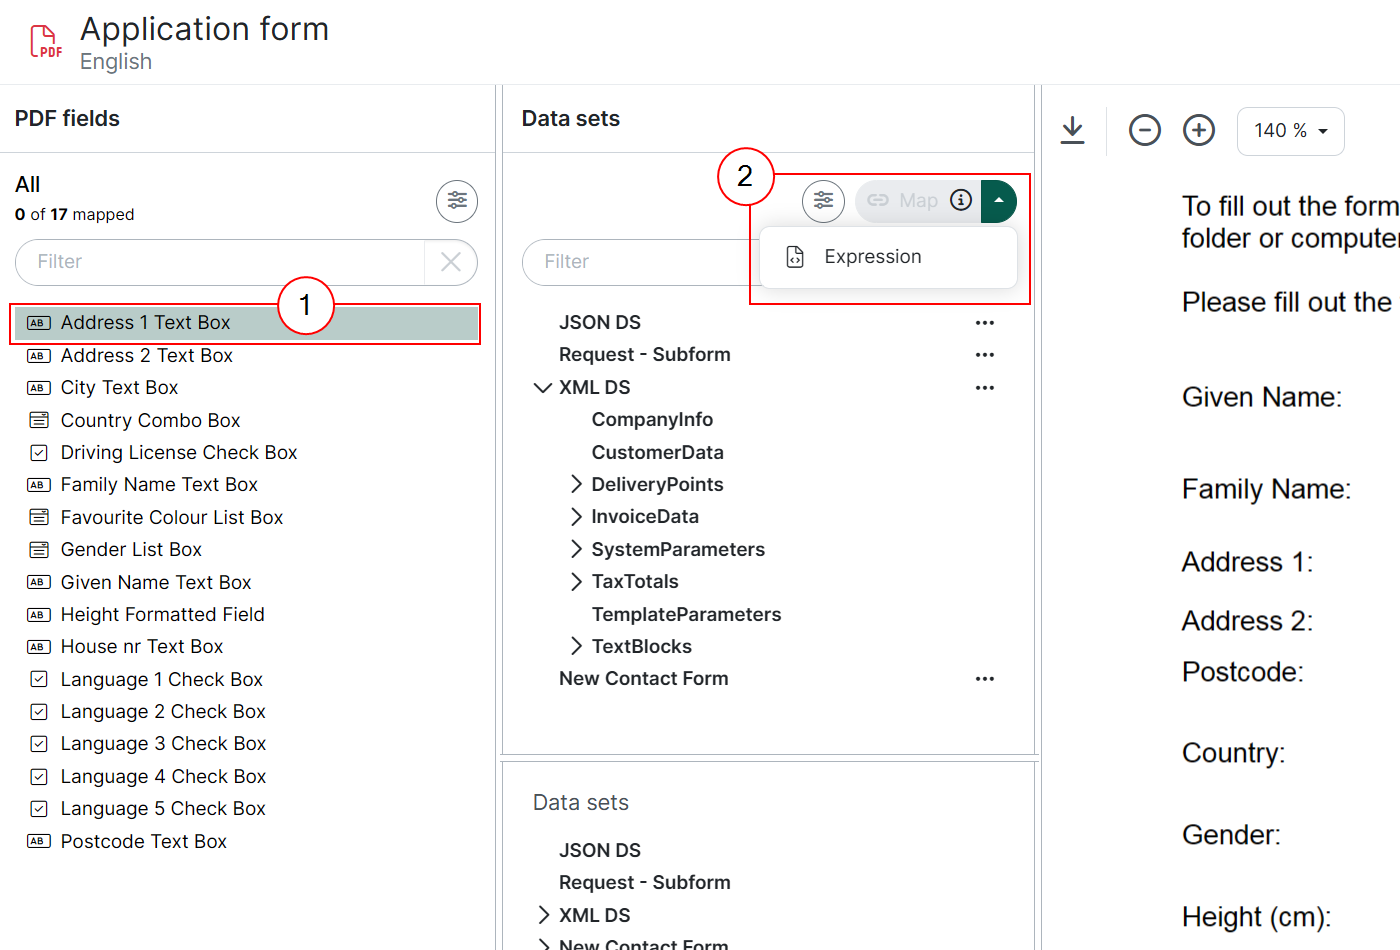
To create a new expression mapping:
-
Locate the PDF field you wish to map.
-
In the Data Set panel, select the arrow next to the Map button to open the dropdown menu and select Expression.
The edit Mapping panel opens, showing the expression Build editor.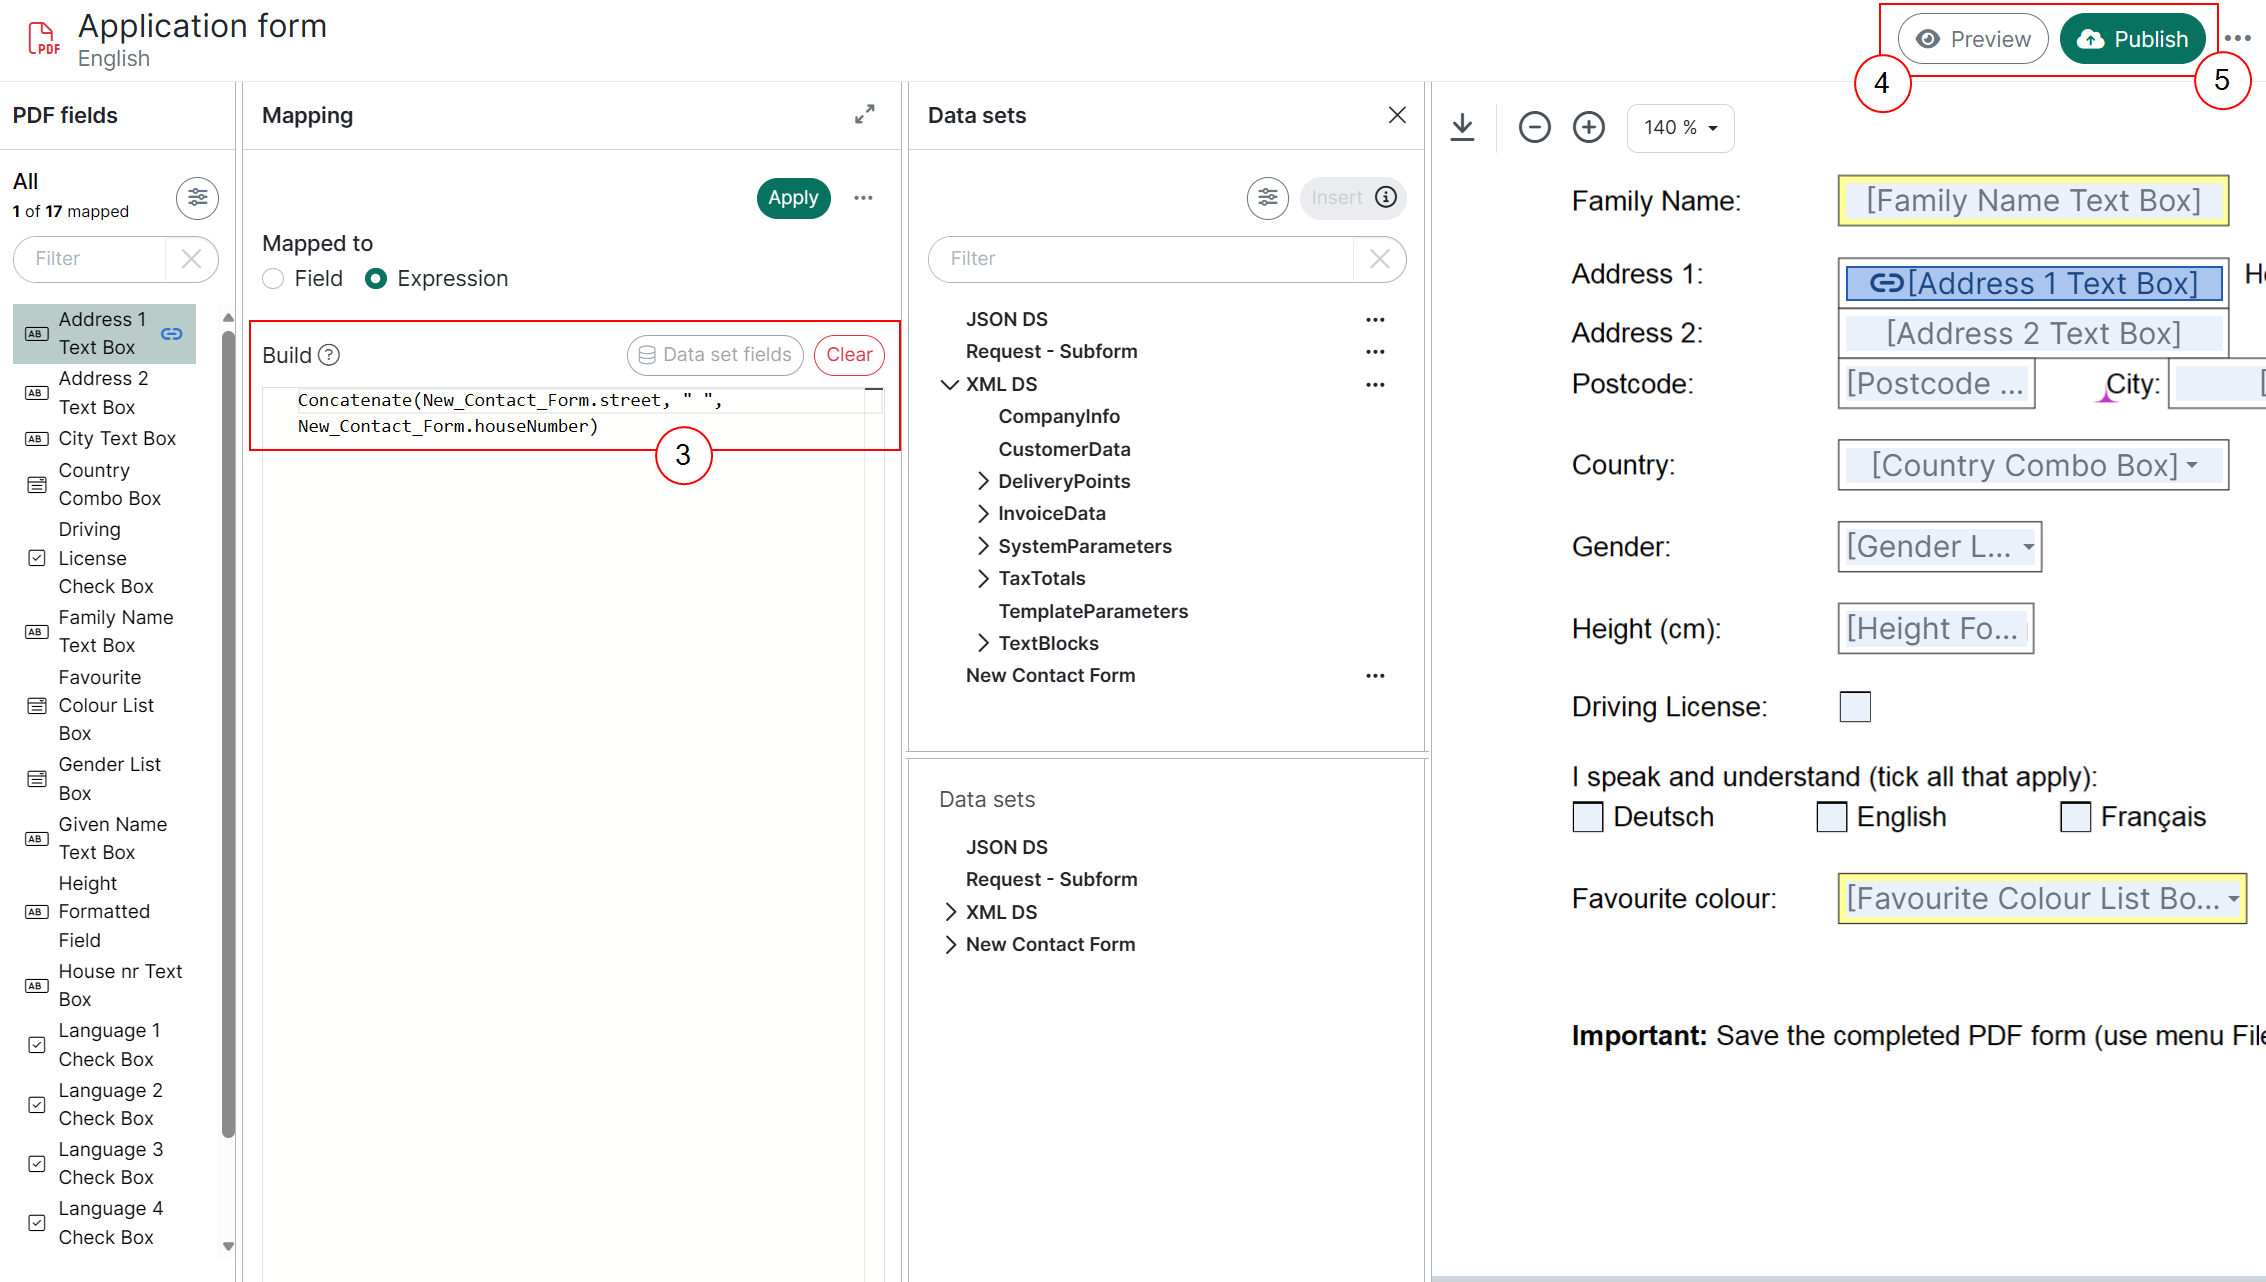
-
Enter a Power Fx expression in the editor and select Apply.
You can enter field names manually or simply double-click a field in the Data Set view to insert it into your expression.
-
Preview your template using an available Sample to ensure the changes are applied correctly.
-
Publish to save the changes.
The system allows you to create, read, update, and delete (CRUD) expression mappings just as a field mappings.
Convert a Field Mapping to an Expression
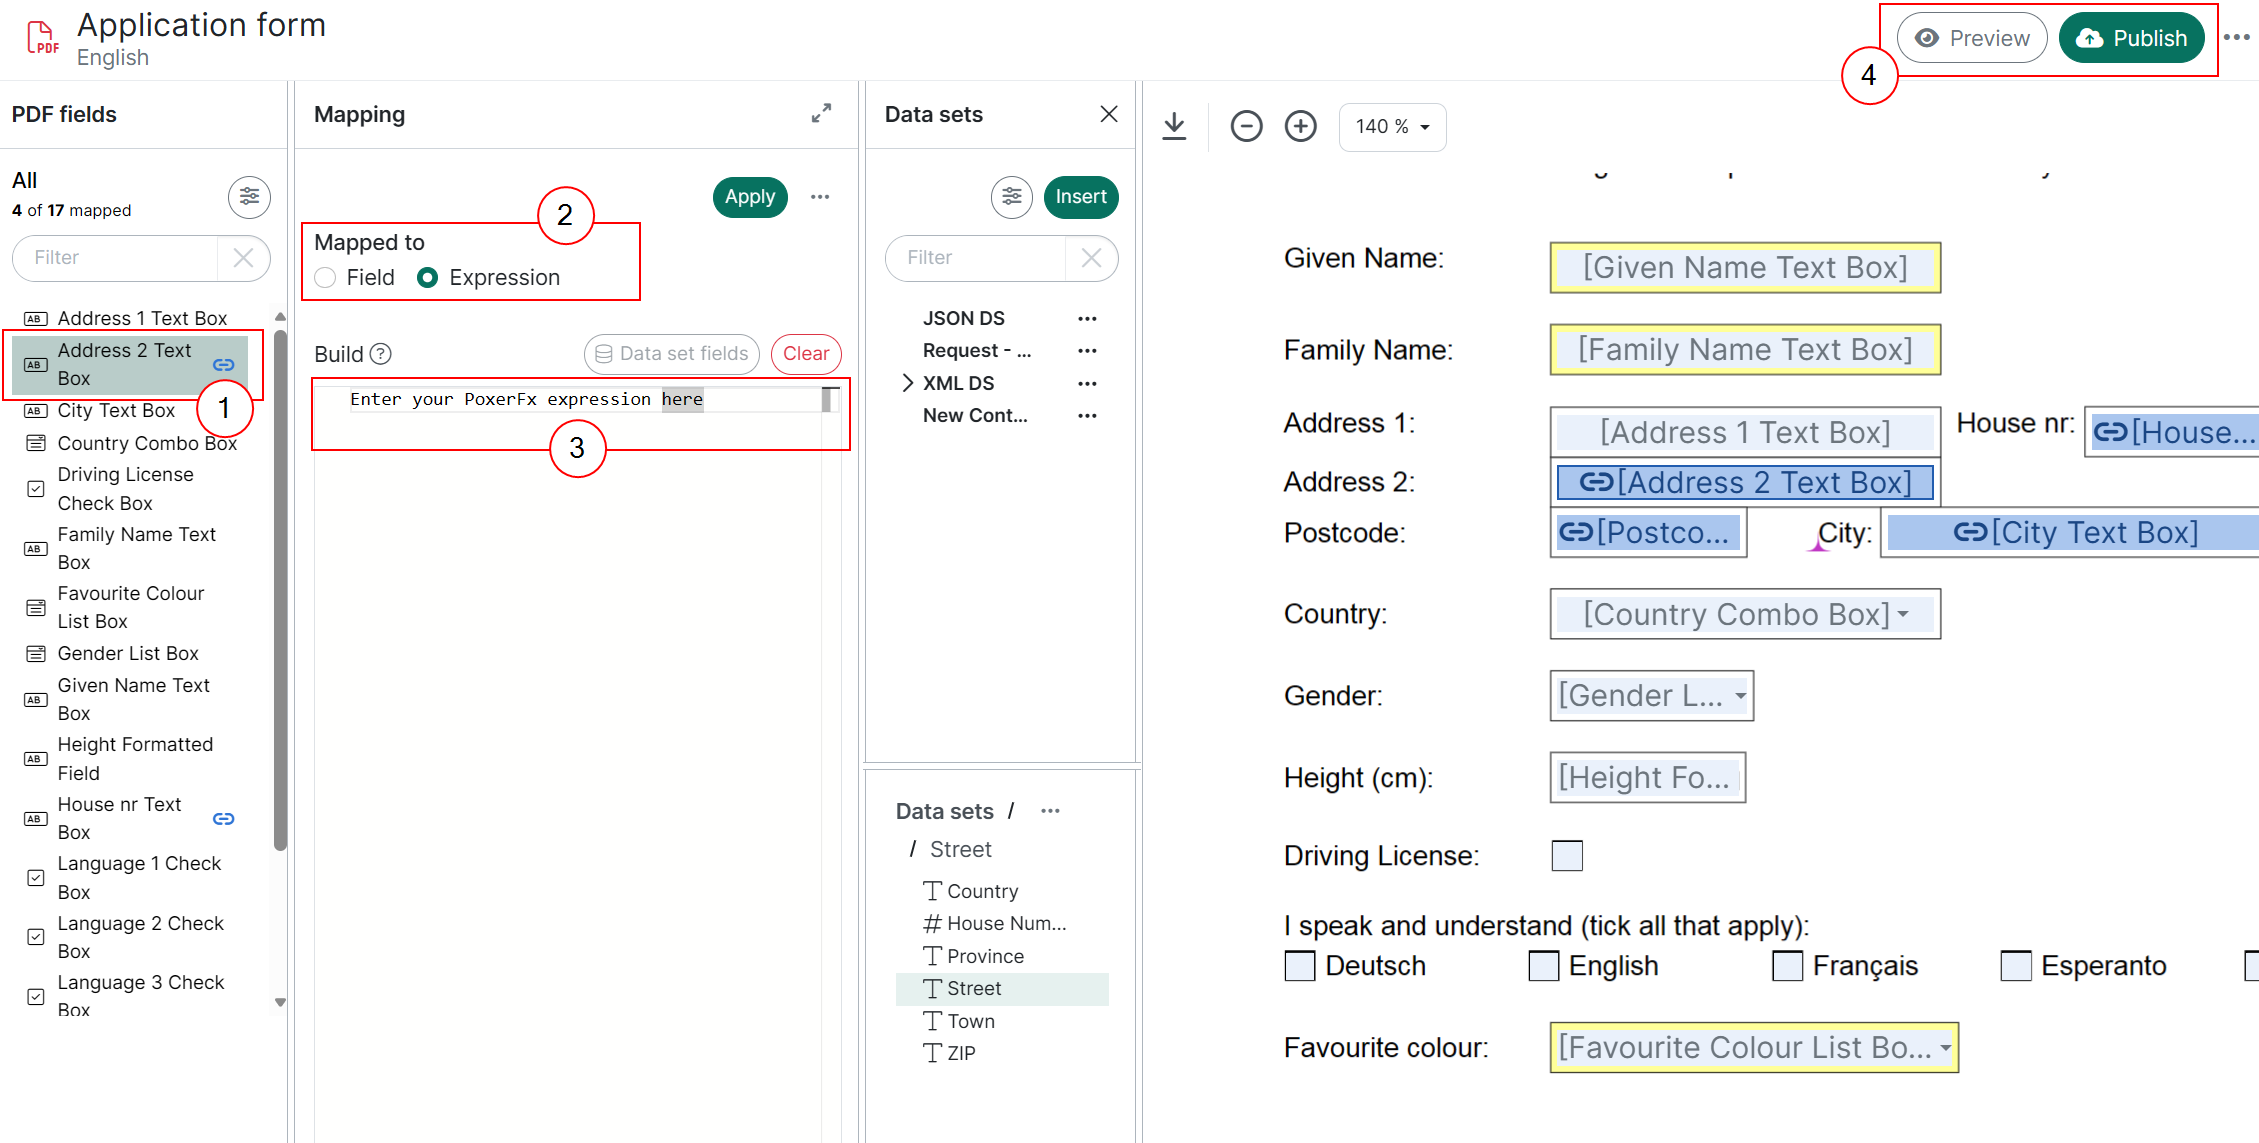
You can update the mapping type at any time by switching between Field and Expression types:
-
Select the mapping.
-
In the Mapping edit view > Mapped to, use the radio buttons to switch from Field (default) to Expression.
-
Enter your Power Fx expression in the editor and select Apply.
-
Preview and Publish.
View Mappings
Once the mapping is successful, the mapping icon appears next to the mapped PDF field, indicating that the field has been successfully linked.
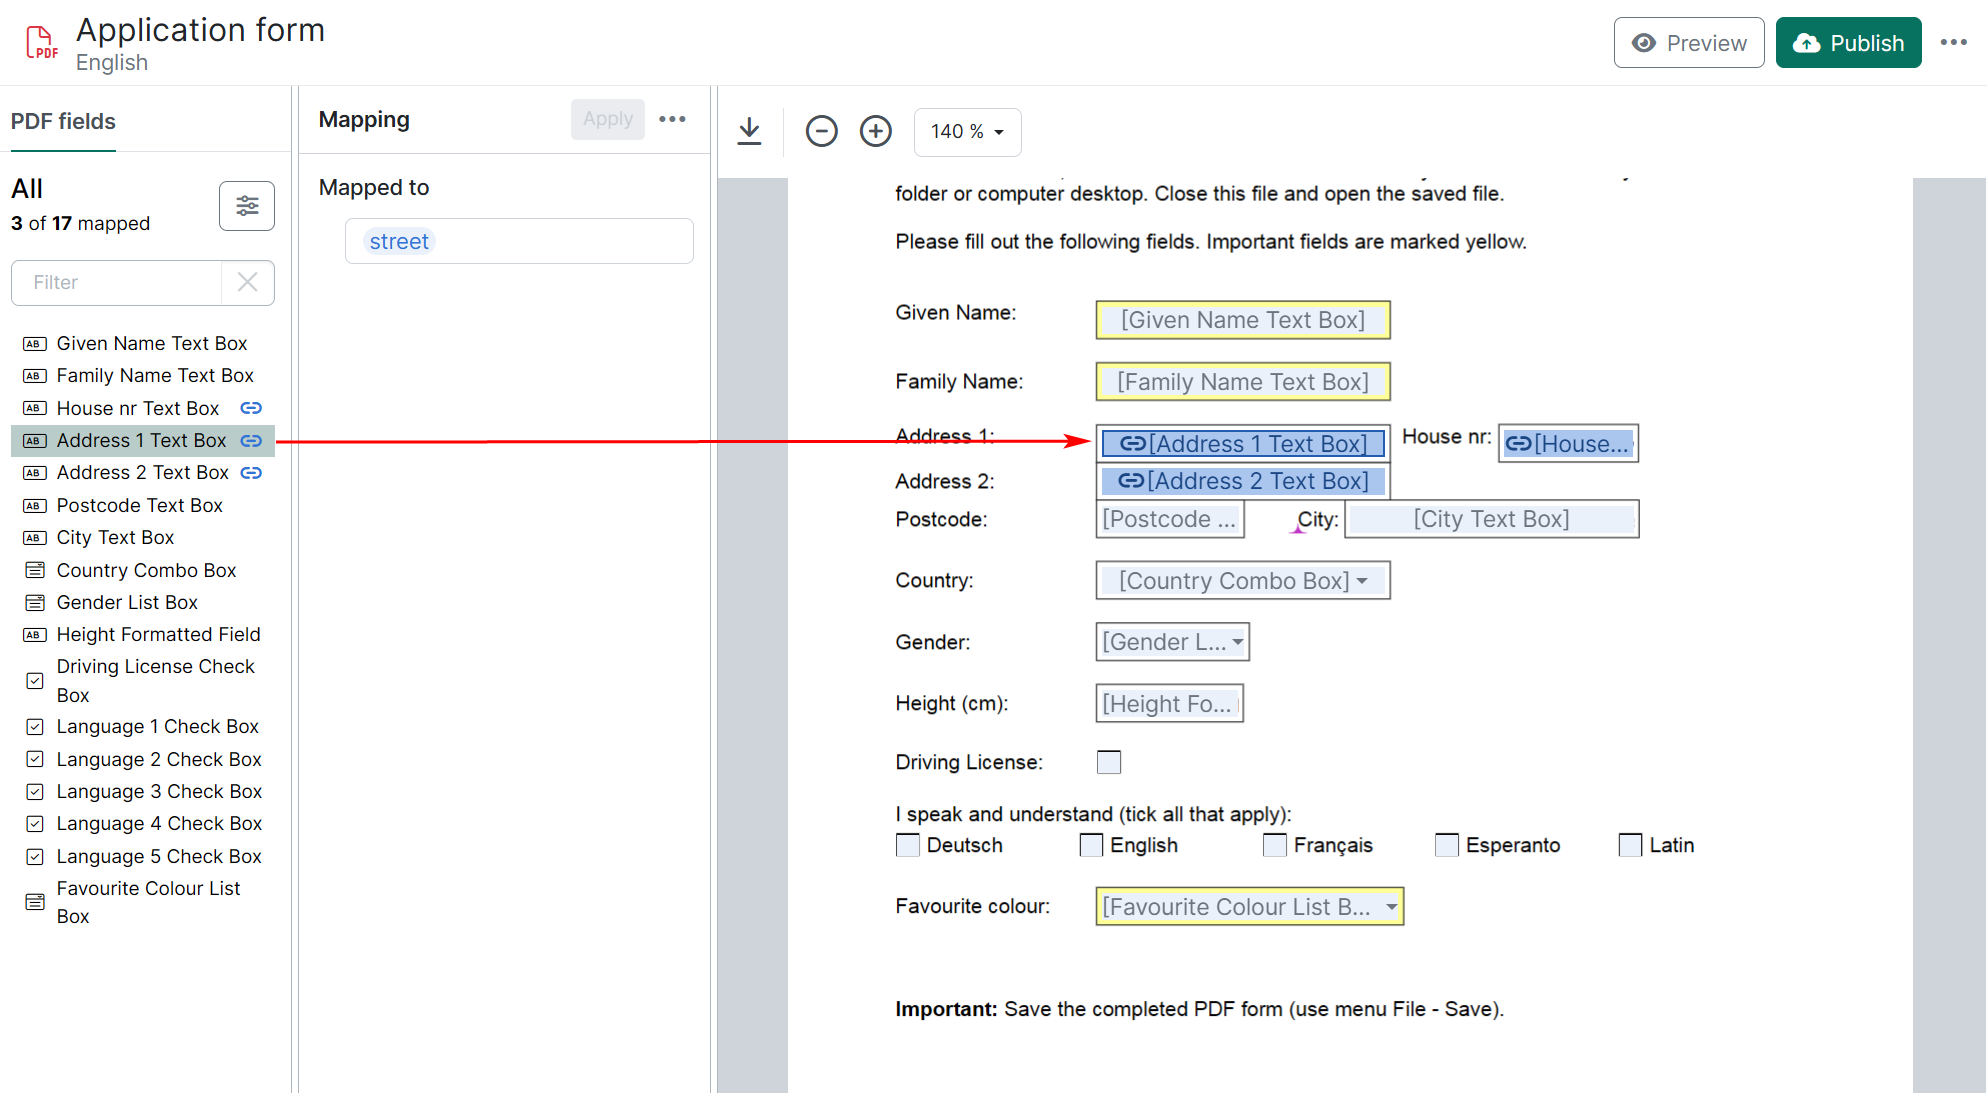
Edit Mappings
Modify existing PDF field mappings by linking them to different data set fields.
To edit a mapping:
-
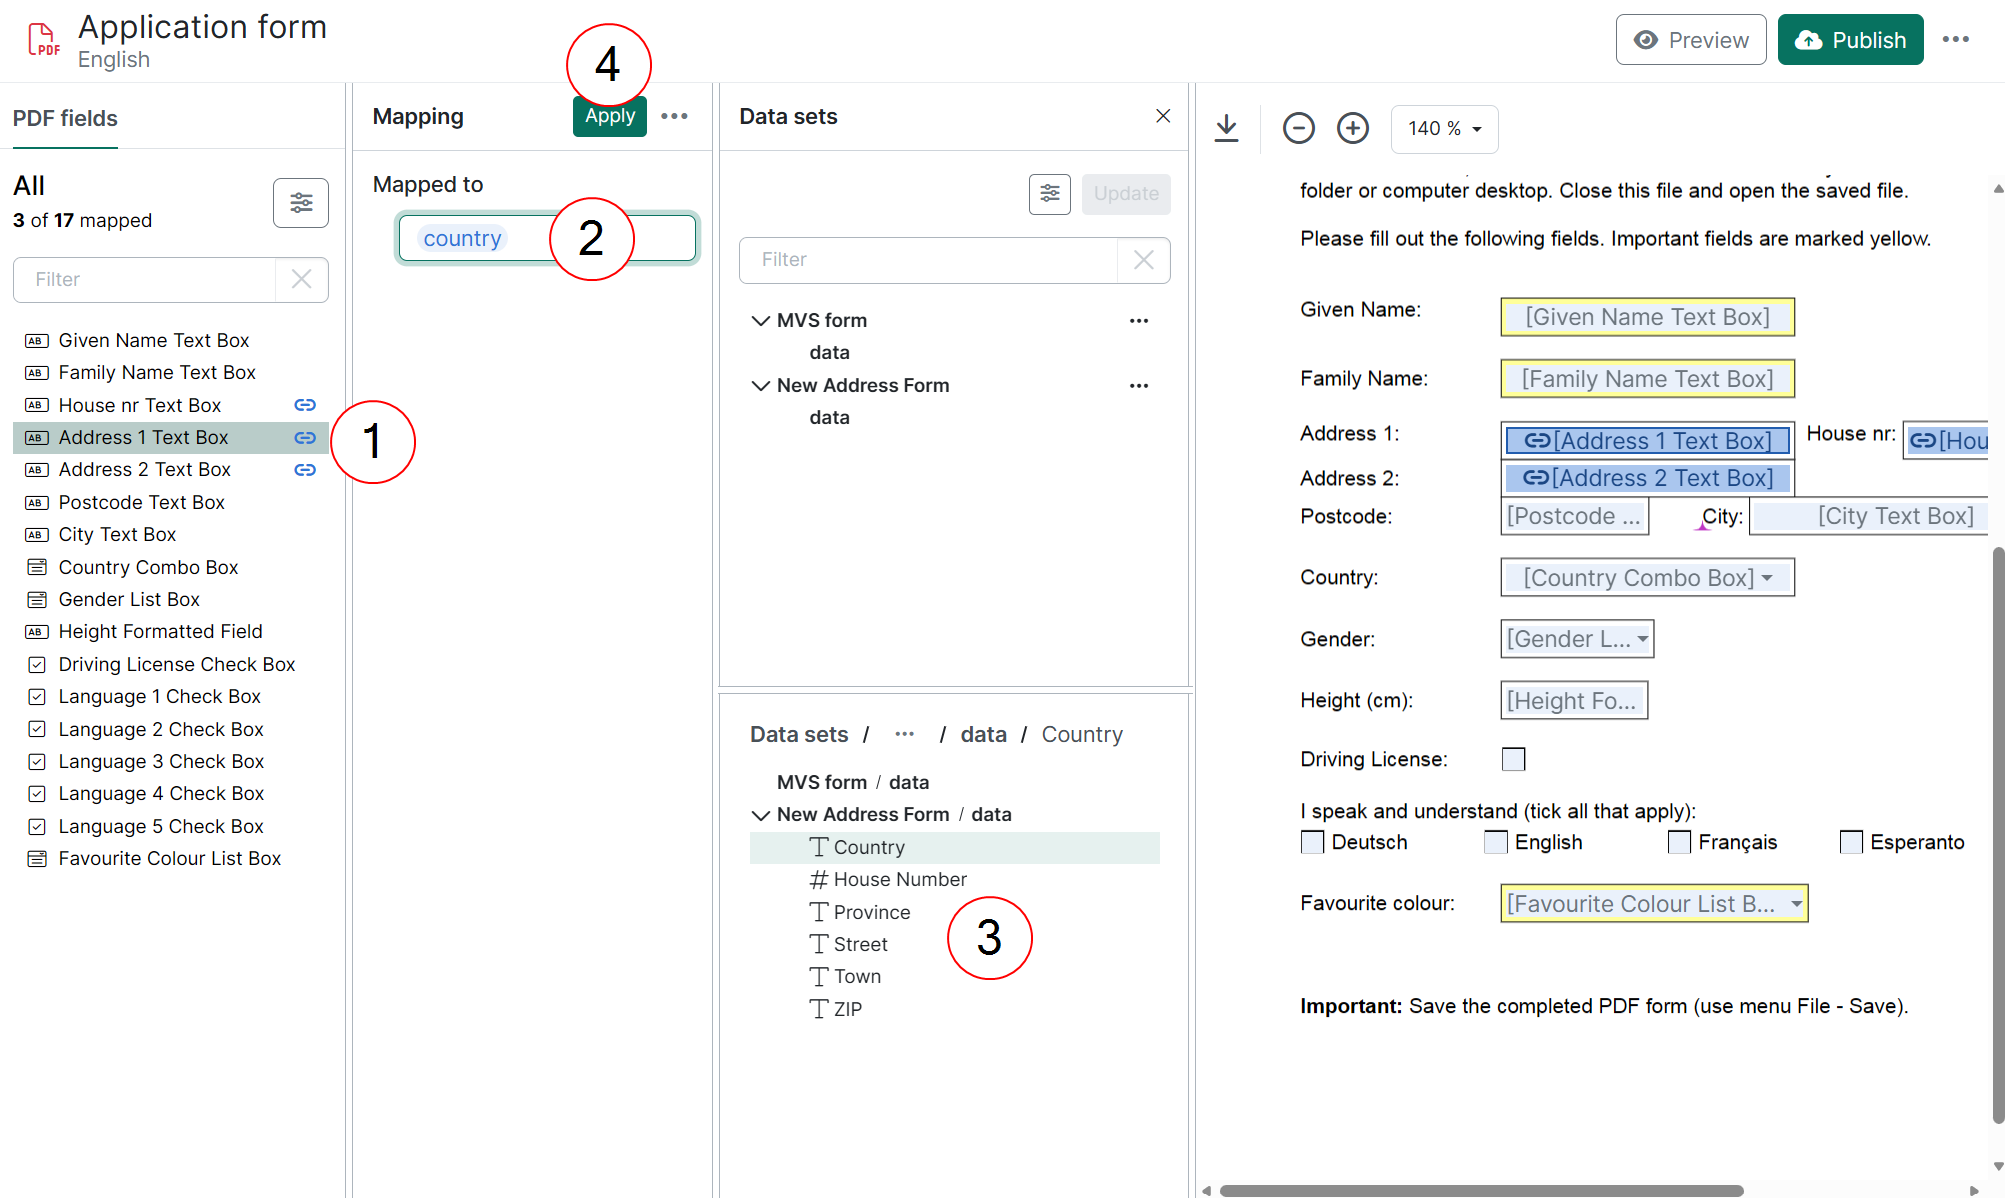
Select the PDF field you want to remap.
-
Select the Mapped to field. The Data sets pane opens.
-
Choose a replacement field from the data set by double-clicking it or using the Update button (which becomes active upon selection).
This updates the mapping, closes the data set pane, and enables the Apply button. -
Select Apply
Format mappings
When designing a PDF template, you can control how individual mappings, whether they reference a data field or use an expression, display their output.
Templates inherit the default formatting configured in Project Settings > Field Formats, which serves as the single source of truth for formatting across the project templates. However, template designers can override these defaults for specific mappings directly within the template when a different format is required.
Any formatting applied at the mapping level affects only the selected field or expression in that template. The project-wide format settings remain unchanged and continue to apply to all other mappings that do not have an override configured.
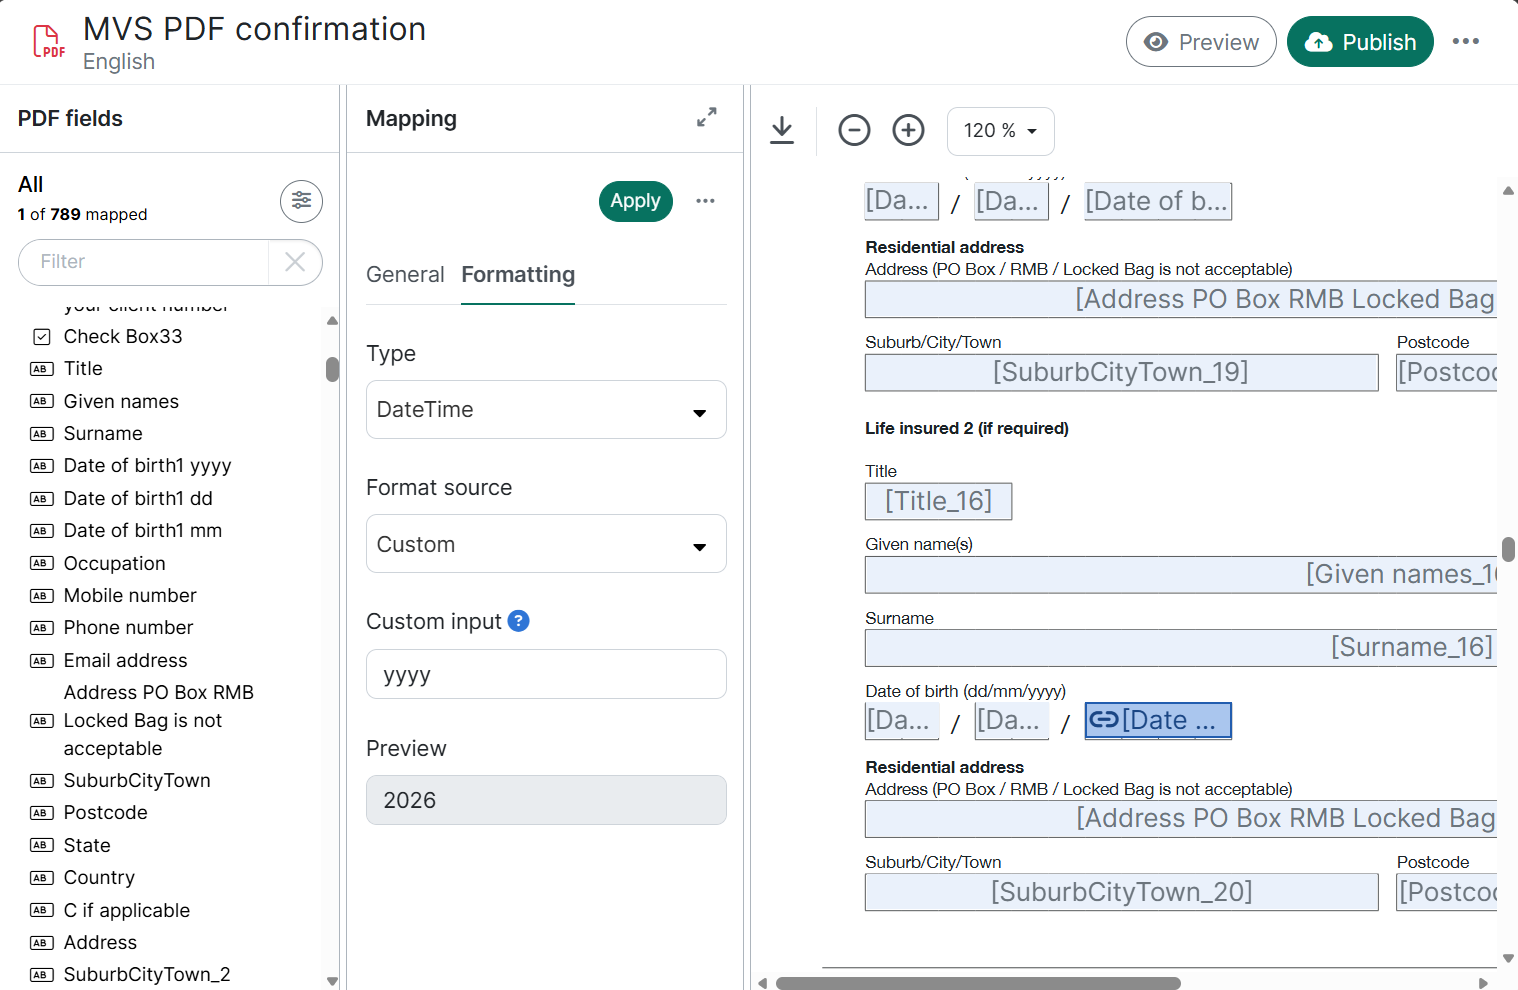
Locate the Formatting section:
-
Open the PDF template in the PDF Template Designer.
-
Select a field in the PDF document body or from the Fields list.
-
In the right-hand Mapping pane, configure your mapping (Field or Expression).
-
Open the Formatting tab, located next to the General mapping configuration tab.
Formatting Options
-
Type: Displays the output data type of the selected mapping. The Type setting can be modified to override the originally detected field type and apply a different field type when required.
-
Format source: Indicates where the currently applied format originates from. The format can either be inherited from the project-level settings or defined as a system or custom override for the specific mapping.
-
Inherited: Uses the project's default field format for the selected data type. Any future changes made to the project default format will automatically update this mapping.
-
Project Format: Allows you to choose a different pre-configured format from your project's Field Formats library.
-
System Format: Applies a standard, built-in system formatting pattern.
-
Custom: Manually define a custom formatting pattern directly on the mapping (such as custom date/time tokens).
-
Override a Mapping Format
-
In the Mapping pane, locate the Formatting section.
-
Select the Data type dropdown if you need to adjust the data type (e.g., Date and Time).
-
Select your desired formatting source (Inherited, Project, System, or Custom).
-
Select or enter the specific format pattern.
-
Select Apply in the Mapping pane header to commit your changes.
Note: Updating a mapping format triggers change detection. When you publish your template, a new version of the template language variant is generated automatically
Deleting Formats and Fallback Behavior
If a project-level format referenced by a mapping is deleted in Project Settings:
-
Mappings using that format will automatically adopt the project's Default format for that field type.
-
If the deleted format was itself the project default, the project falls back to standard System settings.
Remove Mappings
-
Select the PDF field from which you want to remove the mapping.
-
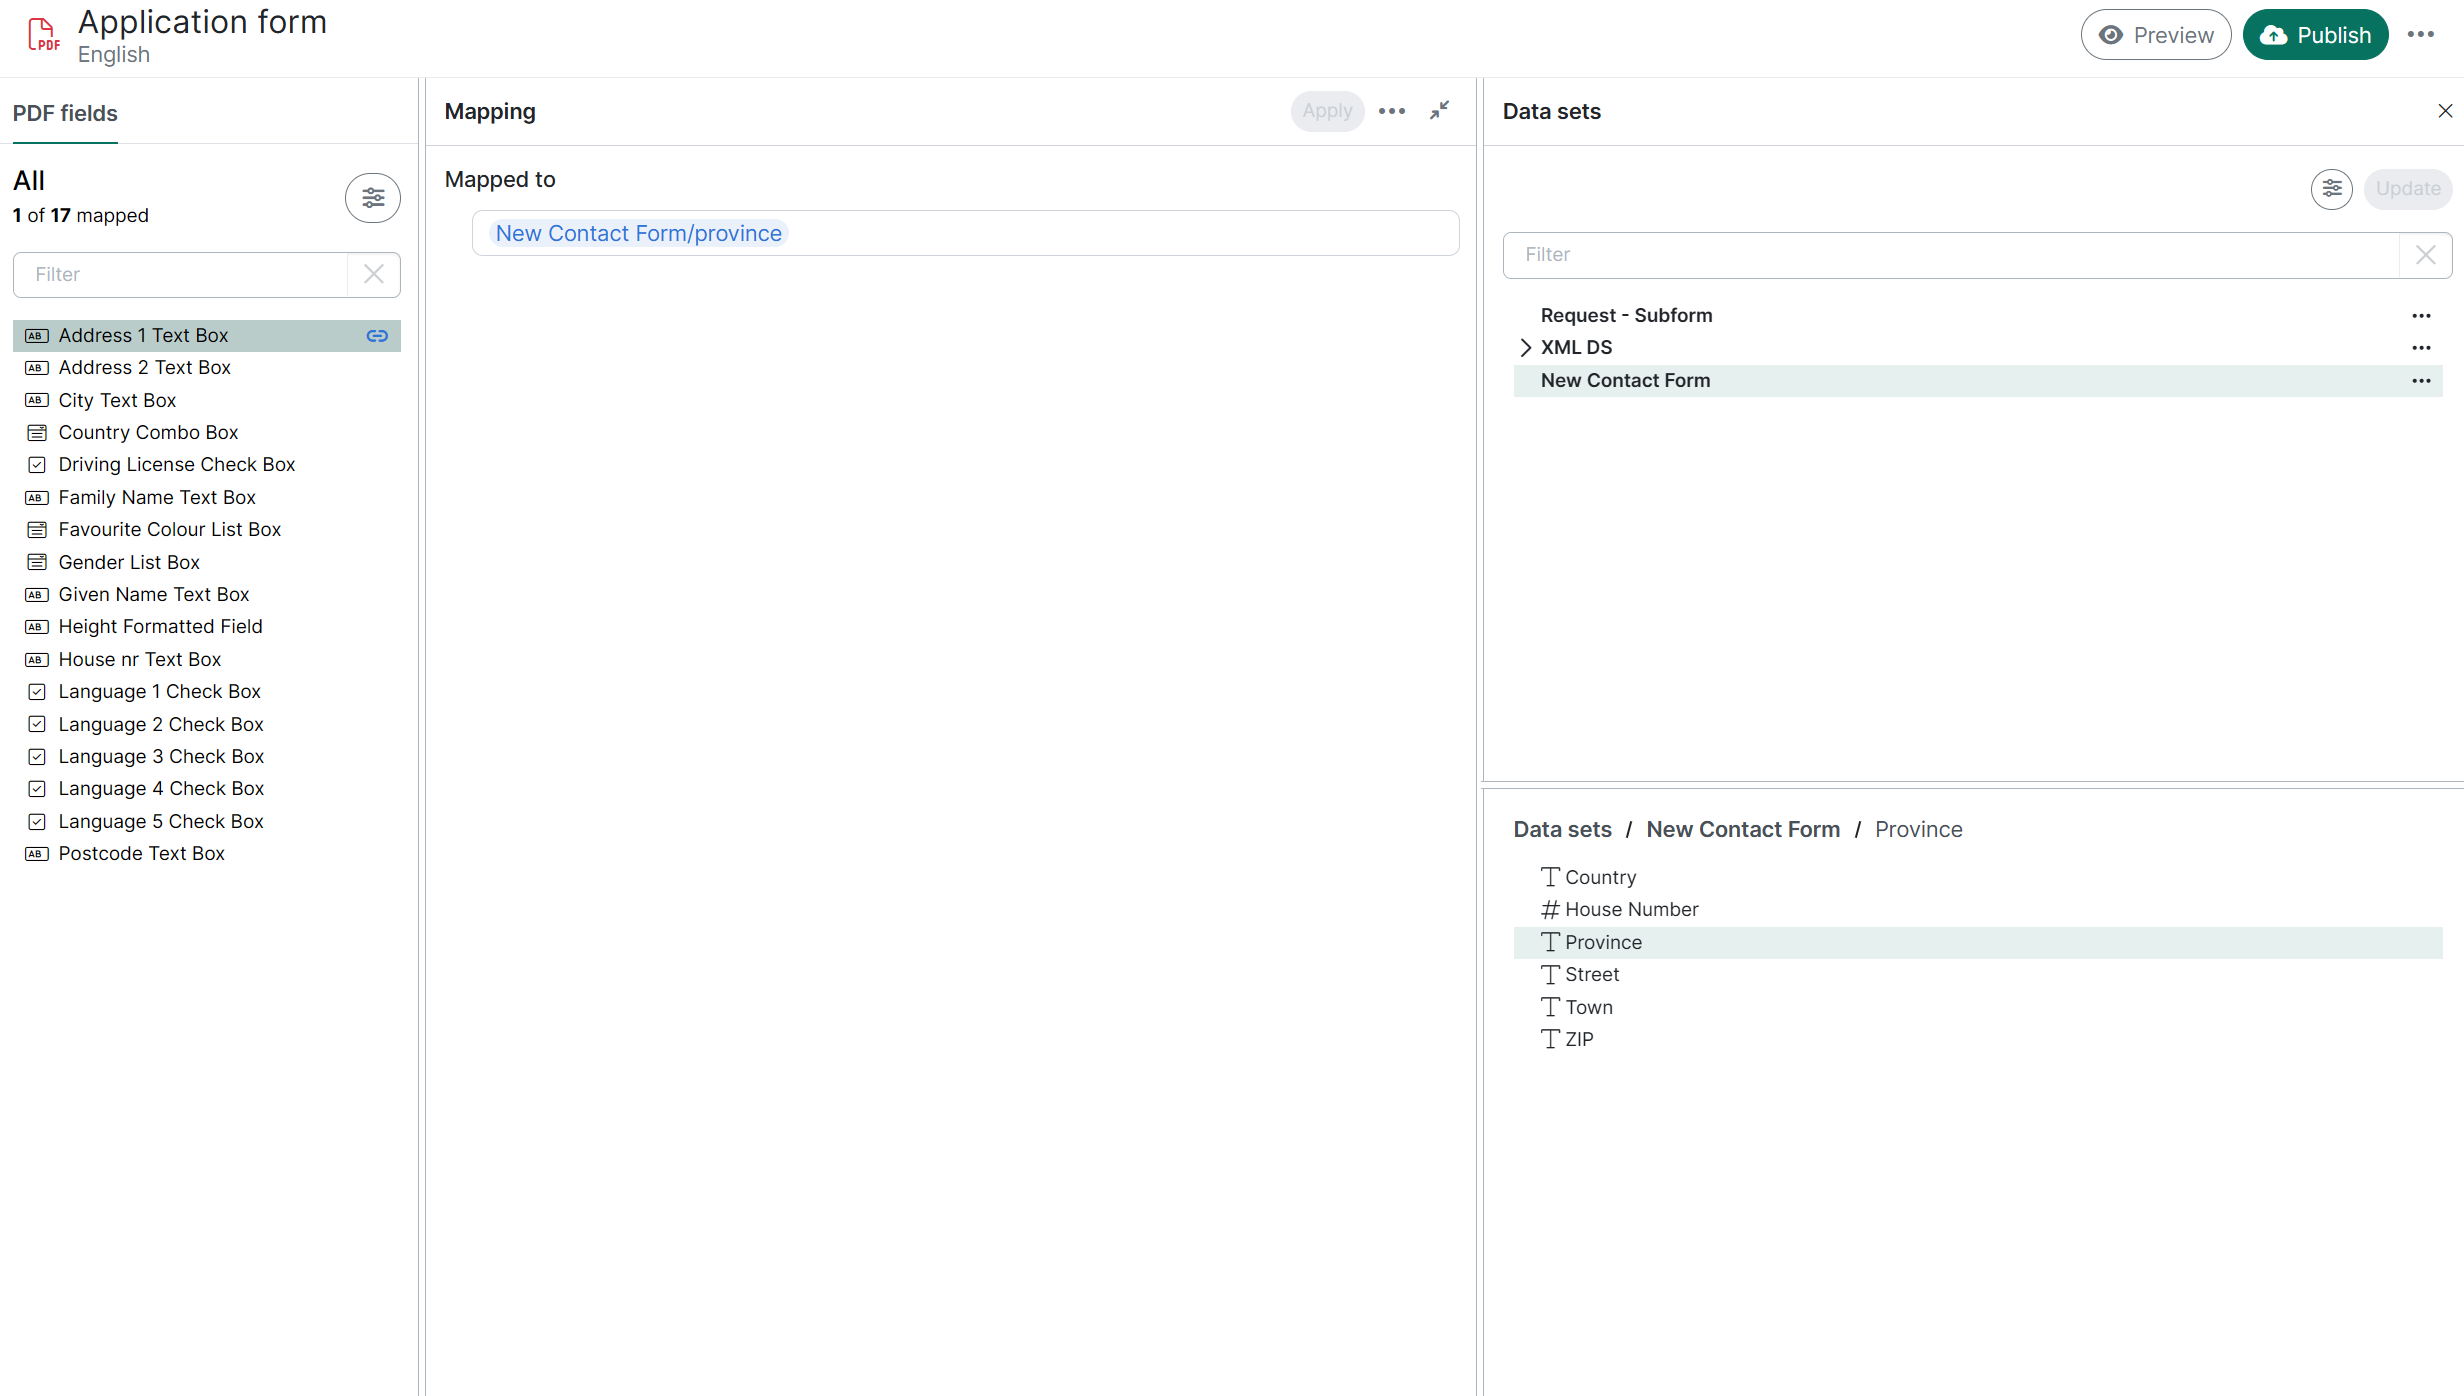
Select Unmap in the ellipsis (⋯) menu of the Mapping pane.
Users can expand the Mapping pane (hiding the PDF viewer) to provide more space for editing, or minimize it to restore the original view.
-
The PDF field is successfully unmapped from the data set field. The mapping icon is no longer displayed next to the PDF field.
Invalid Mappings
Invalid mappings are mappings that no longer reference valid fields in the data set or the PDF document. Mappings may become invalid if the associated data set is modified or if a new PDF document with a different structure is uploaded. To ensure documents are generated correctly, review and update your mappings whenever you change the data set or update the PDF.
Mappings may become invalid if the associated data set is modified or if a new PDF document with a different structure is uploaded.
To ensure documents are generated correctly, review and update your mappings whenever you change the data set or update the PDF.
Example 1:
Replacing the PDF document leads to Invalid Mappings
As a template designer, you are working on a template that already contains several mappings.
After receiving an updated version of the PDF document from your team, you replace the PDF currently used in your template with the new one in the Design screen.
The new PDF document is successfully uploaded, but some mappings became invalid since the new document has a different structure: certain PDF fields have been modified or removed.
Solution:
Review the list of invalid mappings, then remap the affected fields or remove the mappings that are no longer needed for this document.
Example 2:
Data set modification leads to Invalid Mappings
Maria is working on a PDF template, mapping the necessary fields and publishing the template when it’s ready. Later, she updates the data set used in the template by adding some fields and removing others, and finishes her work for the day.
The next morning, when she opens her template, she notices that several mappings are marked as invalid. These mappings no longer reference valid fields in the data set.
Solution:
Maria opens the mapping panel to identify which fields are affected. If a field is no longer needed in the template, the mapping can be removed. If the data is still needed, she navigates to the data sets section and adds the missing fields back to the template.
Viewing and Filtering Sample Data in the PDF Template Designer
When designing a Template, you can load real sample data into the Data Sets pane. This allows you to preview exactly what your mapped fields will look like and enables searching and filtering the data tree using actual sample values.
Note: If the data set mapped to your template does not have any samples associated with it, the "Select sample" option will be disabled.
To select a sample:
-
In the Data Sets pane, hover over the root entity of the data set.
-
Select the ellipsis menu (...) that appears next to the root name.
-
Select Select sample from the actions menu.
-
Choose a sample from the dropdown list in the modal window and choose Select.
Once selected, the sample name is displayed next to the root entity, and the actual sample values will appear alongside their corresponding fields. You can also toggle the visibility of these values using the Show/Hide sample values option in the pane actions menu.
Filtering the Data Tree
The Data Sets pane allows you to efficiently filter and navigate through your data set entities and fields. You can search by:
-
Display name
-
Schema name
-
Actual sample values (if a sample is currently active)
If a search filter match is found within a collapsed view (e.g., a parent entity or fields list), the tree automatically expands to reveal the sub-entities or fields containing the matching value.
Preview PDF Templates
Preview serves as a proof of your document before it goes into production, giving you a quick, real-time view of how your mapped data will appear in the PDF document. It validates that each field is mapped correctly and that the output matches your expectations, helping catch errors early and ensuring the final document is accurate.
To create a preview, at least one sample must be added for a data set linked to the template. See Data Sets Samples Tab for instructions on adding samples to data dets.
When there are no data sets associated with the template, the Preview button is unavailable. See Design Screen and Data Sets for guidance on adding data sets to templates.
To trigger the preview from the Design Screen:
-
Select the Preview button.
-
In the pop-up window, select a Sample for each Data Set. Samples are listed alphabetically; by default, the first sample is preselected.
-
Confirm your choice by selecting Preview (or cancel if required).
The PDF document preview is opened in a new tab.